TABLE OF CONTENTS
About Groups
Group work helps students develop important skills such as collaboration, time management, communication, and constructive problem-solving while benefiting from diverse perspectives. For more information on the benefits of group work, refer to The Derek Bok Center for Teaching and Learning: Group Work.
You can create course groups to support collaboration and peer learning through graded activities such as assignments, tests, and discussions, or for non-graded purposes.
Create Course Groups
To create groups, click on the Groups link in your course menu. This will bring you to the Groups page. Click + New Group Set to create a new group.
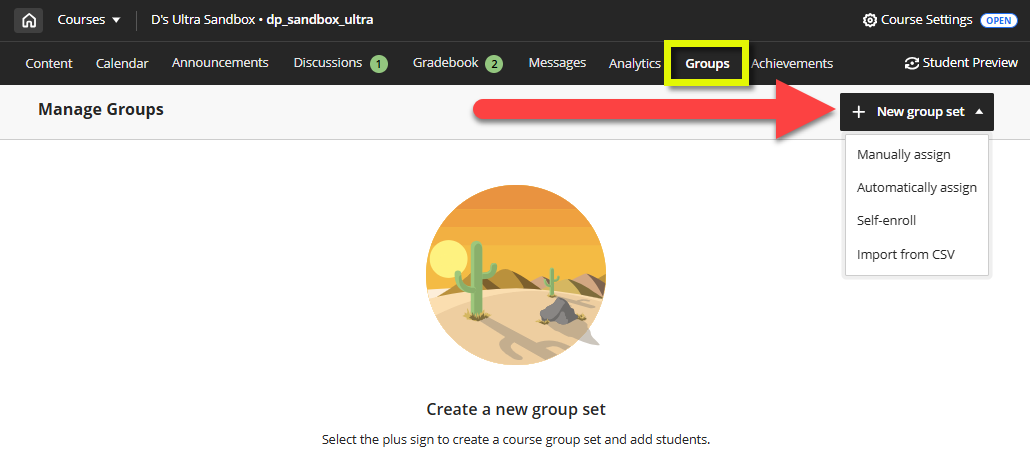
Select how you want to structure and enroll your students into groups. You will have the option to:
- Manually assign: You create groups and manually assign students.
- Automatically assign: You specify the number of students per group and Blackboard randomly assigns students to the groups.
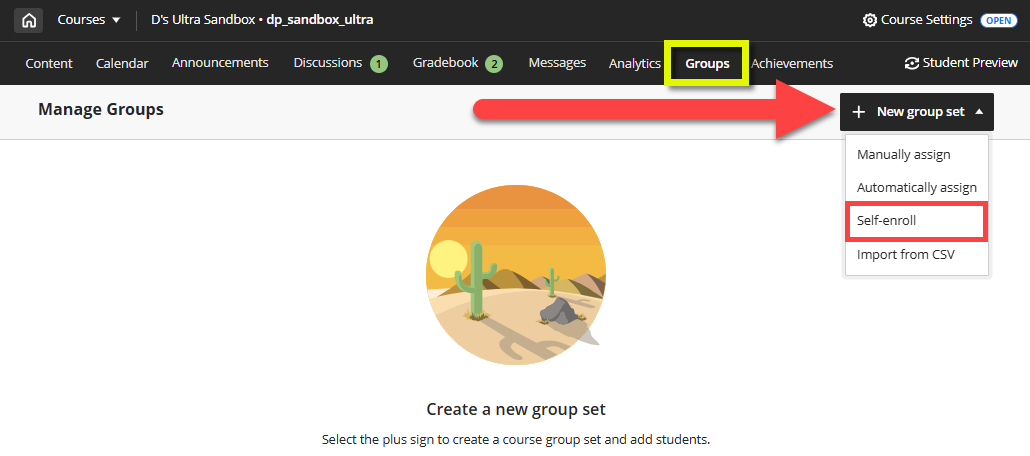
- Self-enroll: You create groups and allow students to enroll in a group of their choosing.
- Import from CSV: Download the provided Group Sets Template to create your groups, then upload the completed file into your course.
Create Manual Groups
From your course's Groups area, click + New Group Set to open a menu. Select Manually assign.
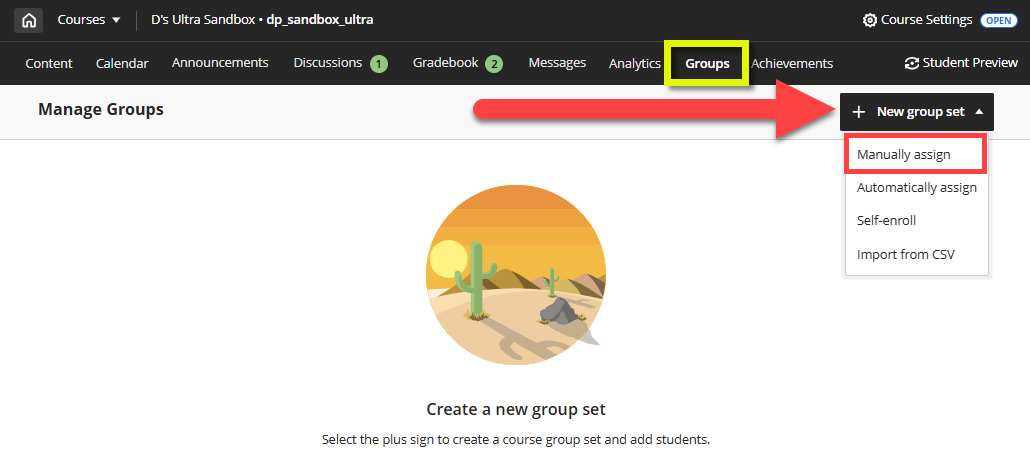
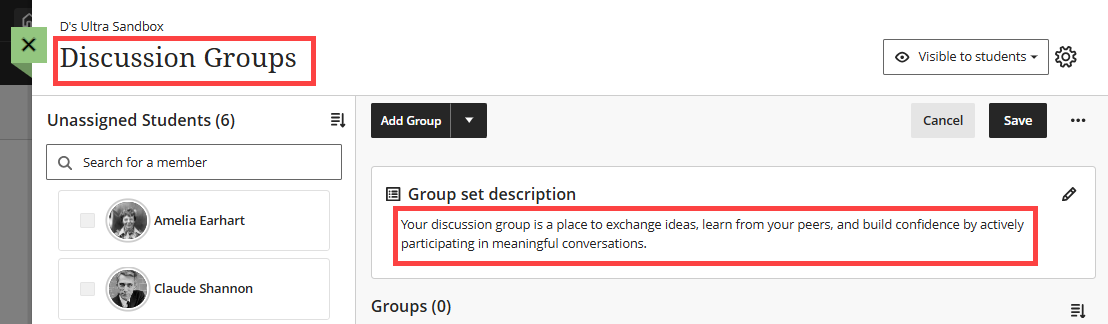
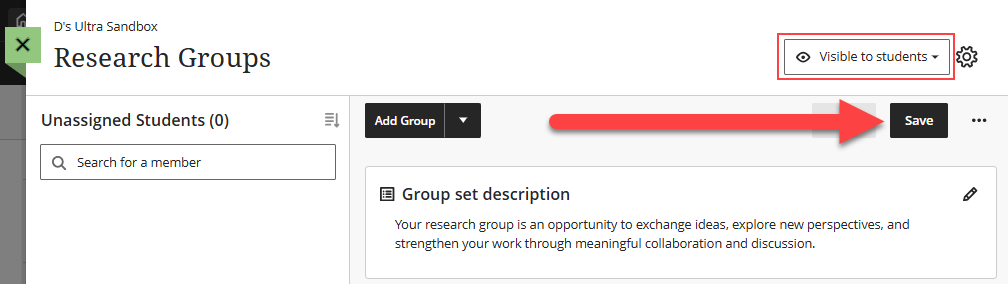
This will bring you to your Groups management screen. Give your group set a name (ex Discussion Groups, Research Groups, etc.) and an (optional description).
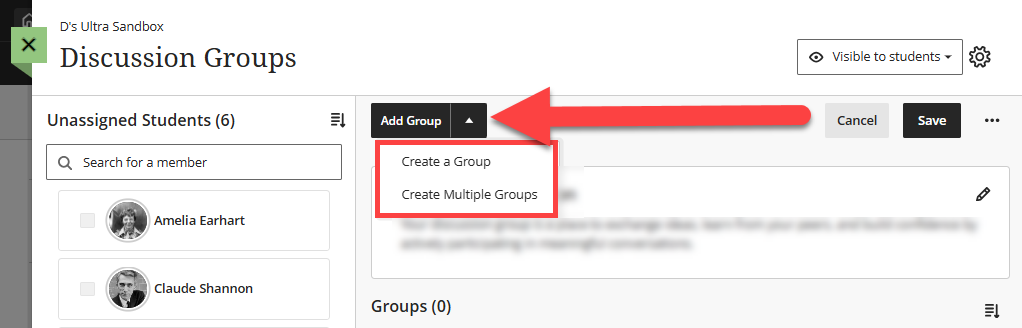
Next, you will create your groups. Select Add Group to open a menu. Select Create a Group to create a single group or select Create Multiple Groups to create multiple groups at once.
Your groups will be given a default name (ex Group 1, Group 2, etc.). You choose may edit each group to give it a unique name and description.
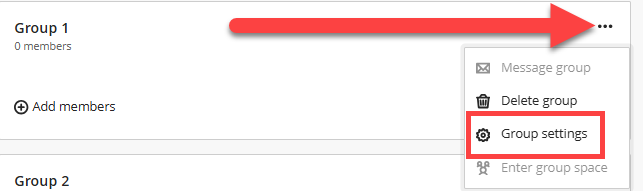
Locate your group and click the More Options (...) button to open a menu. Select Group settings.
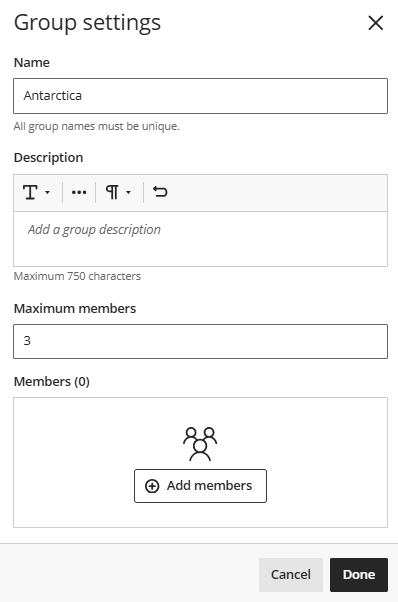
Here you can give your group a unique name and (optional) description. You may also add or remove members from the group. Click Done to save your changes.
Repeat this step for each group.
Now that your groups have been created, you can assign the the students to their respective groups. You may manually assign students to groups, automatically assign students to groups, or allow students to self-enroll into groups. Refer to the Manage Group Enrollment section for details.
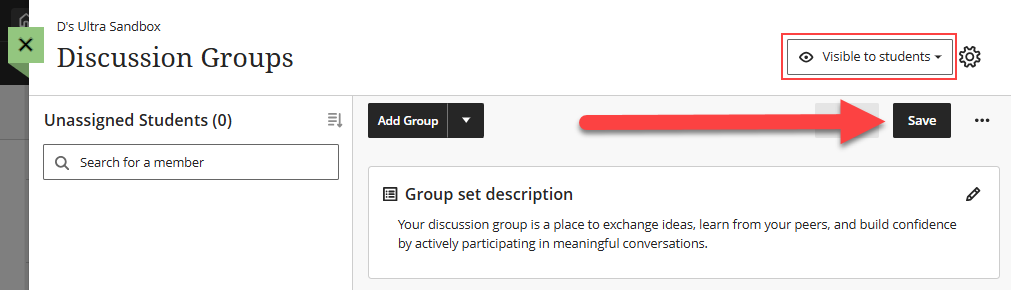
Once you have finished creating your groups and enrolling members, ensure that your group set is Visible to students and click Save to save your changes.
Create Automatically Assigned Groups
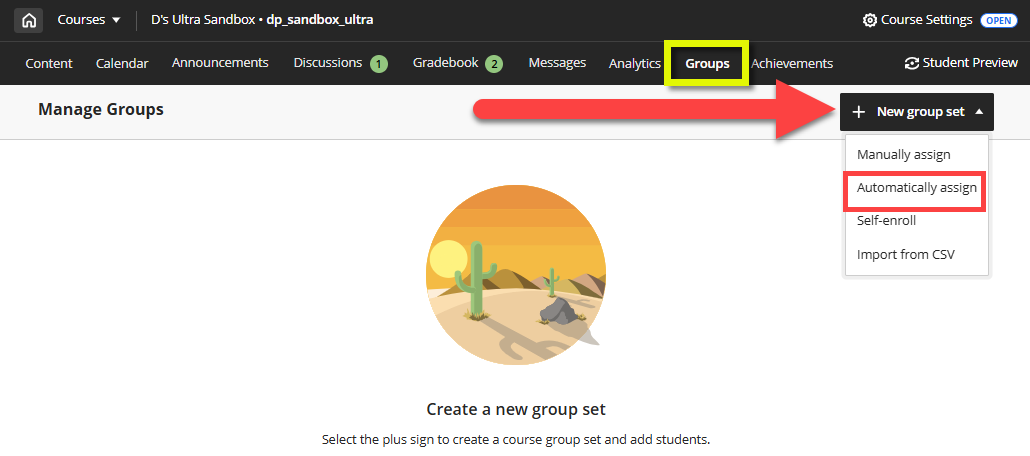
From your course's Groups area, click + New Group Set to open a menu. Select Automatically assign.
This will bring you to your Groups management screen. You will be prompted to enter the number of members you wish to assign to each group. Blackboard will then create the groups and randomly assign students.
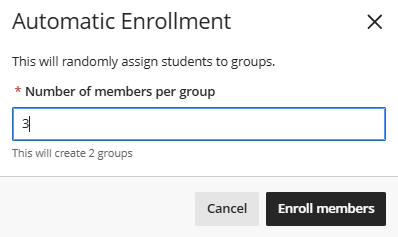
Next, give your group set a name (ex Discussion Groups, Research Groups, etc.) and an (optional description).
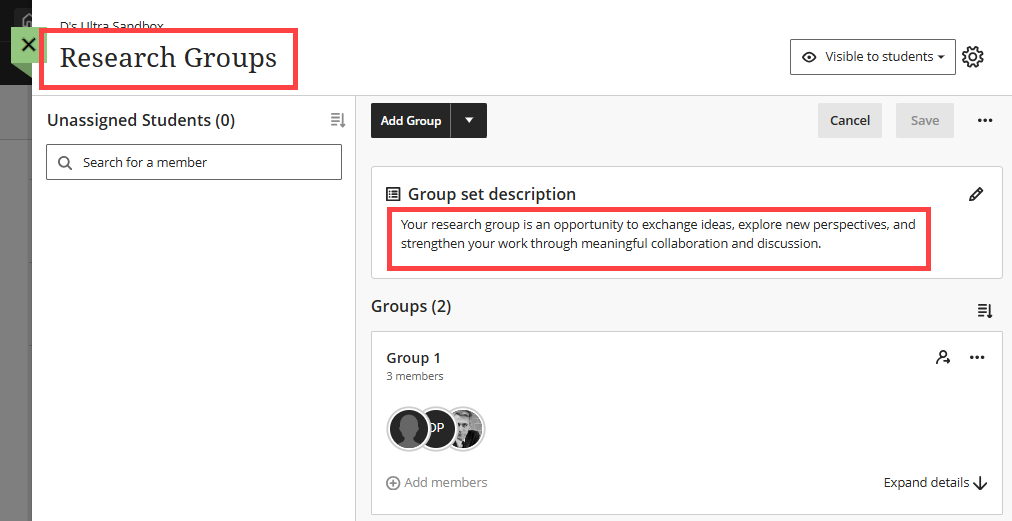
Your groups will be given a default name (ex Group 1, Group 2, etc.). You choose may edit each group to give it a unique name and description.
Locate your group and click the More Options (...) button to open a menu. Select Group settings.
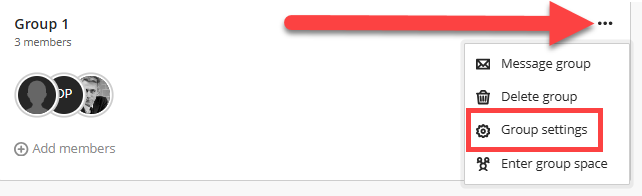
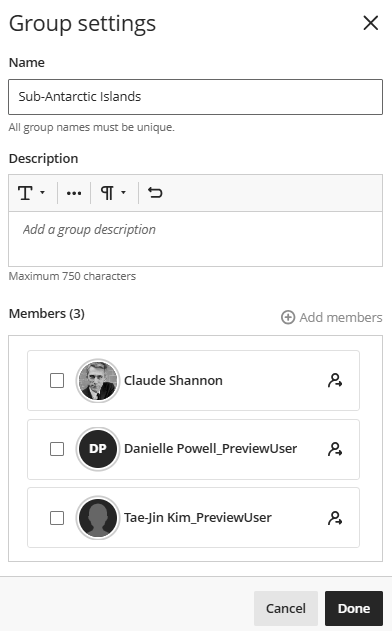
Here you can give your group a unique name and (optional) description. You may also add or remove members from the group. Click Done to save your changes.
Repeat this step for each group.
Now that you have created the groups, you can reassign students to different groups or allow students to self-enroll or change their group enrollment. Refer to the Manage Group Enrollment section for details.
Once you have finished creating your groups and enrolling members, ensure that your group set is Visible to students and click Save to save your changes.
Create Self-Enroll Groups
From your course's Groups area, click + New Group Set to open a menu. Select Self-enroll.
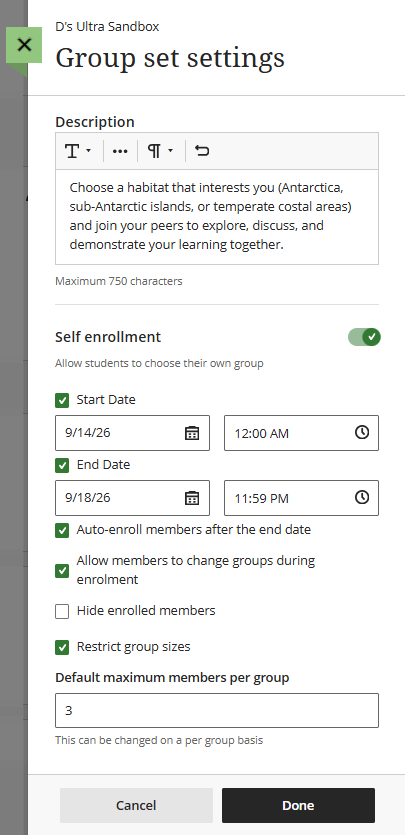 This will bring you to your Groups management screen. You will be prompted to enter the self-enrollment settings, including:
- Description: Enter a description to help guide students as they choose a group.
- Enrollment Start and End Date: Students will be able to enroll in the groups during the time period you specify.
- Auto-enroll members at the end of the enrollment period: Select this option to automatically assign students to a group if they have not enrolled during the enrollment period.
- Allow members to change groups during enrollment: Select this option to allow students to change groups during the enrollment period.
- Hide Enrolled Members: Select this option to prevent students from seeing who has already joined a group. Students will be able to see their group members once the enrollment period has ended.
- Restrict Group Sizes: Students will see the maximum number allowed per group when they make their group selections. Leave this space blank to allow unlimited members per group.
Click Done to save your changes.
Next, give your group set a name (ex Discussion Groups, Research Groups, etc.).
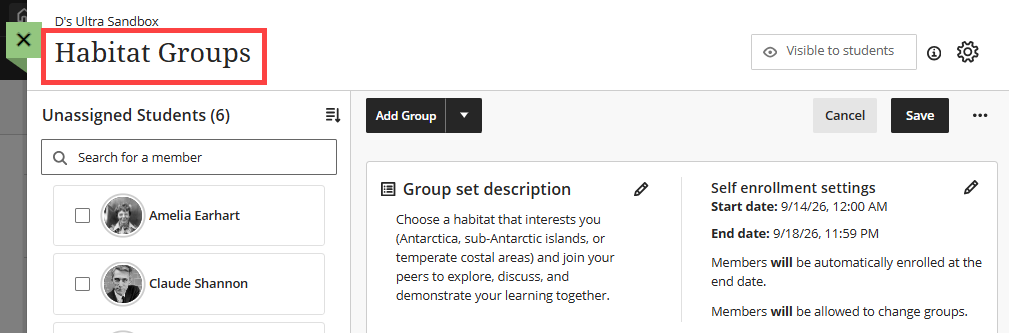
Next, you will create your groups. Select Add Group to open a menu. Select Create a Group to create a single group or select Create Multiple Groups to create multiple groups at once.
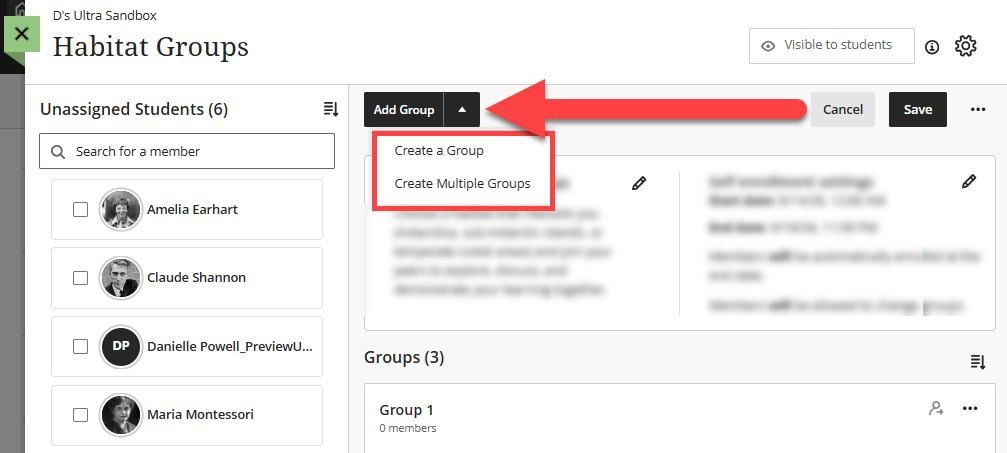
Each of your groups will be given a default name (ex Group 1, Group 2, etc.). In order for your students to select a group that best meets their needs or interest, edit each group to give it a unique name and description.
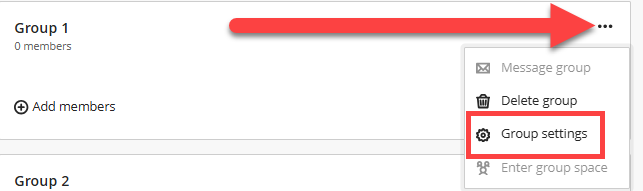
Locate your group and click the More Options (...) button to open a menu. Select Group settings.
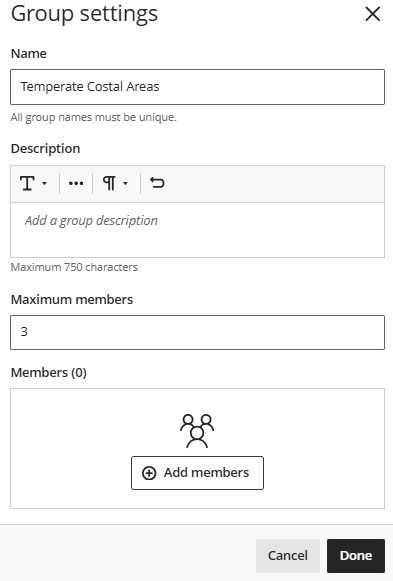
Give your group a unique name and (optional) description. You may also add or remove members from the group. Click Done to save your changes.
Repeat this step for each group.
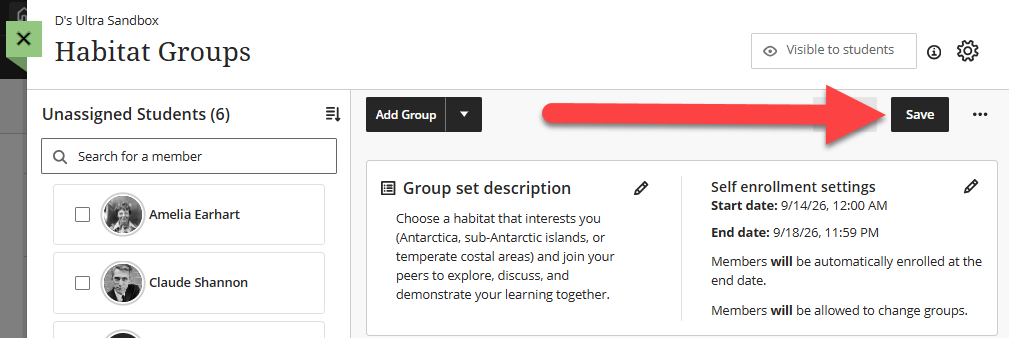
Once you have finished creating your groups, click Save to save your changes. Your groups will be visible to students by default.
Import Groups from CSV
From your course's Groups area, click + New Group Set to open a menu. Select Import from CSV.
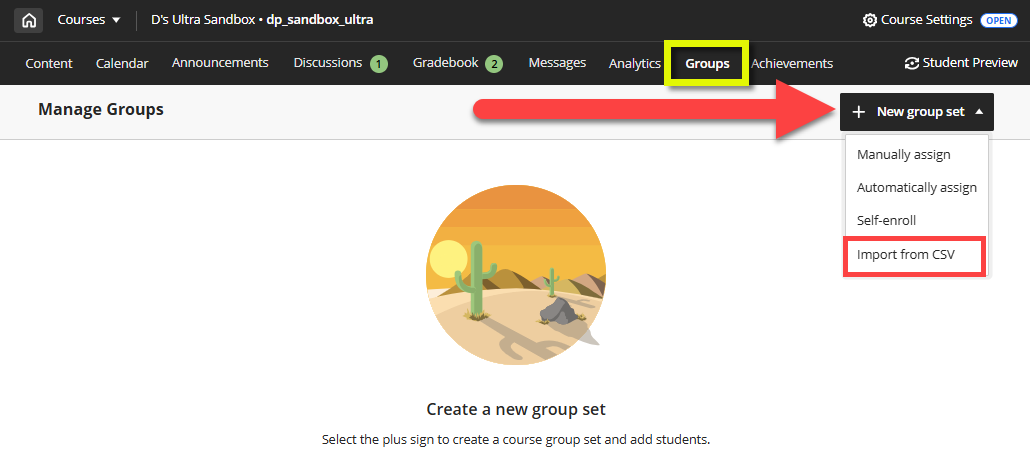
This will open the Import Group Sets panel. Click the Download Group Sets template link to download the CSV template.
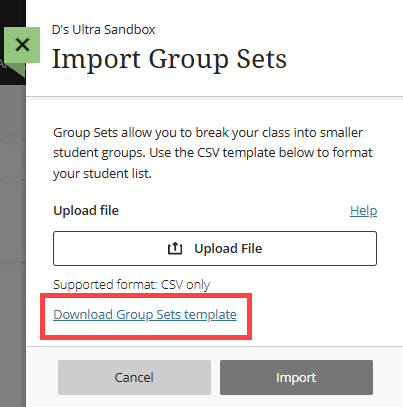
The template has five columns and the required columns are marked with an asterisk.
- Group Code: This field is required. Group codes are unique identifiers used only for import purposes. You can keep the default group code or create new ones.
- Title: This field is required. The title is the name of each group within the set (ex Group 1, Group 2, Group 3).
- Description: This field is optional. Use this field to provide a description of each group.
- Group Set: This field is required. This is the name of the group set (ex Discussion Groups, Research Groups, etc.).
- Self Enroll: This field is required. Enter Y if you want students to self-enroll into groups or enter N if you want to assign students to groups yourself.

Fill out the file with the group sets you’d like to create and save your file as a .csv.
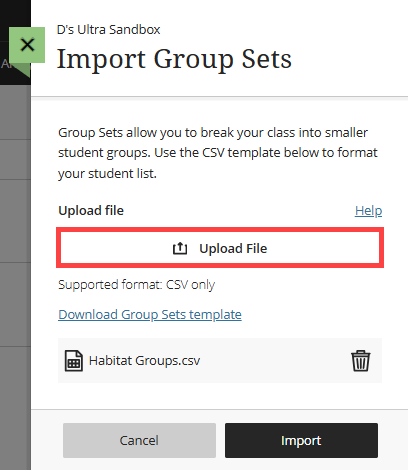
Go back into your course and access the Import Group Sets panel. Click Upload File to attach your file. Then click Import
Depending on your file size, it may take several minutes to import your group set. You will receive a confirmation email when the import process is complete.
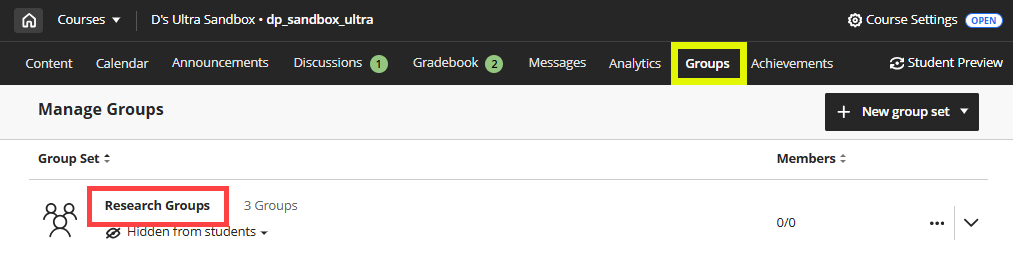
Once your group set has finished importing you may access them on the Groups page. Click the group set to edit your group set name, edit the description, add additional groups, rename groups, and assign students.
Manage Groups
Manage Group Membership: Assign and Unassign Students
Regardless of the type of group you created, you can assign, unassign, and reassign students using multiple methods:
- Manually assign students directly from the Unassigned Students Panel.
- Automatically assign students to groups.
- Assign or remove individual students from within a group.
Manually Assign Students from the Unassigned Students Panel
To manually assign a student to a group, locate the student in the Unassigned Students panel. From here, there are three main ways to assign a student to a group.
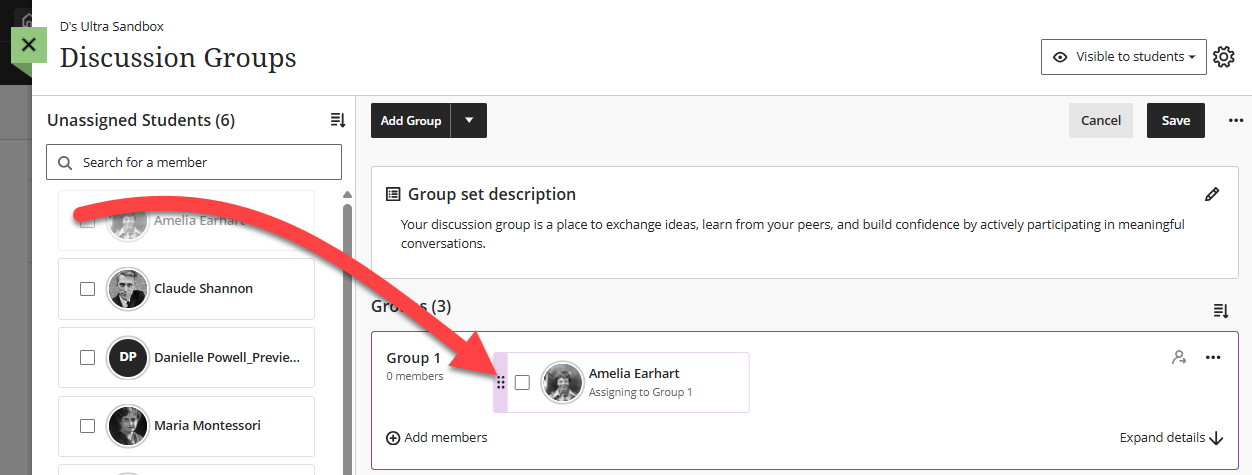
You may drag and drop to add the student into a group. Hover over the student's name until the purple bar appears to the left of the student's name.
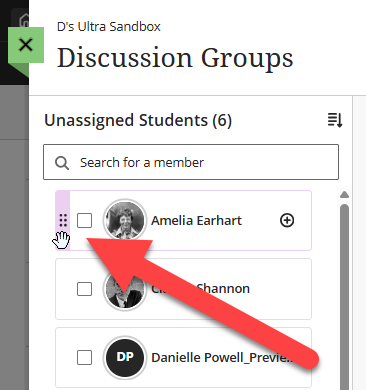
Then click on the bar and drag the student to the desired group.
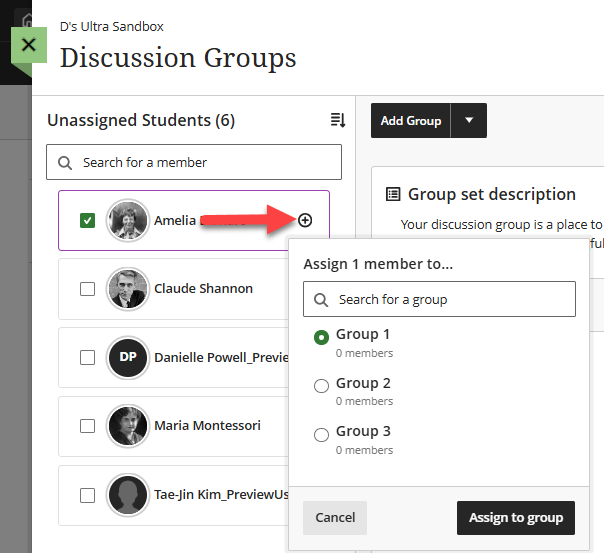
Or you may click the + icon next to the student's name to open a menu. Select a group and click Assign to group.
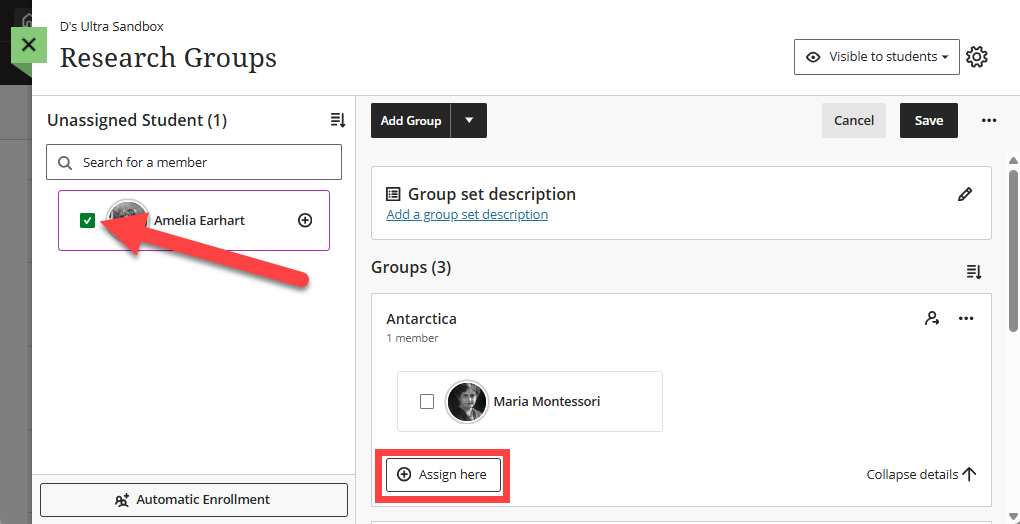
Or you may click the checkbox next to your student's name to select your student. Next, locate the group in the Groups list and click + Assign here button.
Automatically Assign Students to Groups
To automatically assign students to groups, click the Automatic Enrollment button located below the Unassigned Students panel.
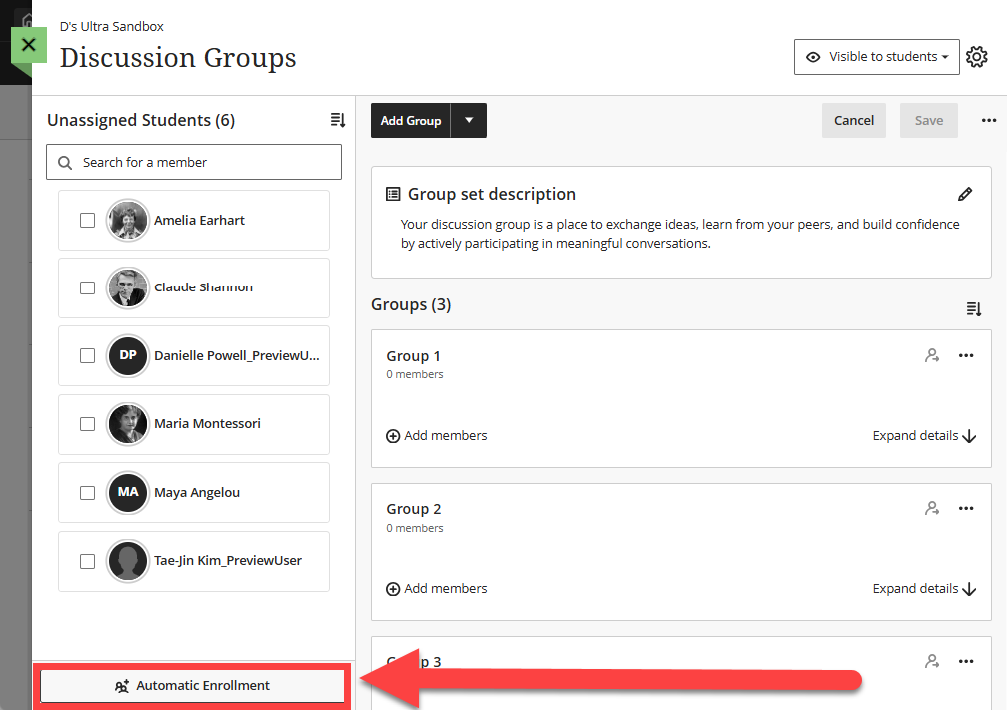
You will be prompted to enter the number of members you wish to assign to each group. Blackboard will then create the groups and randomly assign students.
Remove Individual Students from a Group
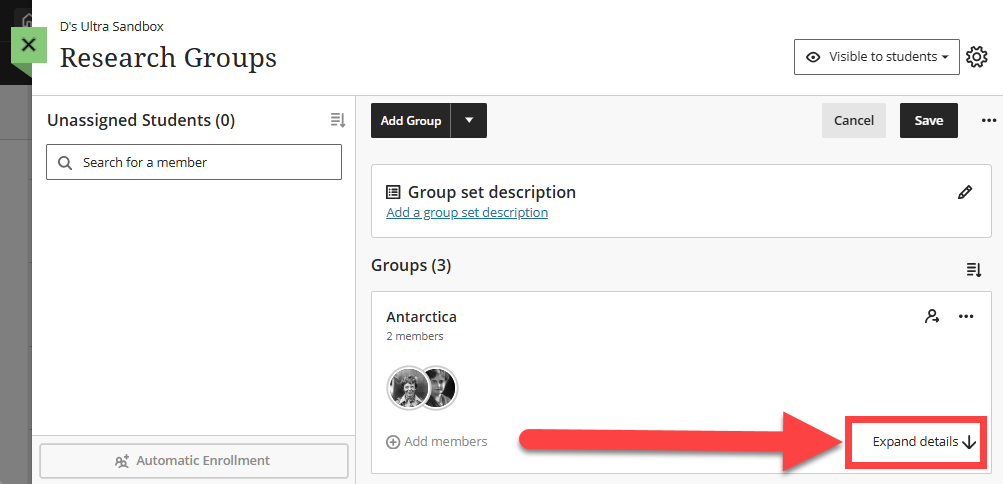
To remove an individual student from a group, locate the group and click the Expand Details button.
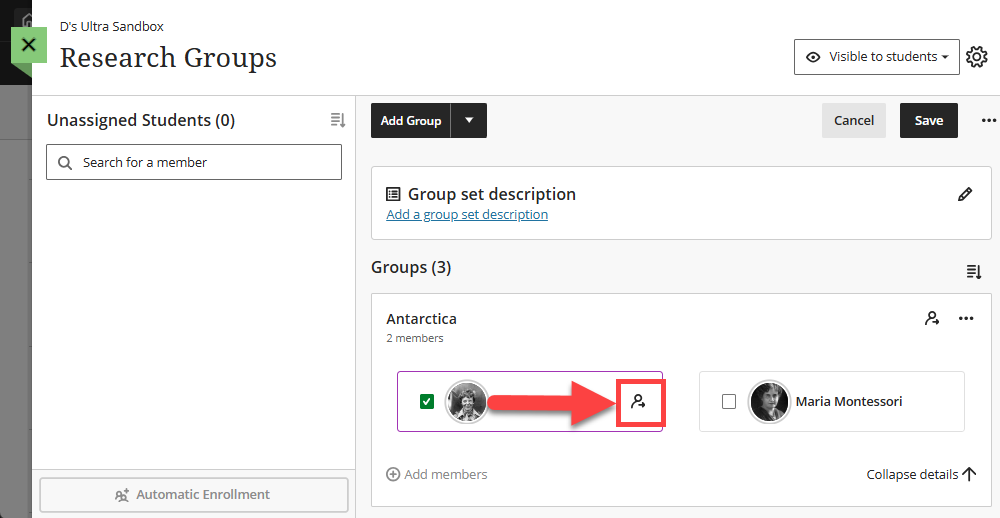
Next, select the student and click the member icon button next to their name. This will move them to the Unassigned Students panel.
Manage Individual Groups
After you create a group set, you can add or delete individual groups, manage student membership, edit group names, or add or edit group descriptions.
Go to the Groups page, click the More Options (...) menu, and select Edit.
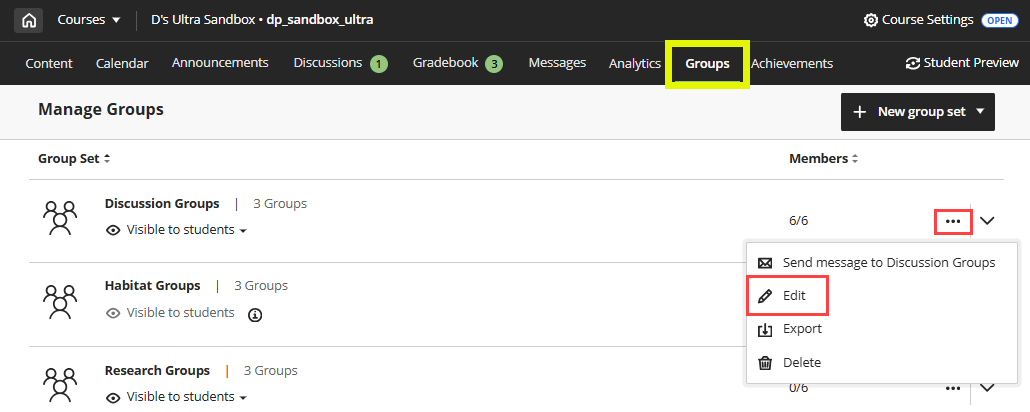
This will bring you into your Group Set.
To add additional groups to your group set, select Add Group to open a menu. Select Create a Group to create a single group or select Create Multiple Groups to create multiple groups at once.
To manage an individual group, locate a group and click the More Options (...) button to open a menu. Here you can:
- Message Group: Send a course message to group members.
- Delete Group: Delete an individual group from the group set.
- Manage Group Settings: Add or edit the group name and description or add or remove users from the group.
- Enter Group Space: Enter the group space to view group assignments and members.
Assign Group Work
When you create Discussions and Assignments, you have the option to assign them to your groups.
Note: You will need to create your groups before assigning group work.
Group Discussions
When you create or edit a Discussion you can assign it to groups, allowing students to work together in a more private setting. You may use Group Discussions for smaller conversations, assign different discussion topics to each group, or simply provide a place for student collaboration on a larger group project. Students will only be able to see and participate in their group's discussion.
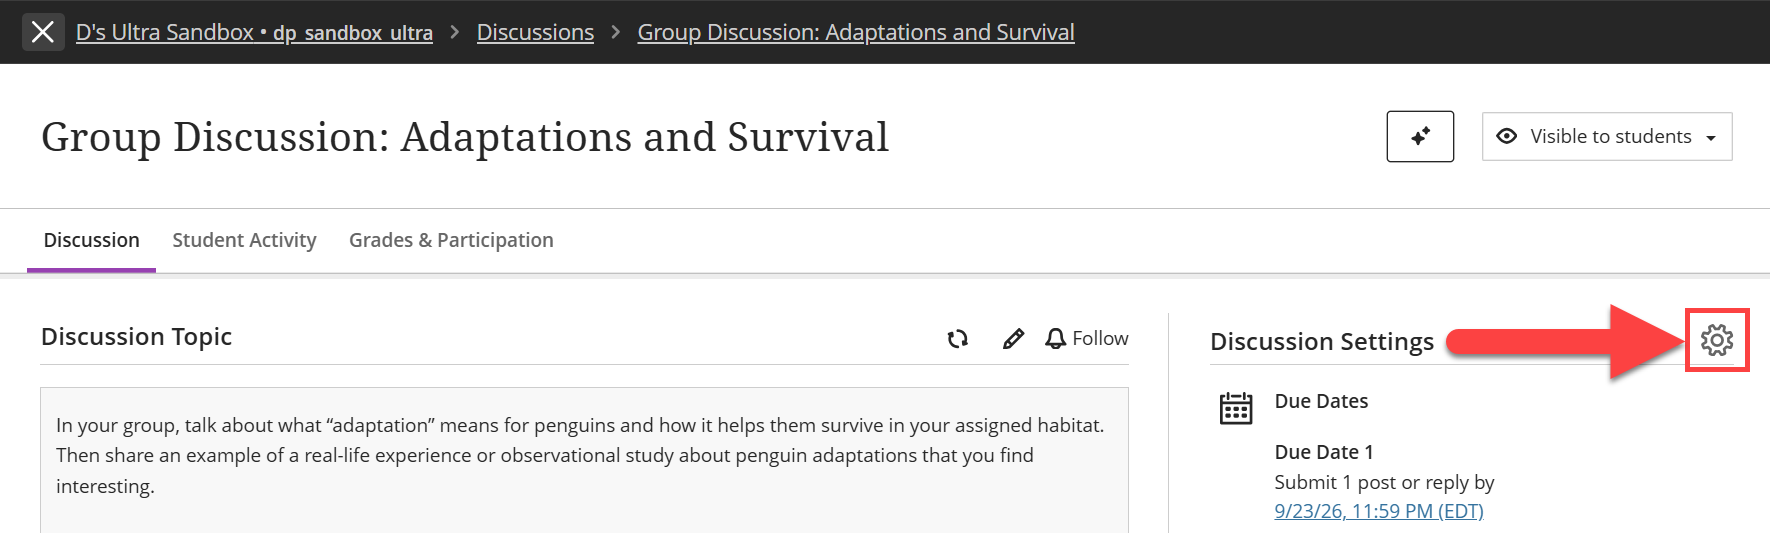
You can assign group discussion from your Discussion Settings.
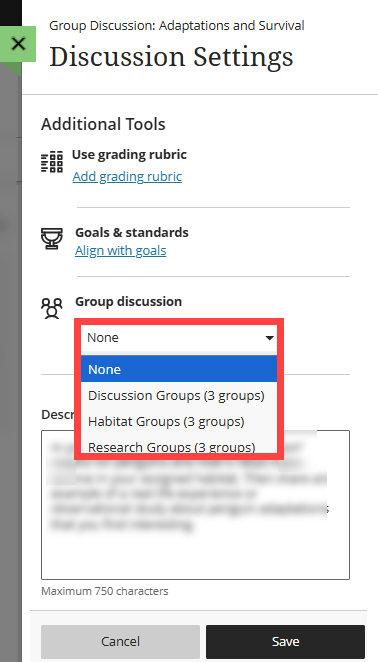
In the Additional Tools section, click the Group Discussion menu and select a group set. Click Save to save your changes.
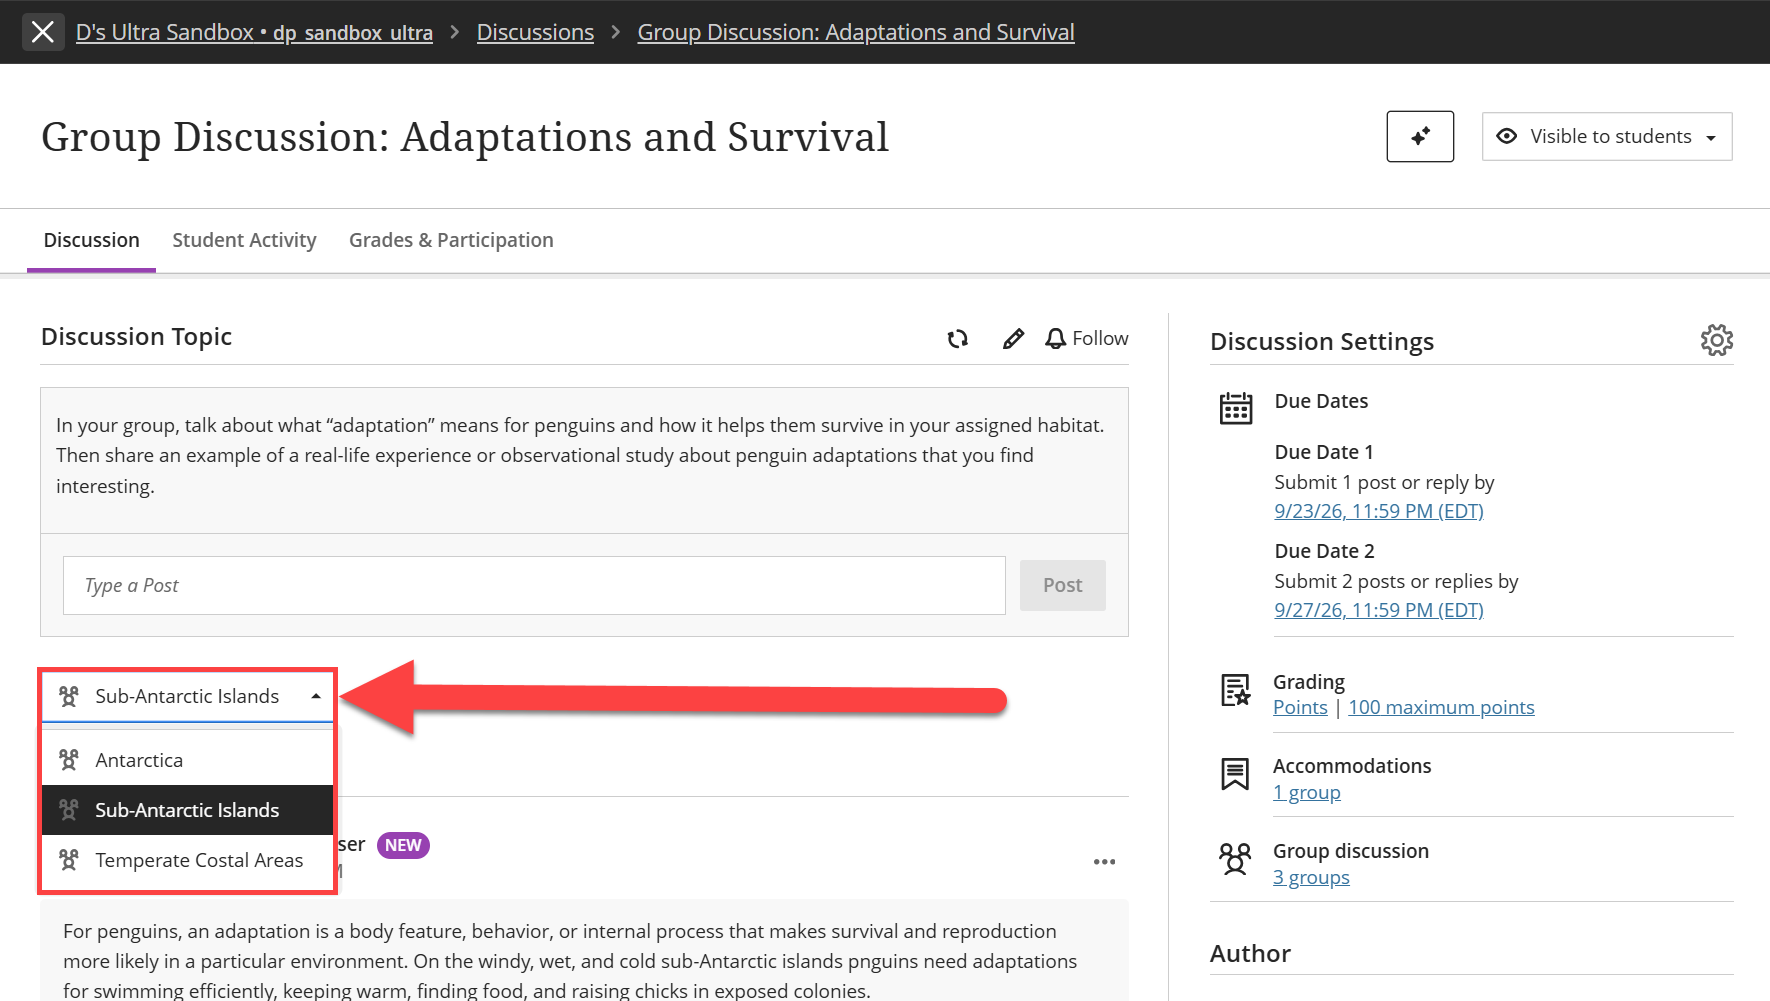
To view your students' contributions to the group discussion, locate the discussion either from the Course Content page or the Discussions page and click on the title to open.
Select a group from the menu to view group members' posts and replies.
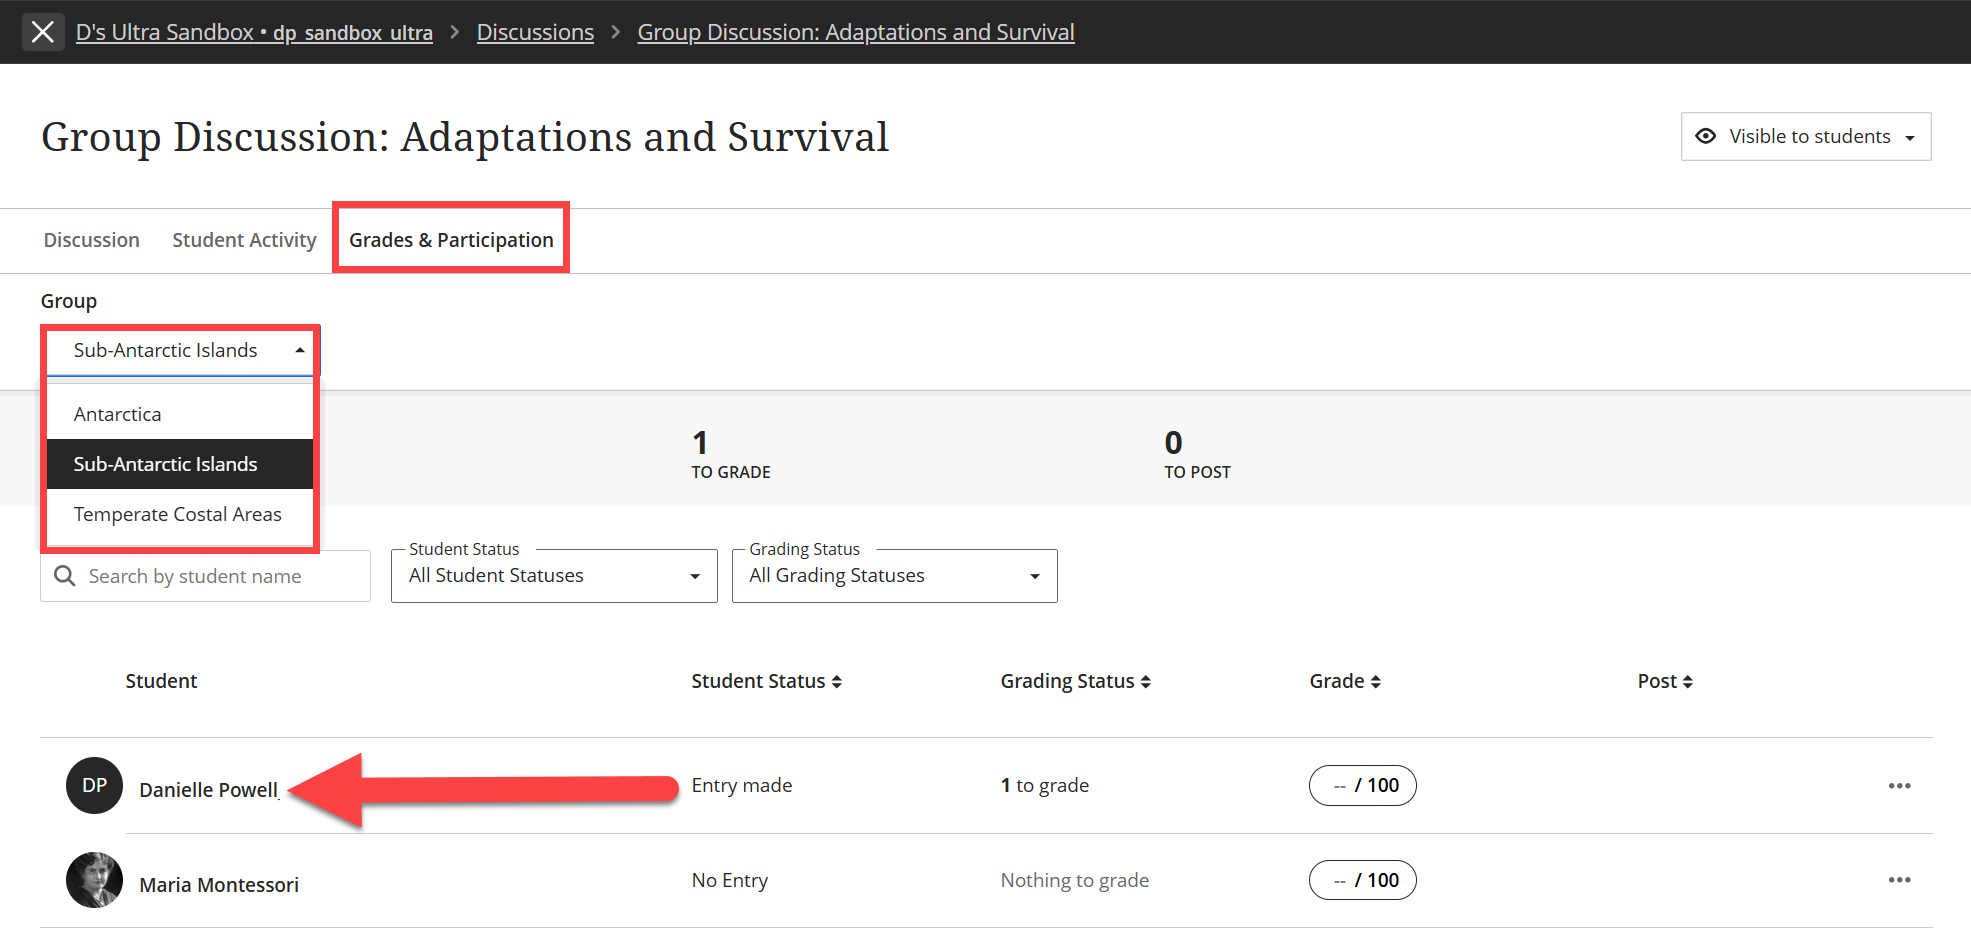
If your group discussion is graded, click on the discussion's Grades & Participation tab. Select a group and click on a group member's name to begin grading.
Refer to the Grade Group Discussions support page for more information.
Group Assignments
When you create or edit an Assignment you can assign it to groups, allowing students to collaborate on an assignment or project.
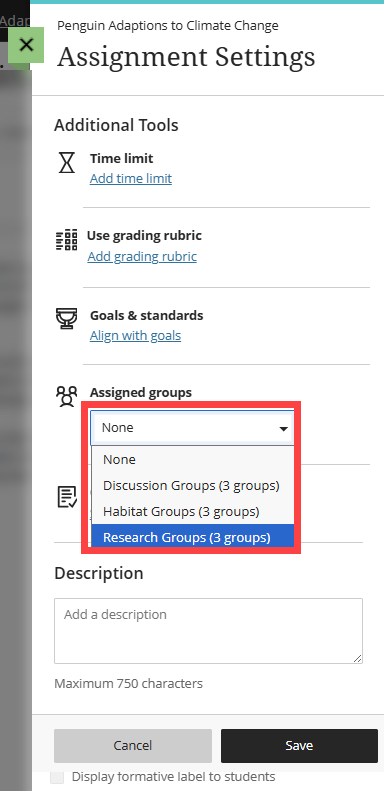
You can assign group assignment from your Assignment Settings.
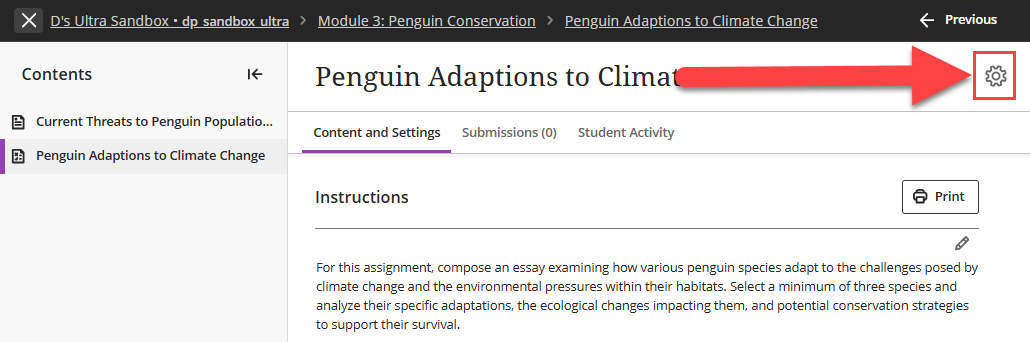
In the Additional Tools section, click the Assigned Groups menu and select a group set. Click Save to save your changes.
Once groups submit their assignments, you can access their work from the Gradebook or by opening the Assignment in the Course Content. You may assign the same grade to the whole group or grade each team member's contribution separately. You cannot change grade settings or group membership once you have started grading.
Refer to the Grade Group Assignments support page for more information and detailed instructions or watch the Group Assignments tutorial video.
Was this article helpful?
That’s Great!
Thank you for your feedback
Sorry! We couldn't be helpful
Thank you for your feedback
Feedback sent
We appreciate your effort and will try to fix the article