TABLE OF CONTENTS
- About the Gradebook
- Gradebook Setup Tutorial
- Access Your Gradebook
- Gradebook Views
- Set Up The Overall Grade
- Grade Student Work
- Assign Automatic Zeroes for Late Work
- Manage Student Accommodations
- Track and Grade Attendance
- Download Gradebook Data
- Additional Resources and Support
About the Gradebook
The Gradebook allows you to grade submissions, track student engagement, message students, add student accommodations, send reminders, and more.
Watch the Gradebook Overview tutorial video for an overview of the Ultra Gradebook.
Gradebook Setup Tutorial
The Gradebook Setup Tutorial walks you through planning and setting up your Gradebook in Blackboard Ultra—starting with outlining your grading structure, creating all gradable content, and adding any remaining manual grade columns. Once set up, your Gradebook will be organized and ready for you to navigate, review, and grade student work efficiently.
Refer to the Gradebook Setup Tutorial for details.
Access Your Gradebook
You may access your Gradebook within each of your courses or from the Global Grades Page.
Access Your Course Gradebook
From within your course, click on the Gradebook tab. This will bring you to the course's Gradebook.

Access Your Gradebook from the Global Grades Page
From the main Blackboard Navigation, click Grades. This will bring you to the Global Grades Page. Here you will see a list all of your courses (in alphabetical order) and the current status of grading. Locate a course and click on View All Work to go to that course's Gradebook.

Gradebook Views
The Gradebook's intuitive navigation provides four different views: Overview, Gradable Items, Grades, and Students. Each view allows you to view and interact with the content in a different way, depending on your current needs.
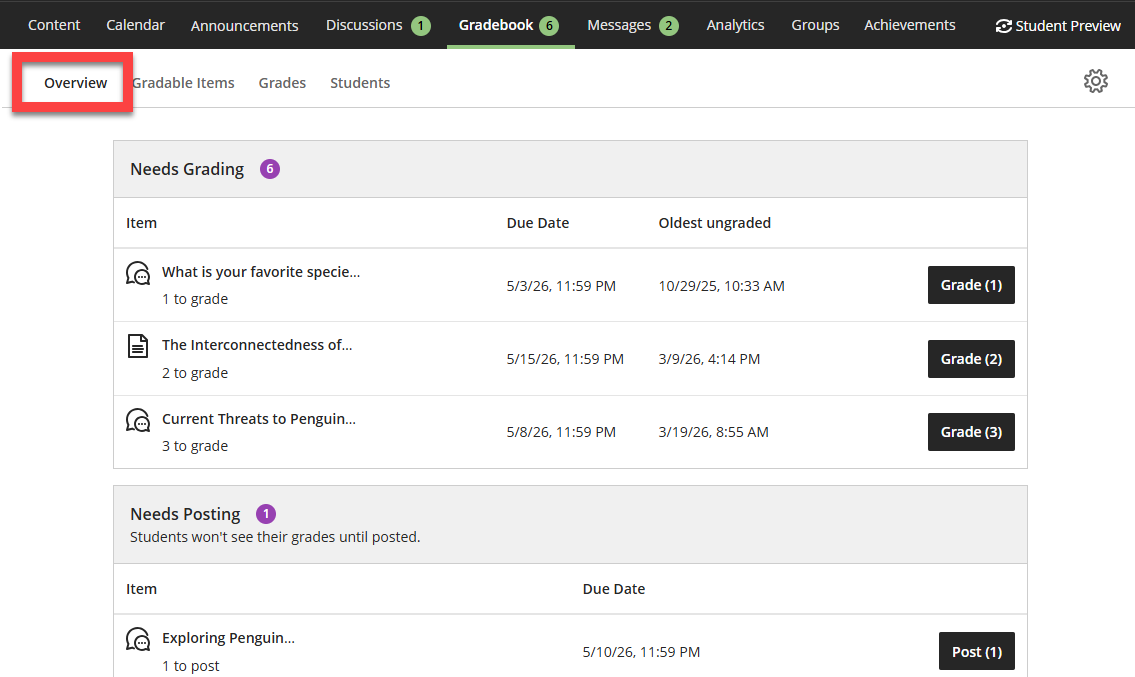
Gradebook Overview
The Gradebook Overview is designed to help you easily stay on top of your grading and features two sections: Needs Grading and Needs Posting.
- Needs Grading: The Needs Grading section highlights the items ready for grading. Click on Grade Now to begin grading.
- Needs Posting: The Needs Posting section highlights the graded items ready to be posted. Click on Post Now to immediately post the grades.
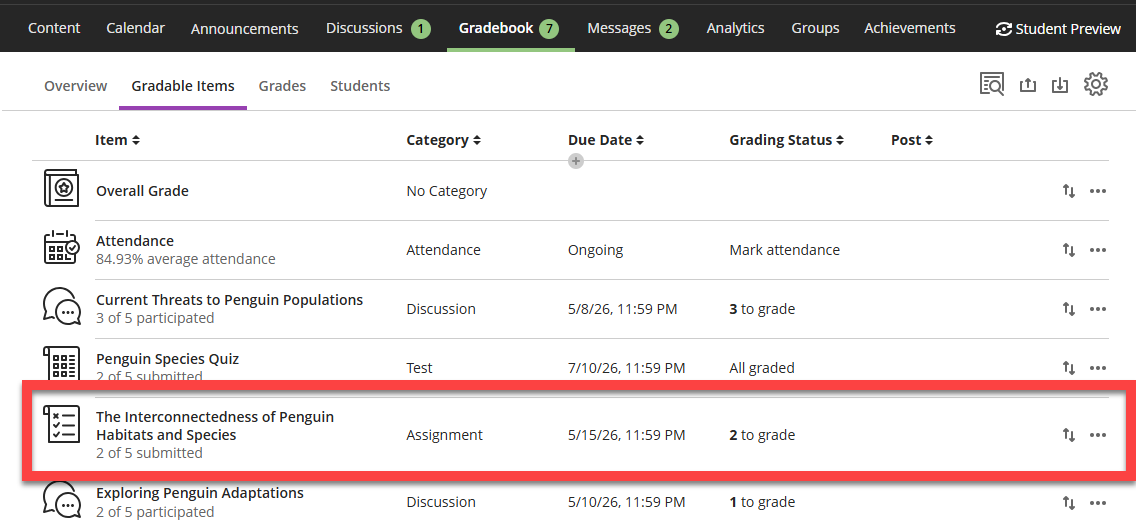
Gradable Items View
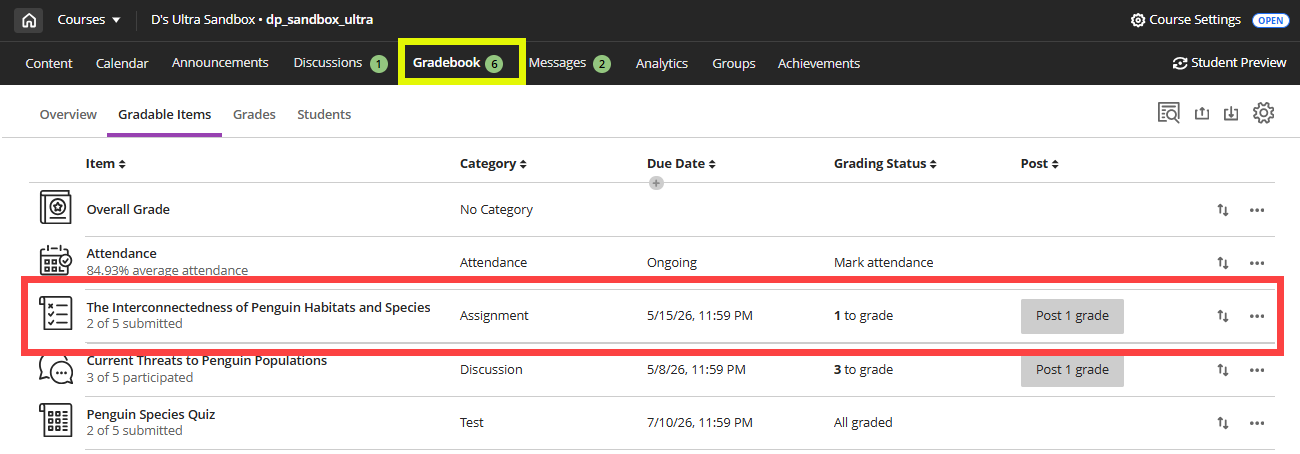
The Gradable Items view lists all the gradable items in your course. When you create a gradable item in your Course Content (ex Assignment, Test, graded Discussion, etc.) a column will be added to the Gradebook automatically. Items with missing submissions after the due date will display in red.
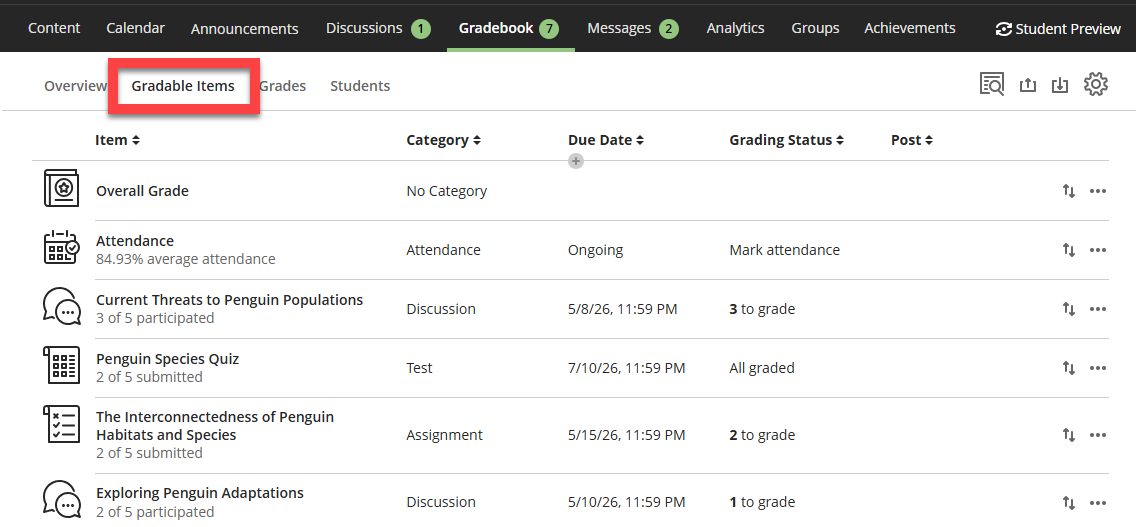
Select an item’s name to go to its Submissions or Grades & Participation page. Or select x to grade to go directly to the submission page and start grading.
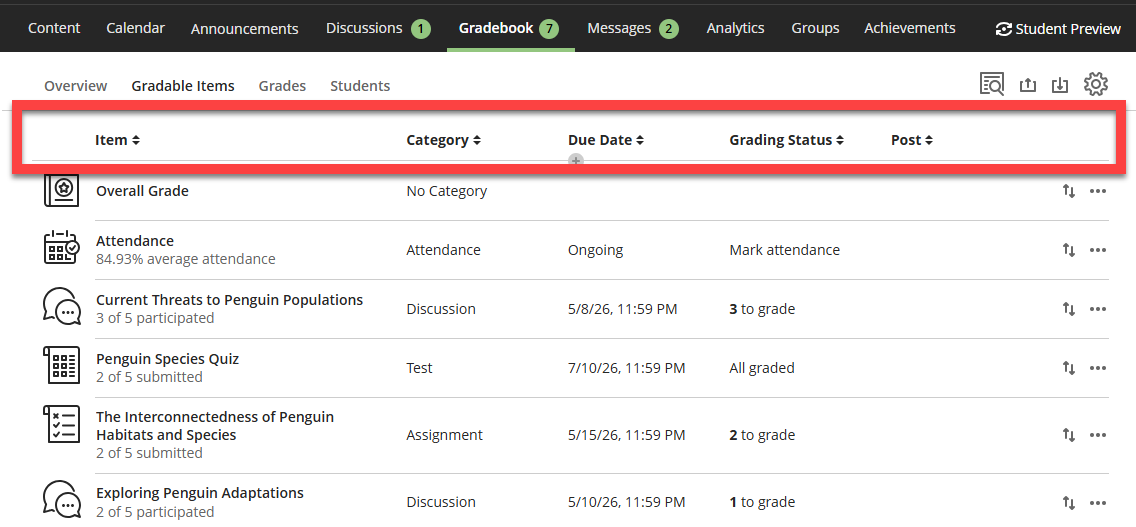
Use the column filters at the top of the page to sort your Gradebook by item name, category, due date, or grading status.
Or manually arrange your Gradebook items by clicking on the Move icon (arrows) on the far right. Drag your item into the desired position in the Gradebook.
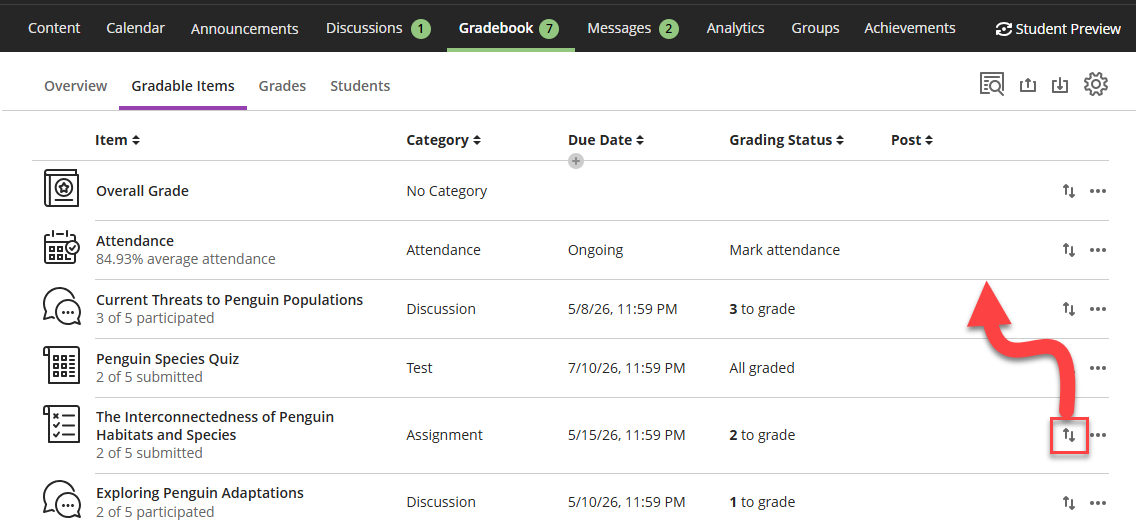
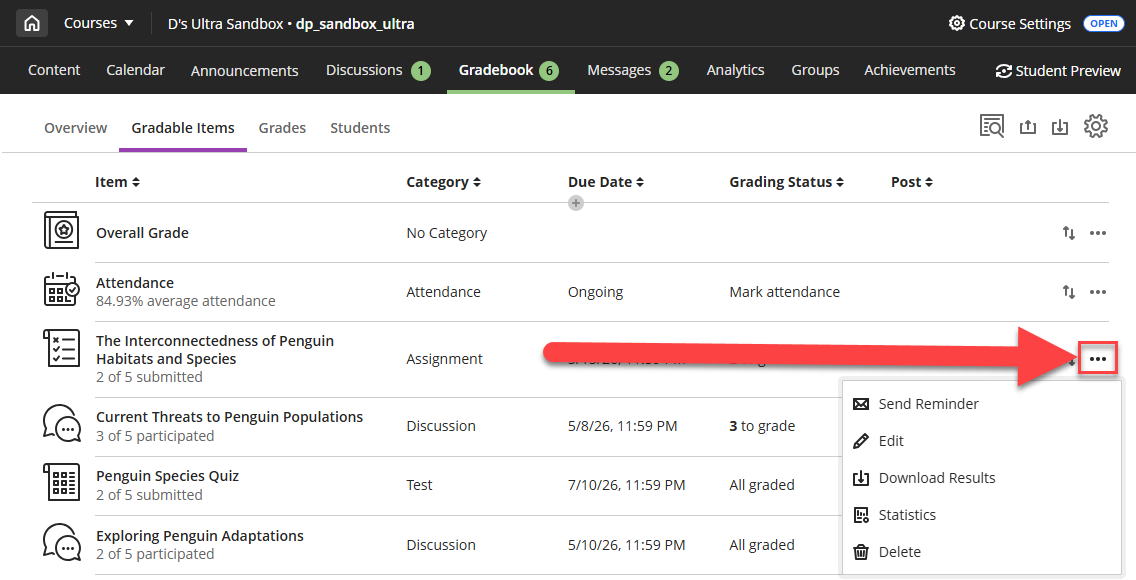
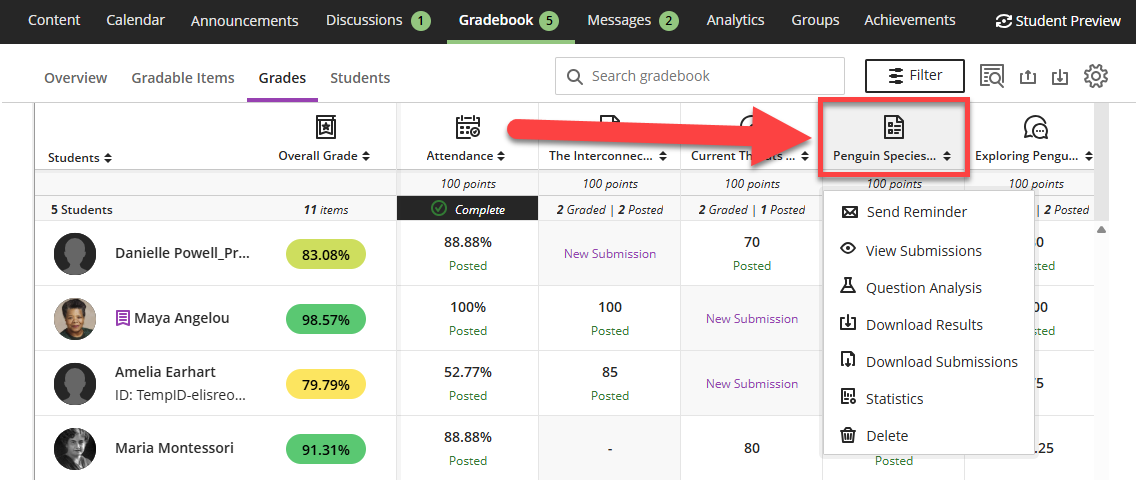
Click on the More Options icon (three dots) in the far right column for additional options, including send a reminder to students, edit the item, download files, statistics, or to delete the item. The options will vary depending on your Gradebook item and student activity.
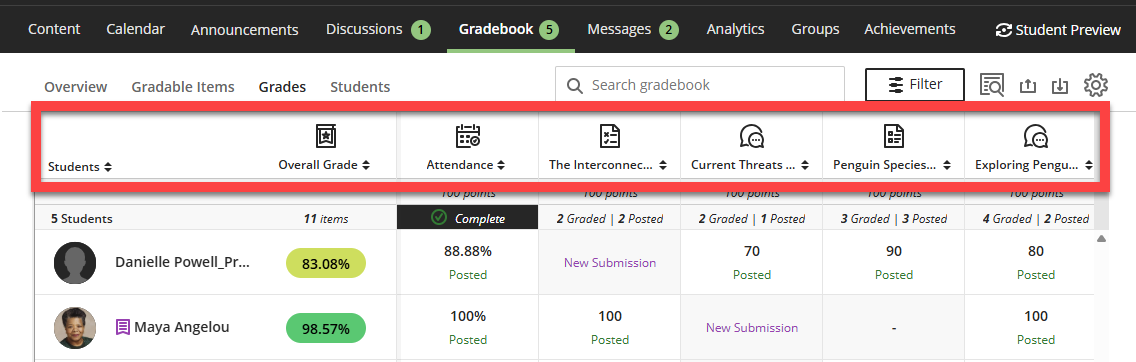
Grades View
The Grades view is a table displaying each student’s grade for a specific assignment. When you create a gradable item in your Course Content (ex Assignment, Test, graded Discussion, etc.) a column will be added to the Gradebook automatically. You will see one student per row and one gradable item per column.
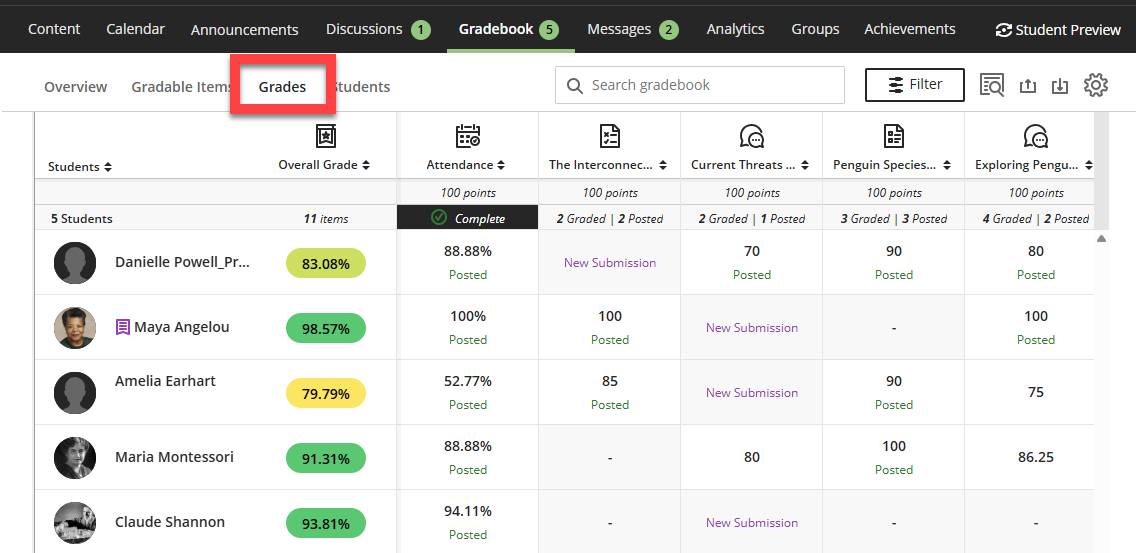
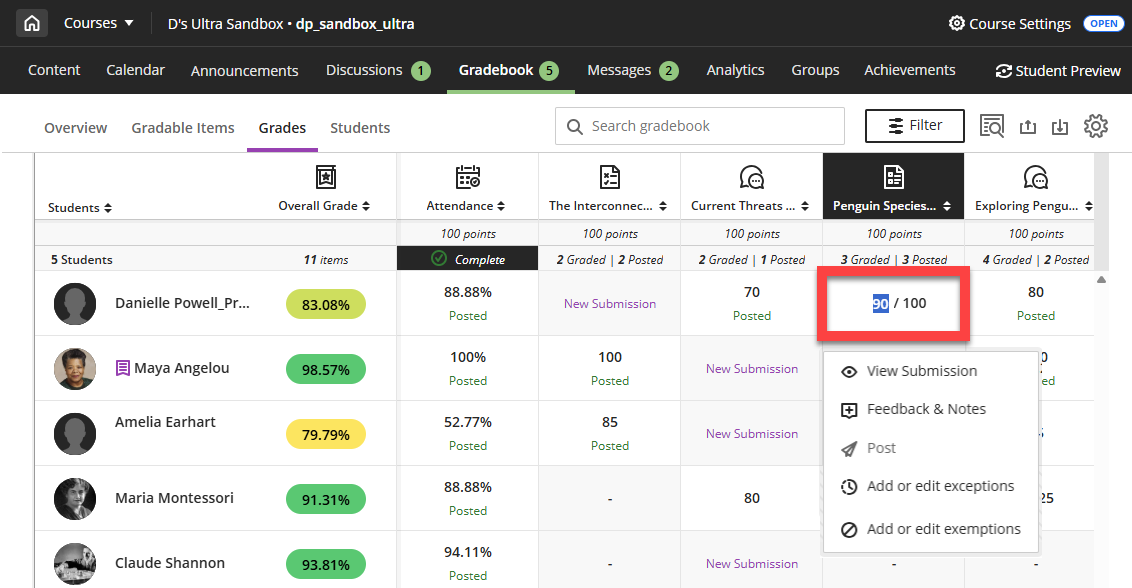
Click on a cell to view a student’s submission and start grading, provide feedback, post the grade, or add/edit exceptions and exemptions.
Use the column filters at the top of the page to sort your Gradebook by student name, Overall grade, or grade on a specific item.
Click on a Gradebook item for additional options, including send a reminder to students, view submissions, question analysis, post grades, download results, download submissions, statistics, or delete the item. The options will vary depending on your Gradebook item and student activity.
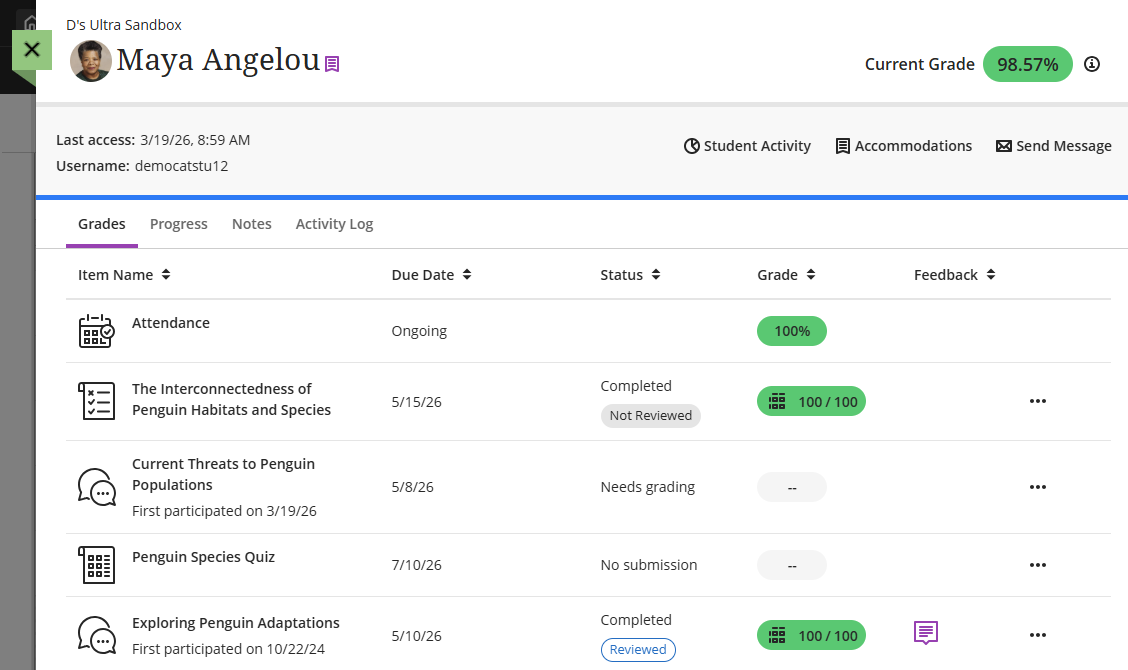
Students View
The Students view lists the students in your course, along with the date they last accessed your course and their overall grade. Students with accommodations have a purple flag next to their name.

Click on a student's name to go to their Student Overview. Here you will find your student's name, their preferred pronouns and name pronunciation (if they provided that information), the date they last accessed your course, and their Overall Grade. You may also view their activity in the course, add or manage accommodations, send a message, or click on an item to grade their work and provide feedback.
Set Up The Overall Grade
The Overall Grade Column is a calculated column that shows the students' current grades in the course. It appears in the Gradebook next to the students' names so you and your students can quickly and easily see how they are performing.
To set up or edit your Overall Grade column, go to the Gradebook and click Settings (gear icon). This icon is available from all Gradebook views.

This will open the Gradebook Settings panel. Scroll down to the Overall Grade section and select Manage overall grade settings.

This will open your Overall Grade. Under Select a Calculation Type, choose how you would like to calculate your overall grade.
- Points grade calculation: A points-based grade calculation displays a running total of the points students have earned out of the total number of points they may earn.
- Weighted grade calculation: A weighted total displays as a percentage of a final grade worth 100%. You can assign percentages to individual items or categories and decide to weigh the items proportionally or equally.
- Advanced grade calculation: Use a custom formula to calculate the overall grade.

In the Overall Grade Settings area, select how the overall grade is displayed (points, percentage, letter, etc.). Check the option to Calculate grades based on points earned out of total graded points so that students can see their current grade in the course based on the assignments that they have already completed.
Once you have finished, click Save. Then close the window to return to the Gradebook.
For more information, refer to the Overall Grade Column support article or watch the Set up the Overall Grade video.
Grade Student Work
Grade Assignments
Blackboard Ultra features Flexible Grading, providing instructors with the flexibility to grade in their preferred style. With Flexible Grading you can easily find and review the status of your grading tasks, provide inline and/or multimedia feedback to your students, and easily access and grade with rubrics.
For more information, refer to the Grade Assessments support page or watch the Grade Assignments with Flexible Grading tutorial video.
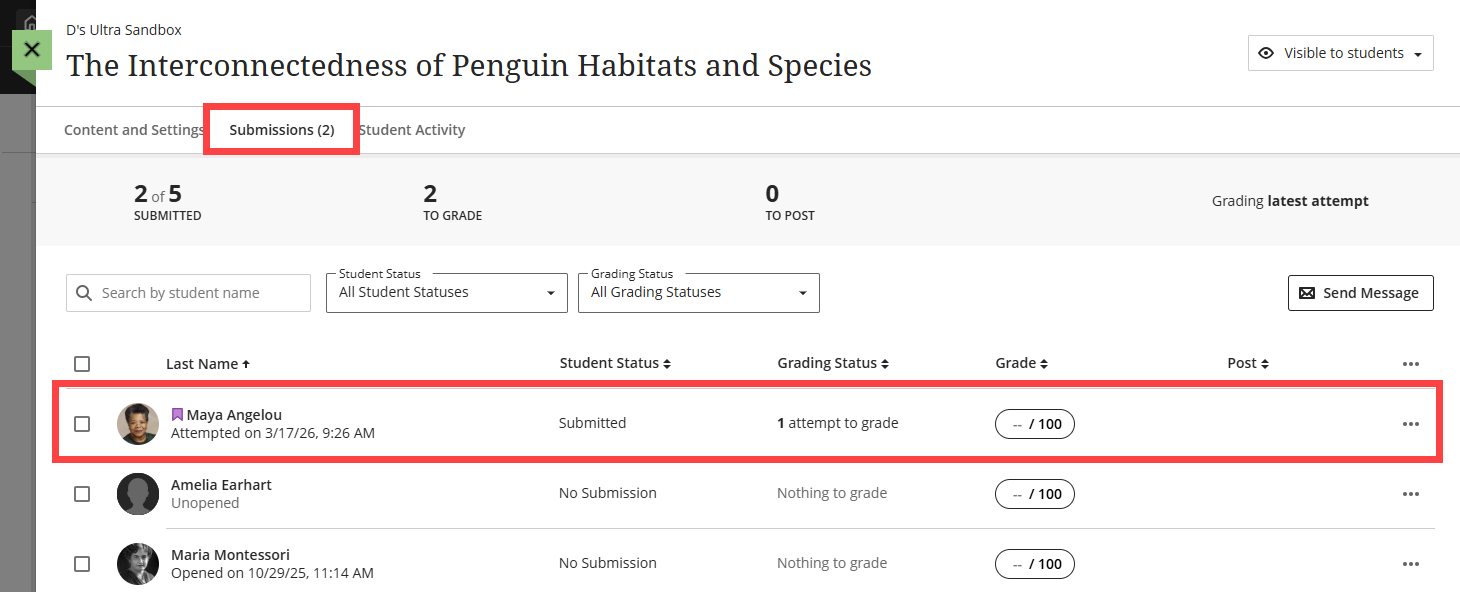
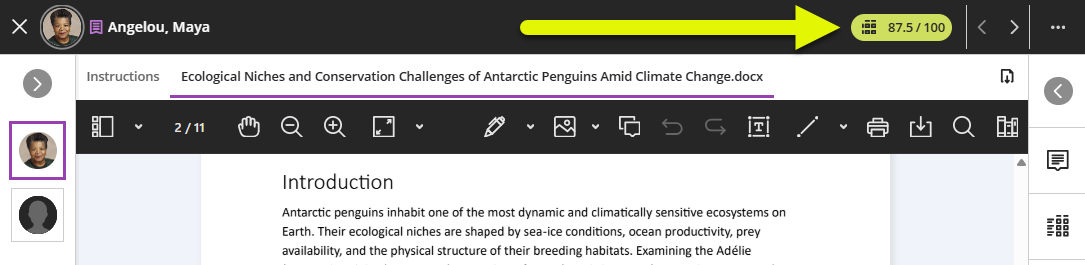
Once your students submit their assignments, you can begin grading. Assignments are graded from the Assignment's Submission page. You may access this page from three areas:
- From Base Navigation: Click on Grades to access your Global Gradebook, locate your course, and select the assignment you want to grade.
- From your Course Gradebook: Click on the Gradebook tab in your course and locate your assignment. You may access it from the Overview, Gradable Items, or the Grades tab.
- From within your assignment: Open your assignment and click on the Submissions tab.
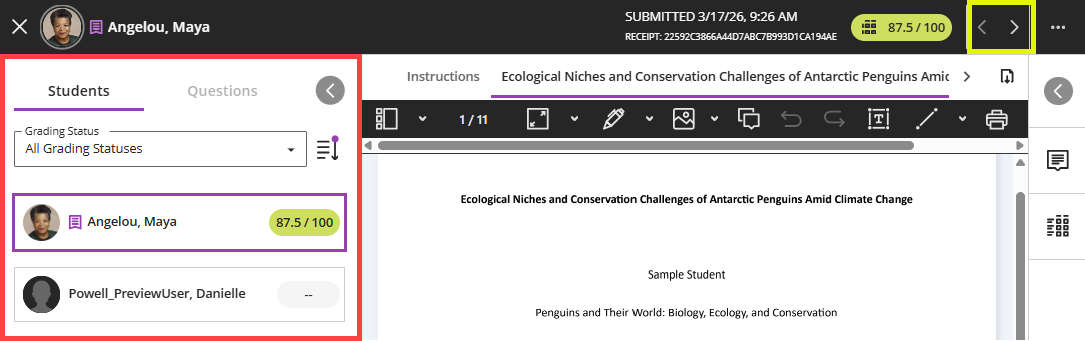
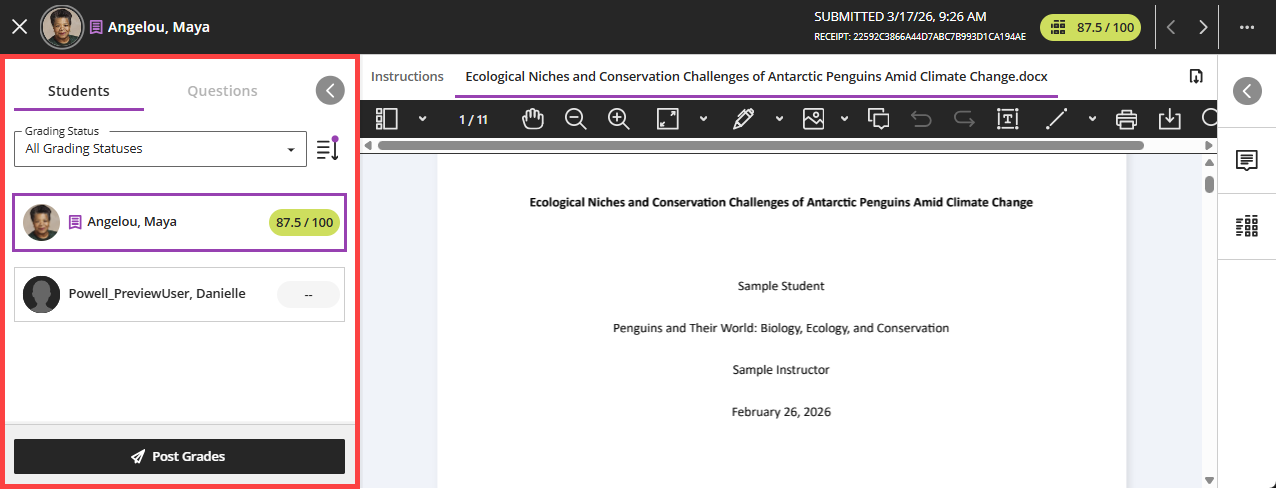
Once you have arrived on the Submissions page, select a student's name to begin.
This will open the grading page. your student's submission will appear in the middle of the page with panels on the left and right side. You may click on the arrows to expand or collapse the Students Panel and the Feedback and Rubrics Panel. If your student has submitted more than one file, they will appear on separate tabs above the Bb Annotate tools.
Did your student submit multiple attempts? Refer to the Grade Multiple Attempts support article for more information.
As you review your student's submission, you may use the Bb Annotate tools for inline grading. The Bb Annotate toolbar appears above the submission and offers robust inline grading features, including a sidebar summary view, drawing and highlighting tools, inline commenting, and more.
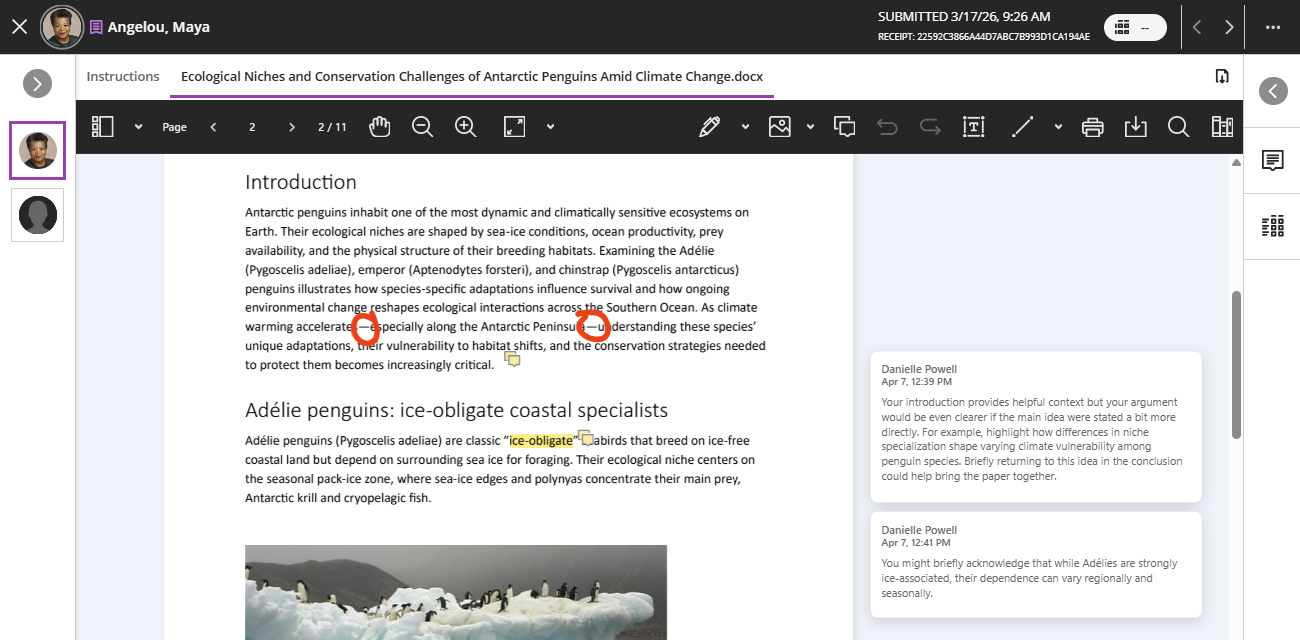
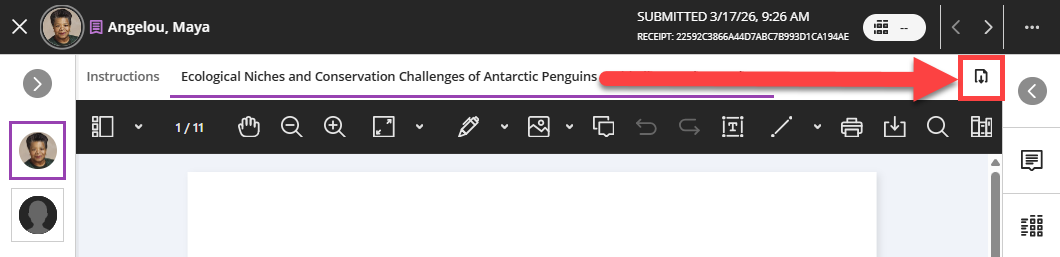
If you prefer to grade offline or provide inline grading and feedback using another tool (such as MS Word), click the Download button to download the original file.
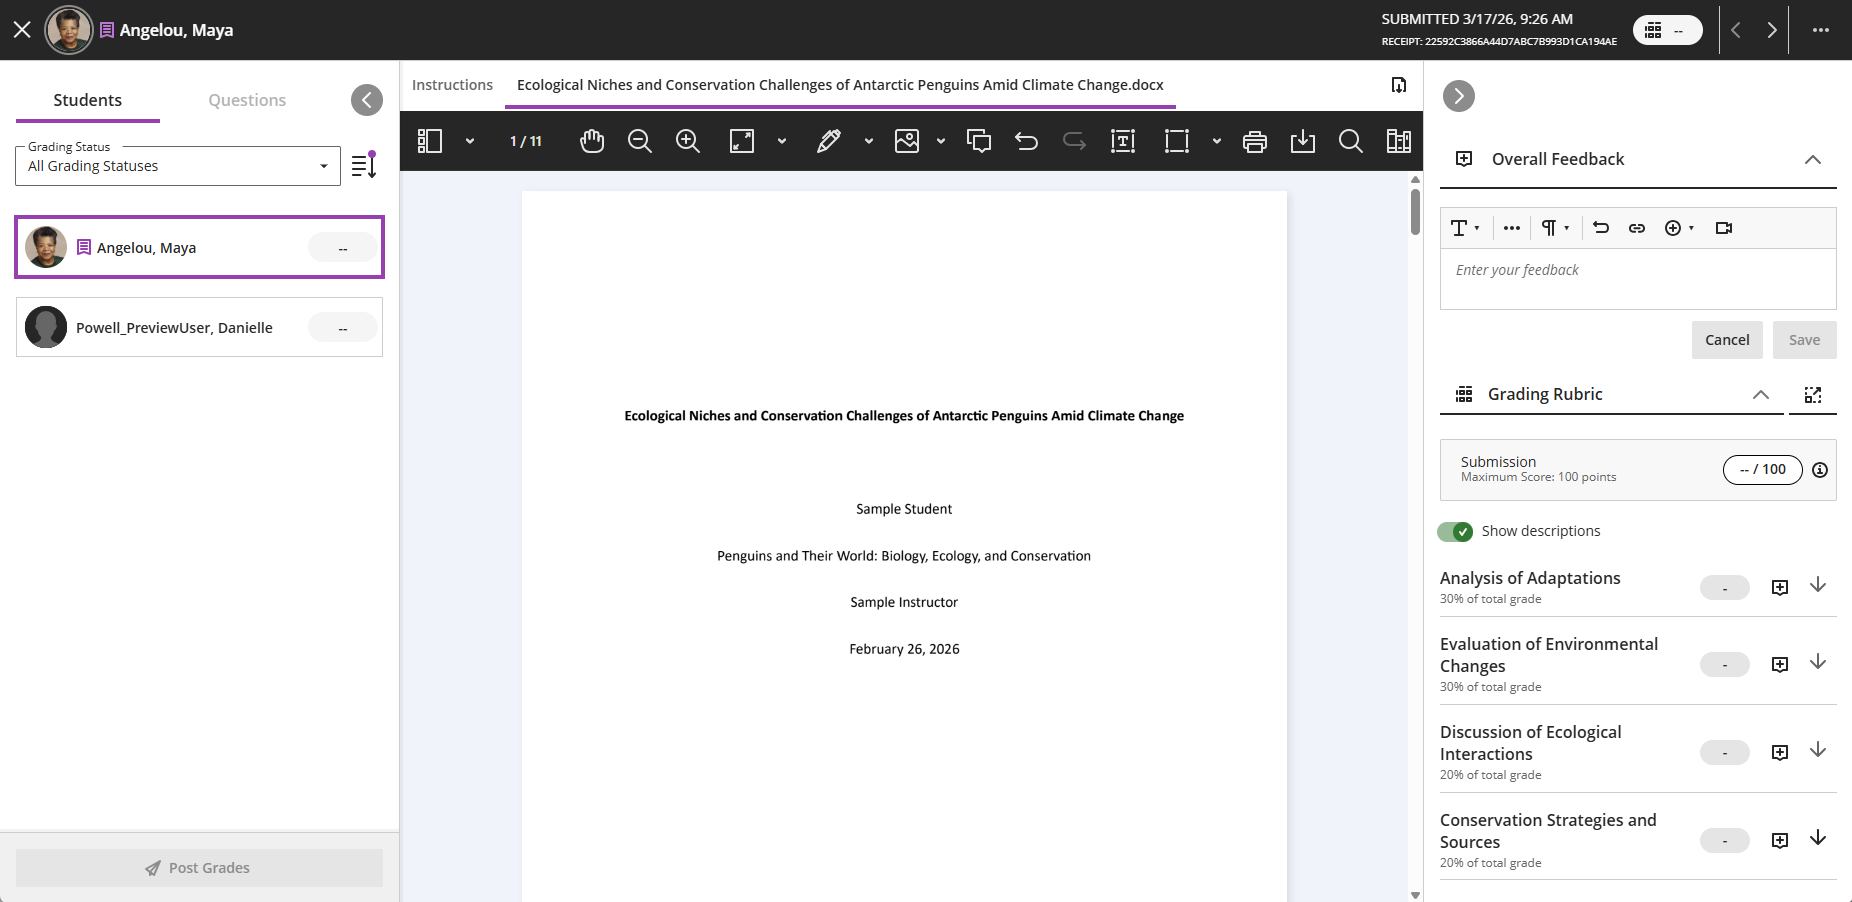
If you are using a grading rubric, expand the Feedback and Rubrics Panel to access the rubric.

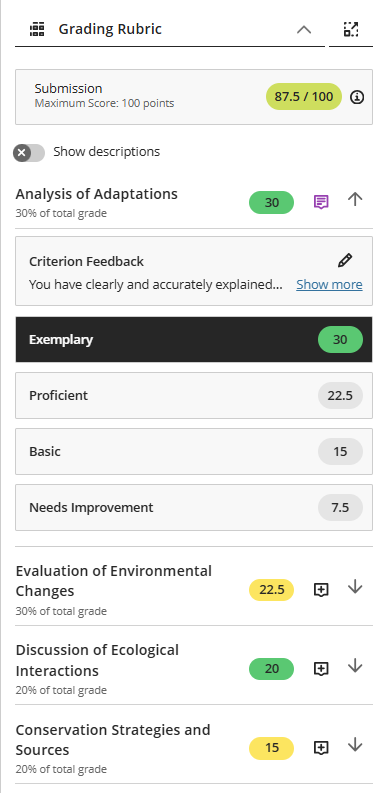
You may either use the stacked-view rubric in the side panel or select the expand icon to open the grid-view rubric and Overall Feedback in a separate, moveable window. For each criterion, click the grade pill to select the student's performance level. You may also provide text-based feedback for each criterion. As you grade, the Rubric Score will update automatically.
For more information and detailed instructions, refer to the Grade with Rubrics support article or watch the Grade Using Rubrics tutorial video.
Click on the Grade Pill at the top of the page to enter your student's score. If you graded the assignment using a rubric, the score will be added to the Grade Pill automatically.
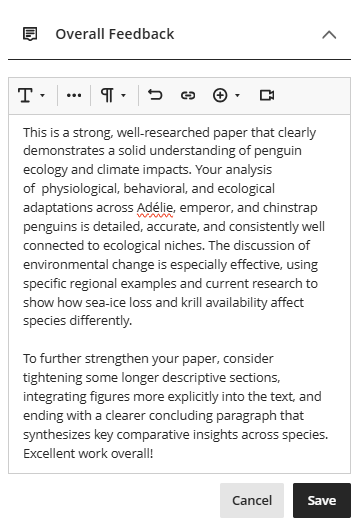
Once you have graded the submission, expand the Feedback and Rubrics Panel to provide your student with feedback.
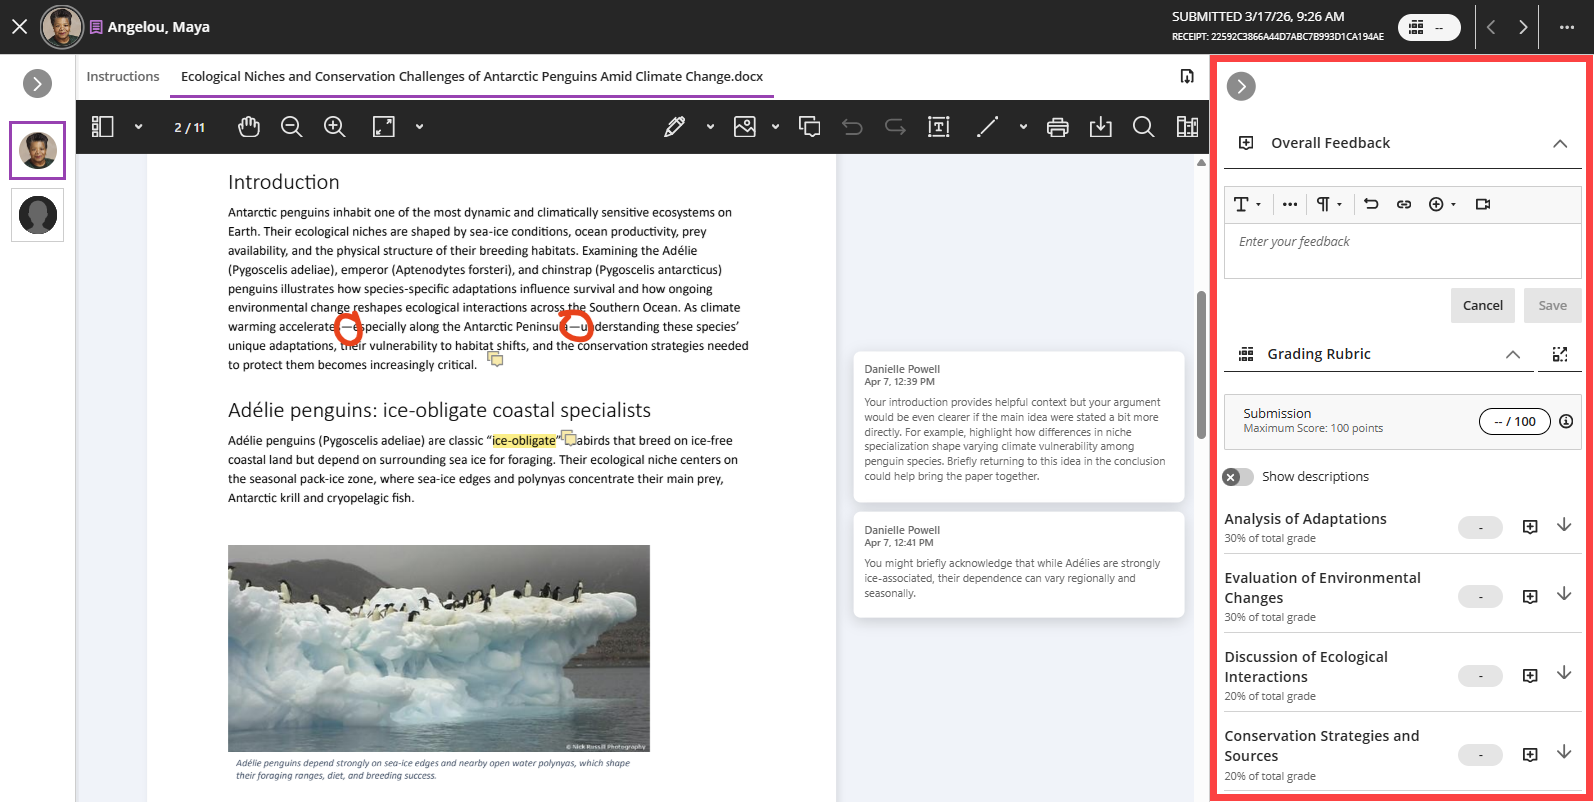
You will provide feedback to your student in the Overall Feedback area. Use the text/content editor to enter and format text, upload a file, link to resources, record audio/video feedback, and more.
Once you have finished, select the next student to grade. You may expand the Students Panel and select a student or click on the arrows at the top of the page to bring up the next submission.
Once you have finished grading you will need to post the grades so that students can review their grades and feedback.
From the Submissions page, open the Students Panel and click Post Grades.
Or, navigate to your course Gradebook, locate the Assignment, and click Post. This option may be found in all Gradebook views.
Refer to the Post Grades support page for more information and detailed instructions.
Grade Peer Review Assignments
Throughout the peer review process, instructors can monitor student progress from the assignment's Submissions tab. Instructors can see who has submitted their assignment, their grading status, the status of their peer reviews, and their grade.

Once you are ready to grade, click on a student's name to open their submission and reviews.

Review the student's submission. You may use the Bb Annotate options at the top of the submission to highlight text, add comments, zoom in or out, use freehand drawing tools, and more. For more information and detailed instructions, refer to the Bb Annotate support article or watch the Annotate in Blackboard Learn tutorial video.

Below the student's submission you may find the feedback that they gave their peers. You can see which students they reviewed and review the feedback.

In the Feedback Panel, you can review the feedback other students have provided, give your own feedback, and assign the student a grade.

Once you have finished grading, Post your grades. Students will not be able to review their peers' feedback until the grades are posted.
For more information, refer to the Self and Peer Assessment in Blackboard Ultra support article.
Grade Tests
Blackboard Ultra features Flexible Grading, providing instructors with the flexibility to grade in their preferred style. With Flexible Grading you can easily find and review the status of your grading tasks, provide inline and/or multimedia feedback to your students, and easily access and grade with rubrics.
Most test questions are graded automatically. However, certain question types, including essay questions, must be manually graded.
For more information, refer to the Grade Assessments with Flexible Grading support article or watch the Flexible Grading Tests tutorial video.
Once your students submit their tests, you can review their submissions or begin grading. Tests are graded from the Test's Submission page. You may access this page from three areas:
- Base Navigation: Click on Grades, locate the course, and select the Test you want to grade.
- Course Gradebook: Click on the Gradebook tab in your course and locate your Test. You may access it from the Gradable Items view or the Grades view.
- Test: From within your Test, click on the Submissions tab.
Once you have arrived on the Submissions page, select a student's name to begin.

You may grade your tests by student or by question.
To grade your test by student, open the Students/Questions Panel and select Students. Use the Grading Status filter to display all students or select the Needs Grading filter to focus on remaining grading work. Select a student to begin.
This will open the grading page. your student's submission will appear in the middle of the page with panels on the left and right side. You may click on the arrows to expand or collapse the Students/Questions Panel and the Feedback Panel.

To grade your test by question, open the Students/Questions panel and select Questions. Use the Grading Status filter to display all students or select the Needs Grading filter to focus on remaining grading work.
Select a question to grade all students' responses to a single question.

If the question(s) are graded automatically you will see the students' scores for each question. You may adjust the question's score or select the Feedback button to add feedback specific to the student's response to the question.

Essay questions must be graded manually. Read your student's response and enter a score in the question's grade pill. Select the Feedback button to add feedback specific to the student's response to the question.

Once you have finished grading the test, you may provide some overall feedback to your student in the Feedback panel. Use the Record Audio and Video Feedback option to add a video or audio recording of your feedback. Students can watch or listen to your feedback alongside any text you include.

Once your test has been graded your will need to post the grades so that your students may see them. You may opt to post test grades automatically or to post grades manually.
- Post Grades Automatically: To automatically post grades when the Test is graded, go to the Test Settings Panel and select the Post Assessment Grades Automatically option. This setting is on by default. If your test contains essay questions, the test grade will post automatically after you grade the essay questions.
- Post Grades Manually: If you did not set your test to auto-grade, you can post grades from your course Gradebook or from the Test's Submission page.
For more information, refer to the Post Grades support page.
Grade Discussions
Watch the How to Grade Discussions tutorial video for an overview of grading Discussions.
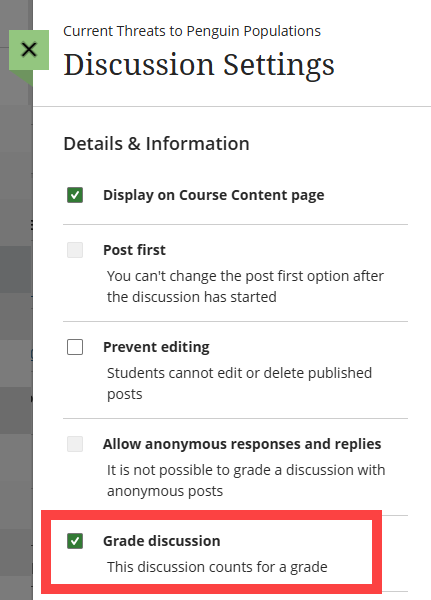
By default, discussions are not a graded activity. If you would like to grade your discussion, go into the Discussion Settings and select Grade Discussion. Once selected, you will see additional settings, including due dates and participation requirements, maximum points, and the option to attach a rubric.
Refer to Grade Discussions: Discussion Grade Settings for detailed information.
Once your students post their discussion responses and replies, you can begin grading. Discussions are graded from the discussion's Grades & Participation page. You may access this page from the Gradebook or from within your discussion.
From your course Gradebook: Click on the Gradebook tab in your course and locate your discussion. You may access it from the Gradable Items view or the Grades view.
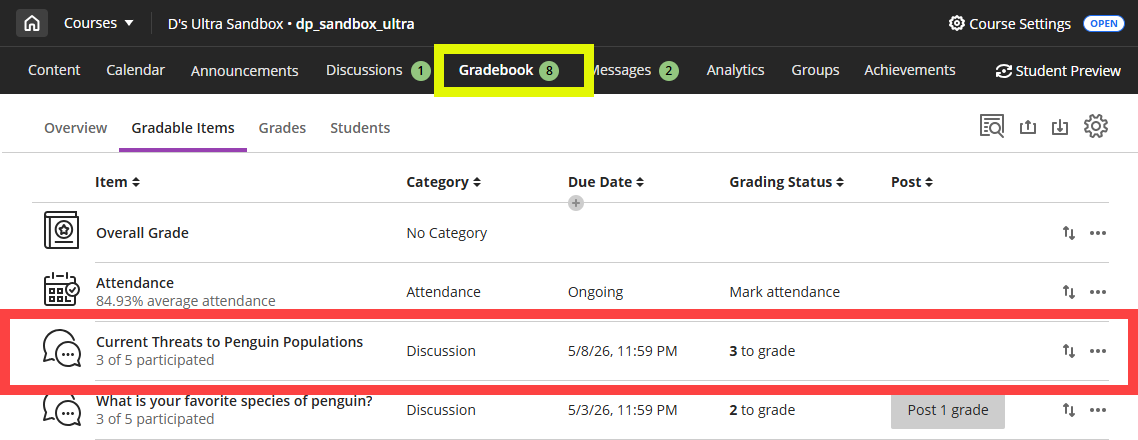
From within your discussion: Open your discussion and click on the Grades & Participation tab.
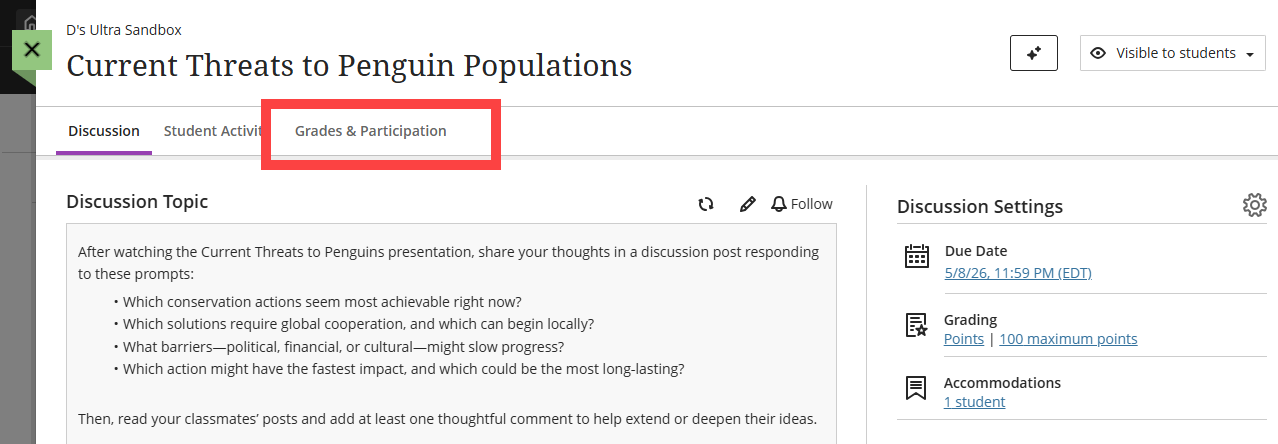
Once you arrive on the Grades & Participation tab, you will see a list of all of the students in your course, whether they have participated in the discussion, their grading status, and their grade. Click on a student's name to begin grading their work.
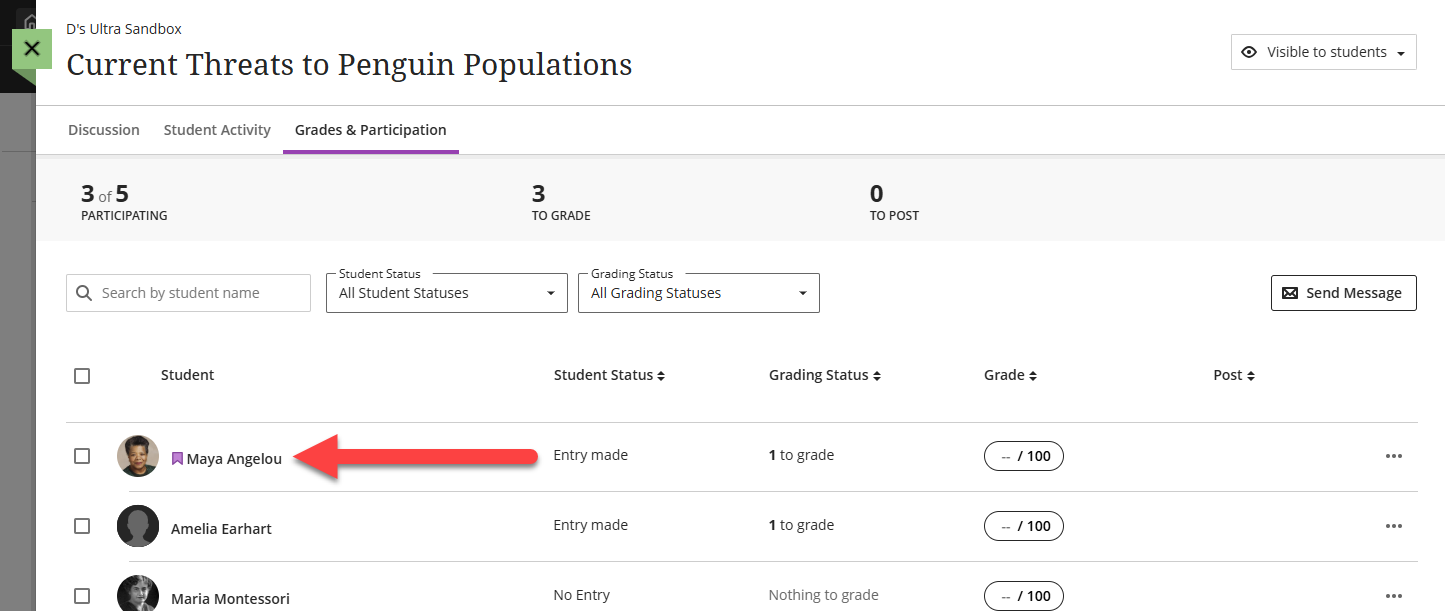
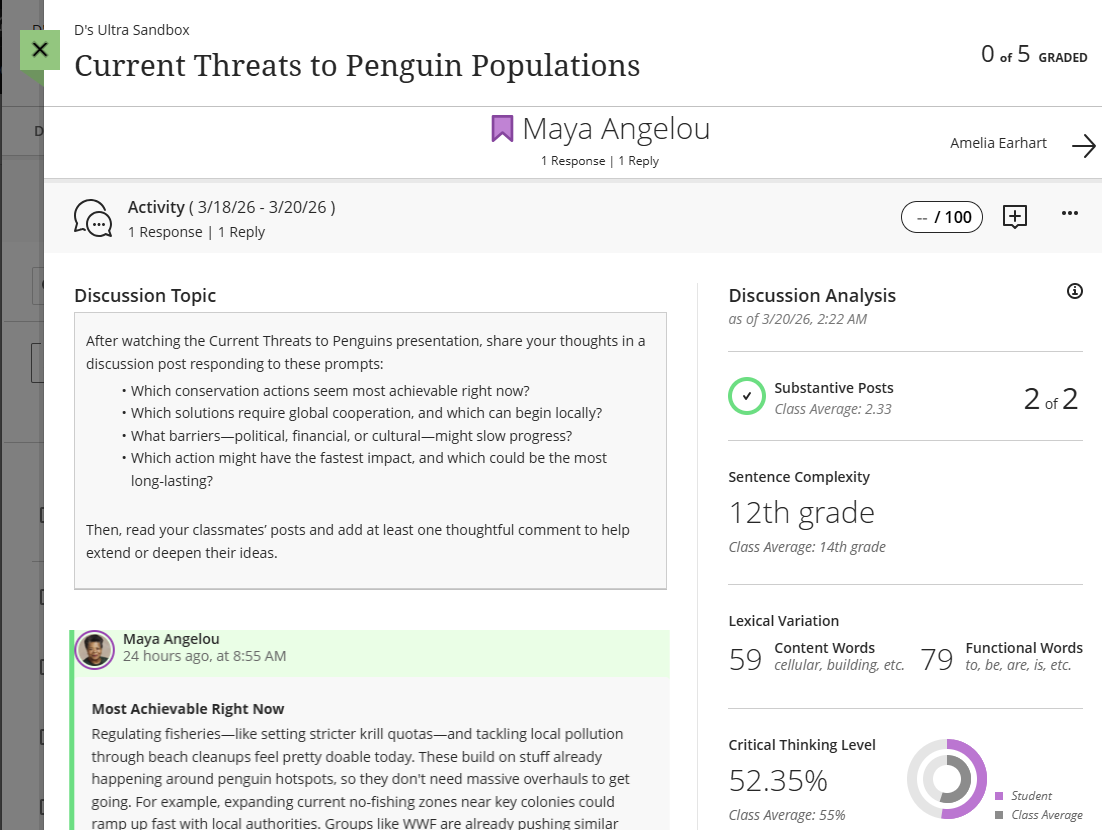
Your student's posts and replies are highlighted so that you can read their contributions in context. You will also be able to view a discussion analysis highlighting the student's participation, sentence complexity, and critical thinking level.
To enter a grade, click on the grade pill at the top of the page and enter the student's grade.

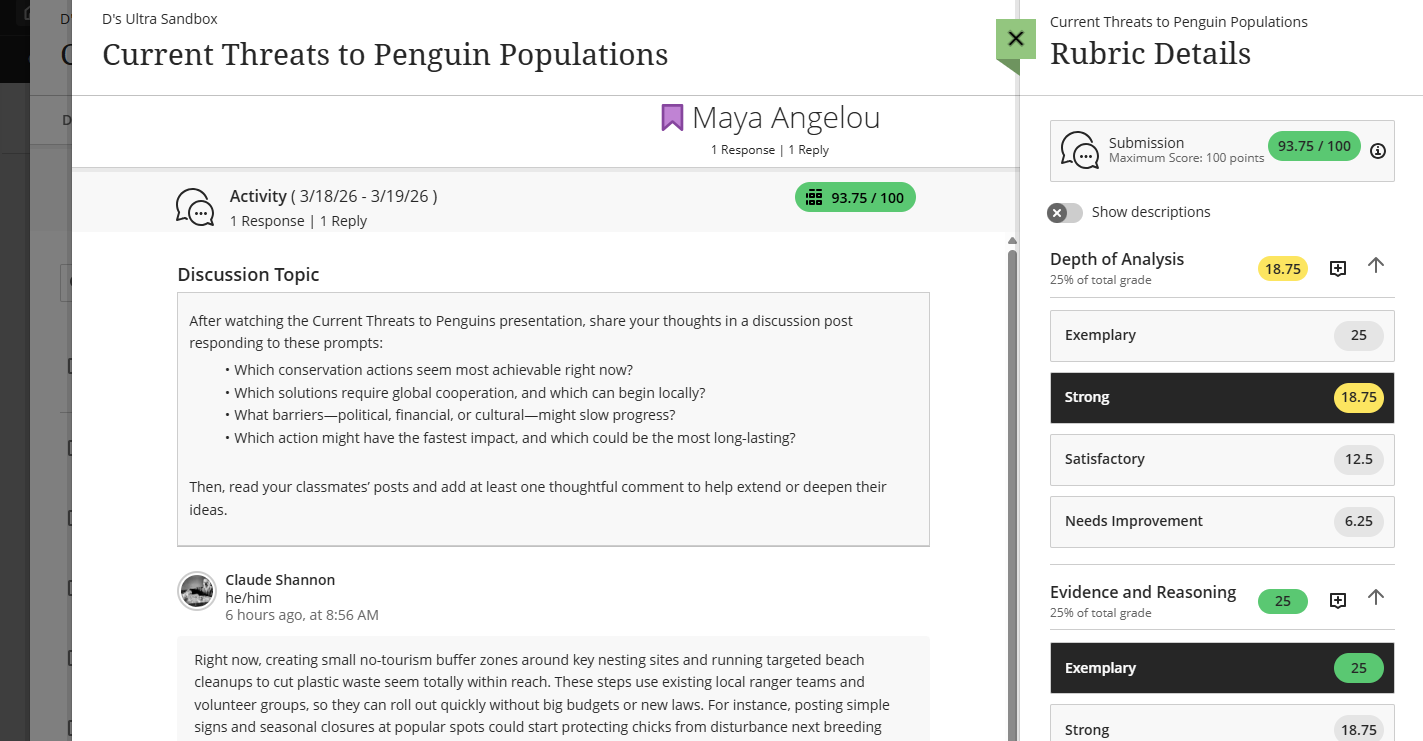
If you are grading with a rubric, clicking on the grade pill will open the Rubric Details panel. Assign a performance level to each criterion by selecting the desired score pill. The grade will update automatically.
To provide feedback to your student, click on the Feedback icon (+) at the top of the page.

This will open the Feedback panel. Enter your feedback and used the text/content editor to format your text, add a link or attachment, etc. All feedback will remain private between you and the student.
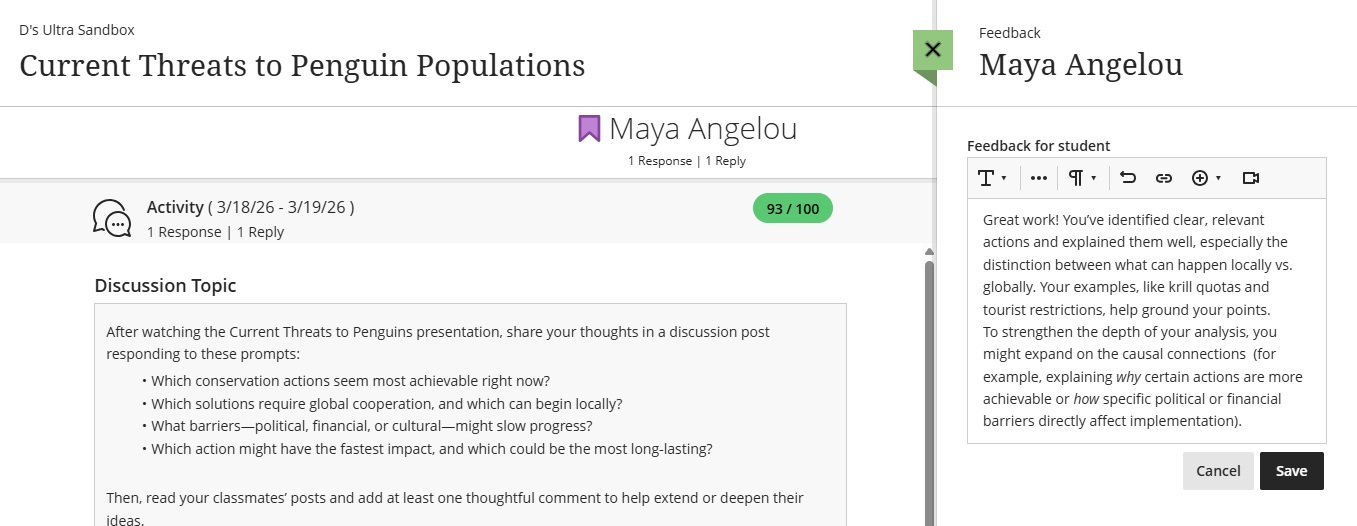
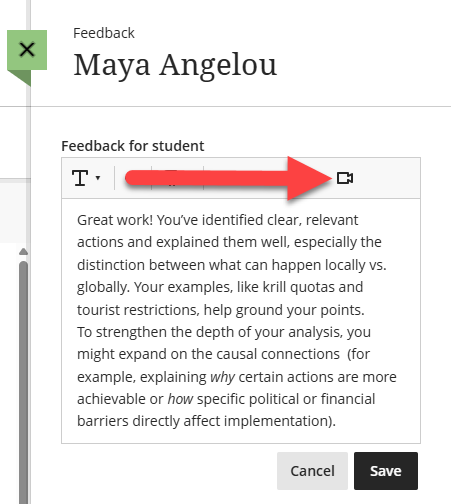
Use the Record Audio and Video Feedback option to add a video or audio recording of your feedback. Students can watch or listen to your feedback alongside any text you include.
Click Save to save your changes.
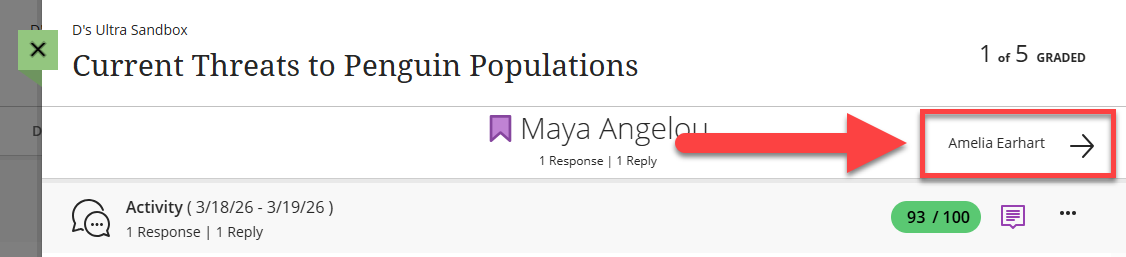
Once you have finished grading the student, you may click on the arrow at the top of the page to grade the next student. Or click on the green X to close the window and return to the Grades & Participation page.
For additional information and detailed instructions, refer to the Grade Discussions support article.
Assign Automatic Zeroes for Late Work
You can choose to automatically assign zeroes to work that is not turned in by the due date. If allowed, students can still submit work after the due date and you can grade it as normal.
Note: Students with due date accommodations will not receive automatic zeroes for overdue work.
To assign or unassign automatic zeroes, go to the Gradebook and click Settings (gear icon). This icon is available from all Gradebook views.

This will open the Gradebook Settings panel. Scroll down to the Automatic Zeroes section and select or unselect the box to assign automatic zeroes.

Manage Student Accommodations
Blackboard Ultra offers different ways of accommodating your students, depending on your their needs. This may include extended due dates, untimed Tests, an exemption from a course activity, or early access to course content.
- Add Due Date or Time Limit Accommodations: You can set Accommodations for individual students to allow for extended due dates and/or additional time to complete tests. Accommodations are tied to the individual student and are applied to all graded items within the course.
- Grant One-Time Assessment Exceptions: When special circumstances arise, you can give an individual student an Exception for a specific assessment. You may give the student additional submission attempts, reschedule the due date, or extend access to the assessment. Exceptions are tied to the specific Assignment or Test and do not affect other assessments in the course.
- Exempt a student from a graded activity: In some circumstances you may need to exempt a student from an assessment or course activity. Exemptions can be applied to any item in the Gradebook including Assignments, Tests, Discussions, Journals, and more. Exemptions are tied to the specific Gradebook item and do not affect other course activities. When a Gradebook item is exempt, it will not be included in the student's Overall Grade calculation, marked late, or assigned an Automatic Zero.
- Set Release Conditions: You may set release conditions to determine when content is available to students. If you have a student, or group of students, who needs access to content earlier than the rest of the class you may set rules to give students early access. You may set Release Conditions for any item in your Course Content, including Learning Modules, Folders, Ultra Documents, Assignments, Tests, and more.
For more information and detailed instructions, refer to the Manage Student Accommodations in Blackboard Ultra support article.
Track and Grade Attendance
You can use the Attendance tool to track your students' attendance. You may mark whether each student is present, late, absent, or excused and decide whether or not to use Attendance as part of your students' Overall Grade.
For more information and detailed instructions, refer to the Track Attendance in myLesley support article or watch the Attendance Tracking tutorial video.
Download Gradebook Data
You may download your full gradebook, selected gradebook columns, a full grade history, or individual student assessments.
Download Grades from your Gradebook
You can download your full Gradebook or selected Gradebook columns for your reference or to use in another program (ex perform a statistical analysis in Microsoft Excel). At this time, you cannot download Gradebook items that allow anonymous grading or peer review.
Go to your course Gradebook and select Download Gradebook. This is available from the Gradable Items, Grades, and Students views.

This will open the Download Grades panel. Select the following:
- Download Options: Select Full Gradebook.
- Record Details: Choose which Gradebook items to include in your download.
- You may select individual columns or select Select All Items to download all Gradebook items.
- If you only select one item (ex an Assignment), you may also download feedback for that item.
- File Type: Select whether to download your file as a Tab-Separated file (.xls) or Comma Separated Values file (.csv).
- Save Location: Select whether to save to your computer or your Blackboard Content Collection.
Click Download to download your grades. Your file will include the following information:
- Last name, first name, and username
- Student ID, last access, and availability
- Grade columns
- Attendance (if using)
- Manually added items (if using)
- Calculations (if using)
- Overall grade (if using)
When you download the full Gradebook, the file includes the grades you posted or are ready to post and feedback is not included. The column header includes the name of the grade column and the grade display.

Download Grade History
The Grade History provides a detailed record of student submissions, grades and any grade changes you made in the course.
Go to your course Gradebook and select Download Gradebook. This is available from the Gradable Items, Grades, and Students views.
This will open the Download Grades panel. Select the following:
- Download Options: Select Grade History.
- Record Details: Choose which Gradebook items to include in your download.
- You may select individual columns or select Select All Items to download all Gradebook items.
- If you only select one item (ex an Assignment), you may also download feedback for that item.
- Last Modified Date: Select the timeframe to include in your download. To select all grade history made in the course, select All Time.
- File Type: Select whether to download your file as a Tab-Separated file (.xls) or Comma Separated Values file (.csv).
- Save Location: Select whether to save to your computer or your Blackboard Content Collection.
Click Download to download your grade history. Your file will include the following information:
- Date
- Type of assessment and grade category
- Last edition user’s details
- Student username
- Submission receipt: The submission receipt number
- Submission attempt: The number of the submitted attempt
- Type: If it was a regular or an override grade
- Obtained value
- Event: Additional details such as if was a group attempt, if it’s not posted or if it needs grading
Non-posted grades are also included in the file as they provide greater insight into grade changes in the course.

Bulk Download Student Submissions
Instructors have the option to bulk download students' assignment submissions for offline grading. This may be useful if you prefer to grade outside the system or want to provide inline grading and feedback using another tool, such as Microsoft Word.
At this time, you cannot bulk download group submissions.
Navigate to your Course Gradebook and select the Grades tab. Next, click on your assignment to open a menu of options. Select Download Submissions.

You may choose to download all students' submissions or select individual student submissions. Click Create ZIP file to start the process. You will receive an email and a course message when your package is ready.
Once you receive the email, click Download Now to download your file.

For more information, refer to the Download Assessments support page.
Additional Resources and Support
Gradebook Setup Tutorial
This guide walks you through planning and setting up your Gradebook in Blackboard Ultra—starting with outlining your grading structure, creating all gradable content, and adding any remaining manual grade columns: Gradebook Setup Tutorial.
Create and Grade Assignments
This support article will walk you through how to create and grade assignments in Blackboard Ultra: Create and Grade Assignments.
Create, Manage, and Grade Tests
This support article will walk you through how to create, manage, and grade tests in Blackboard Ultra: Create, Manage, and Grade Tests.
Create, Manage and Grade Discussions
This support article will walk you through how to create, manage, and grade discussions in Blackboard Ultra: Create, Manage, and Grade Discussions.
Time Zones and Due Dates
This support article provides information about how time zones affect due dates in Blackboard Ultra: Time Zones and Due Dates in Blackboard Ultra.
Progress Tracking and Student Progress Reports
This support article provides information on tracking student progress throughout your course: Progress Tracking and Student Progress Reports
Faculty Quick Start Guide
This guide contains instructions and tutorial videos to get you started with Ultra Course View: Blackboard Ultra Course View Faculty Quick Start Guide.
Blackboard Ultra Training Options
New to Ultra? Choose the training option that best suits your needs! Whether you prefer to go at it alone, or want extra support and training on your journey, we have an Ultra training for you: Blackboard Ultra Training Options.
Unable to attend one of our trainings? Email elis@lesley.edu to set up an appointment or request a small group training.
Faculty Online Office Hours
Have questions about myLesley? Need assistance? Join the eLIS staff for our weekly online office hours every Monday and Thursday, 2:00 - 4:00 ET. No appointment necessary: Join eLIS Online Office Hours.
Contact Us
Reach out to eLearning and Instructional Support (eLIS) at elis@lesley.edu with any questions or to request a 1:1 or small group training.
Was this article helpful?
That’s Great!
Thank you for your feedback
Sorry! We couldn't be helpful
Thank you for your feedback
Feedback sent
We appreciate your effort and will try to fix the article