TABLE OF CONTENTS
- What is Blackboard Ultra?
- Self-Paced Course: Faculty Training for Ultra
- Create Course Content
- Create and Share Media Content
- Student Work and Participation
- Create and Manage Groups
- Copy Course Content
- Set Content Visibility and Release Conditions
- Communicate with your Students
- Track and Grade Attendance
- Navigate and Set Up Your Course Gradebook
- Grade Student Work
- Manage Student Accommodations, Exceptions, and Exemptions
- Progress Tracking and Student Progress Reports
- View Your Course as a Student (Student Preview)
- Additional Resources and Support
What is Blackboard Ultra?
Blackboard Ultra is the latest version of Blackboard. It has been redesigned from the ground up and features a modern, mobile-first design and intuitive navigation. Features include:
- A responsive mobile friendly experience. Move from phone to tablet to computer seamlessly.
- Improved accessibility.
- Consistent navigation for students across courses.
- Progress tracking.
- Streamlined grading.
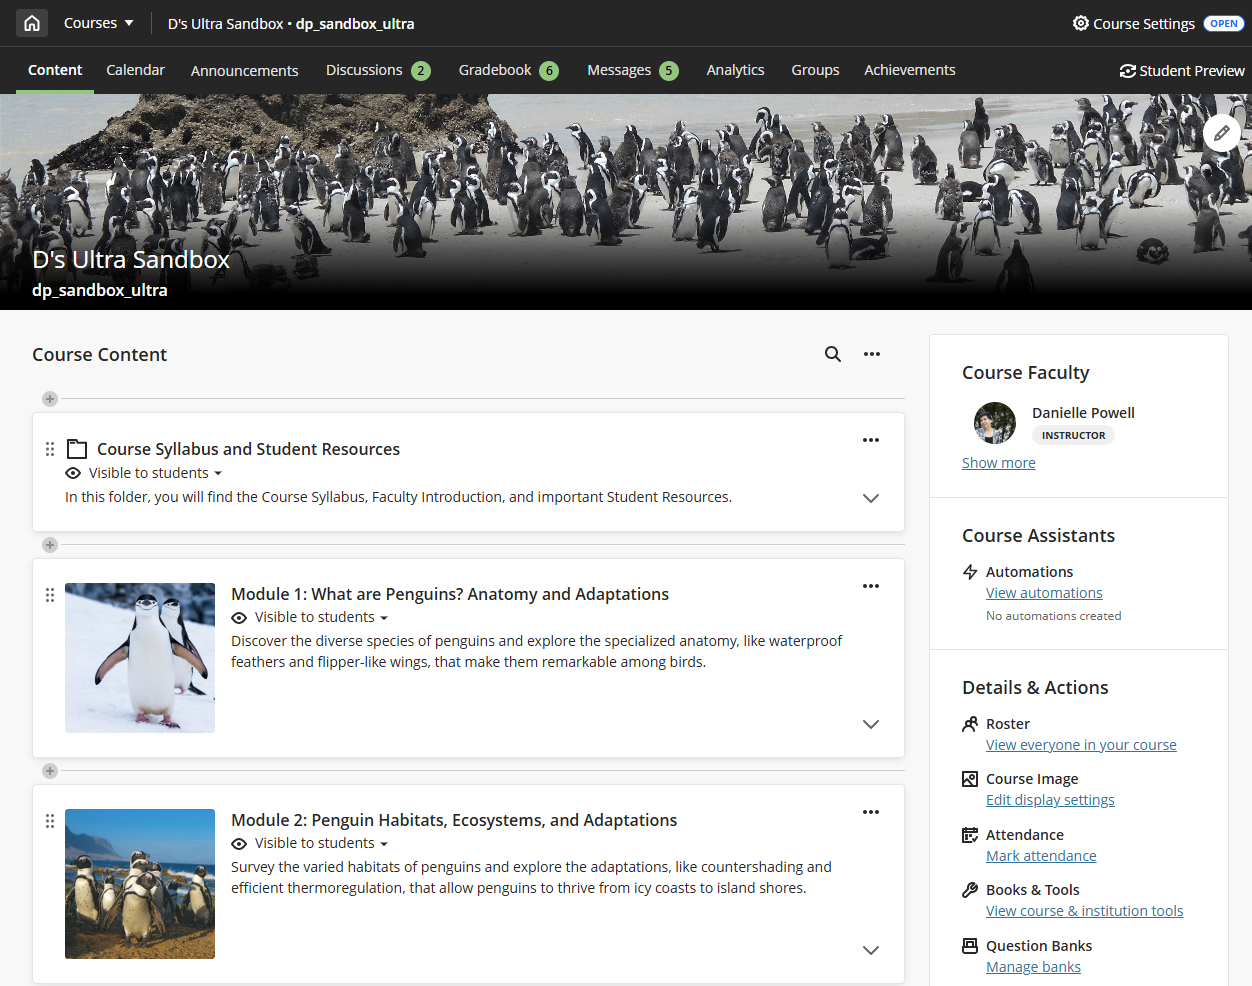
Blackboard releases new features and improvements every month! Some of these features are large updates with completely new functionality while others are small enhancements. Check out our roundup of new features we think you'll enjoy: What's New in Ultra?
Self-Paced Course: Faculty Training for Ultra
The Self-Paced Course: Faculty Training for Ultra, is a short self-paced tutorial to introduce you to creating content for your Blackboard Ultra course. It should take approximately one hour or less to complete.
To enroll in the course, to go Enroll in the Self-Paced Course: Faculty Training for Ultra.
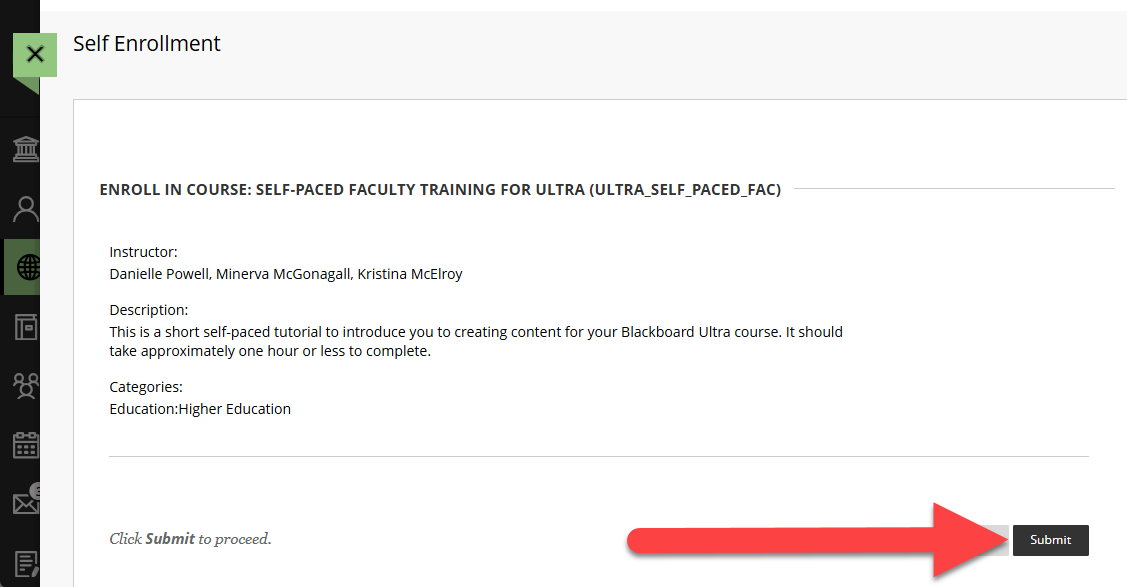
You will see the option to self enroll in the course. Click Submit to enroll in the course.
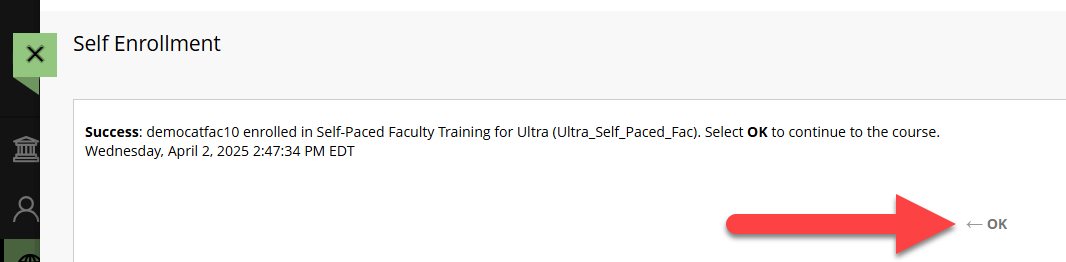
You will then see a confirmation message. Click OK to continue to the course.
After enrolling in the course you may access it at any time from your Courses page.
Create Course Content
Your course creation starts on the Course Content page. Here you can create Learning Modules or Folders in which to organize your content, copy content from a previous course, upload content from your computer, link to online resources, etc.
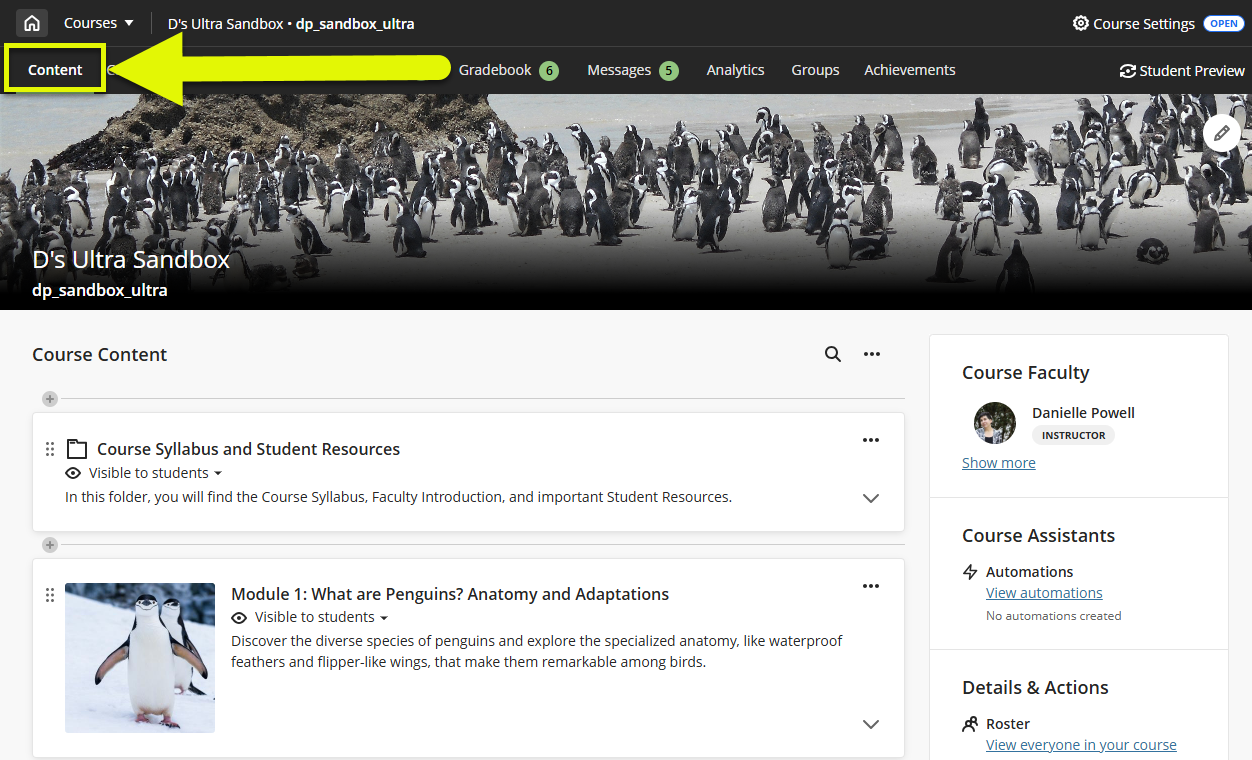
When you design your course, we recommend that your content be “chunked” into discrete, manageable units of learning. This could be by week, unit, topic, or whatever will help to present materials in a meaningful and helpful way.
Upload Your Syllabus
Upload your syllabus to your course so that your students can easily access it. You should upload your syllabus as a Word file (DOC, DOCX) or PDF.
Before you upload your syllabus, check to make sure that it is accessible to all users:
- Use built-in heading styles and ensure that your headings follow a logical structure.
- Use the built-in formatting tools to add bulleted and numbered lists.
- Avoid using tables. If you must use tables, create simple tables with no more than one header row and one header column.
- Create descriptive links to online content.
- Use the Microsoft Accessibility Checker to ensure that your file is accessible.
For more information and links to additional resources, refer to the Accessibility Checklist support article.
In your Course Content area, click on your Course Syllabus and Student Resources folder to open it. Hover your mouse over the location in the folder where you wish to upload your Syllabus. A purple line with a plus sign (+) will appear. Click on the plus sign to open a menu and select Upload.
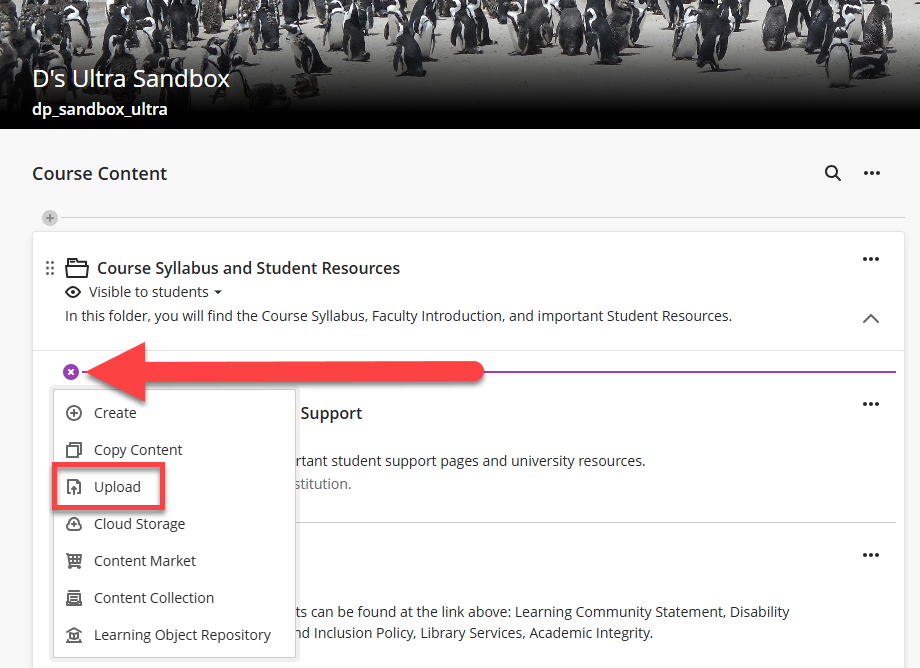
Locate the file on your computer and select it to upload. You will then be prompted to edit your file options. You may edit the file's display name and decide how you would like students to interact with your document: view and download, view only, or download only.
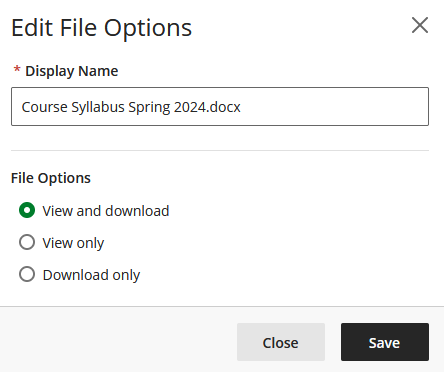
Click Save to save your changes.
By default, any content you upload to your course will be Hidden from students. To make your syllabus visible, click on the visibility setting to open a menu. Then select Visible to students.
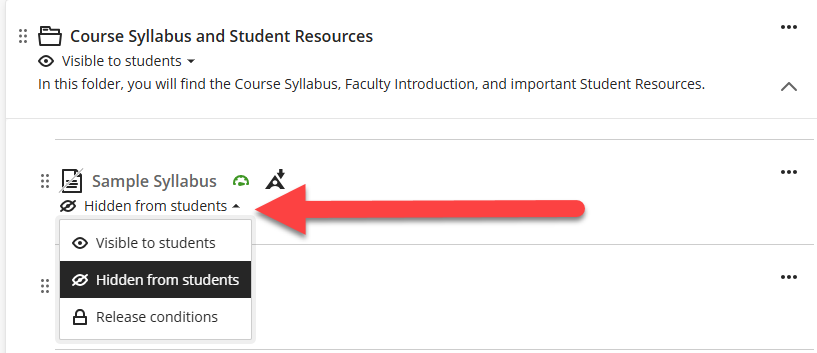
For more information on updating the visibility of your course content, refer to the Setting Content Visibility and Release Conditions support article.
Organize Your Content in Learning Modules or Folders
When you design your course, we recommend that your content be “chunked” into discrete, manageable units of learning. This could be by week, unit, topic, content type, or whatever will help to present materials in a meaningful and helpful way.
While Learning Modules and Folders may look and function similarly, they serve different purposes.
- Learning Modules are designed to be the main course structure (ex to organize your content in weeks, units, or topics) and guide students through course content in a clear sequence.
- Folders are designed to organize course content within a structure.
You can add Folders within Learning Modules to group related content, but you cannot place a Learning Module inside a Folder. This is because Learning Modules are meant to stay at the top level so that students can easily see and follow the course flow.
For more information refer to the Organize Your Content in Learning Modules or Folders support page.
Create Learning Modules
To create a Learning Module, click on the + button anywhere on your Course Content page. Select Create and then select Learning Module.
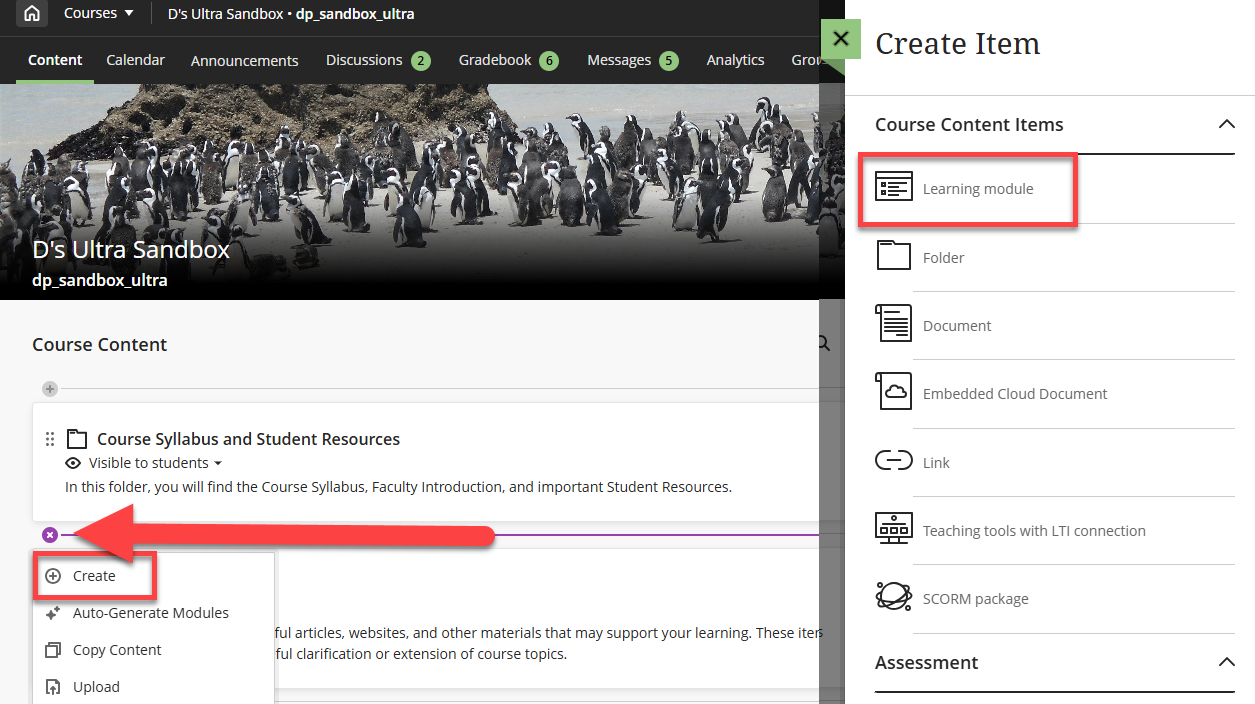
Give your Learning Module a name and decide whether to make it visible to students. You have the option to write a short text-only description (maximum 750 characters) and decide whether to force sequence. You may also personalize your module by uploading an image or using a stock image from Unsplash. Click Save to save your changes.
Once you create a Learning Module, click on it to open. Then click the + button to add content within it. You may add folders, Ultra Documents, assignments, tests, discussions, files, links, and more.
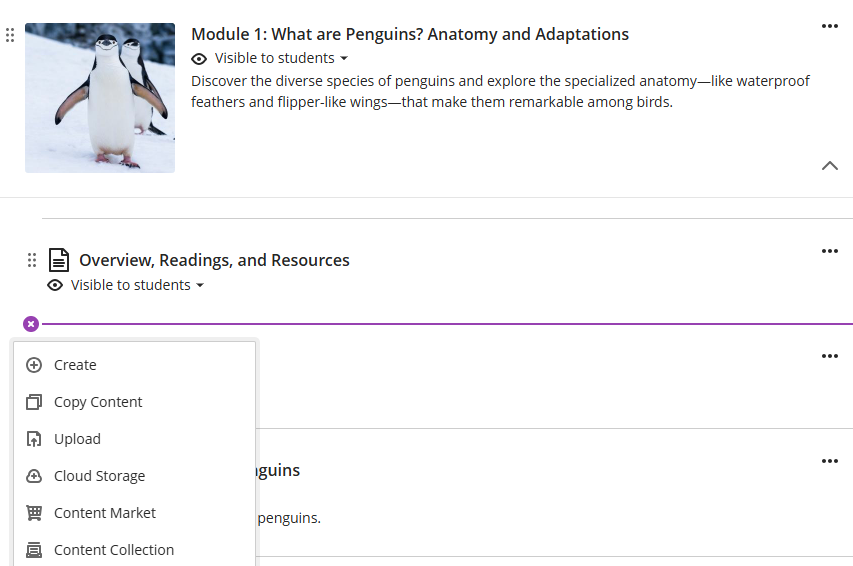
For more information refer to the Organize Your Content in Learning Modules or Folders support page.
Create Folders
To create a Folder, click on the + button anywhere on your Course Content page, within a Learning Module, or within another Folder. Select Create and then select Folder.
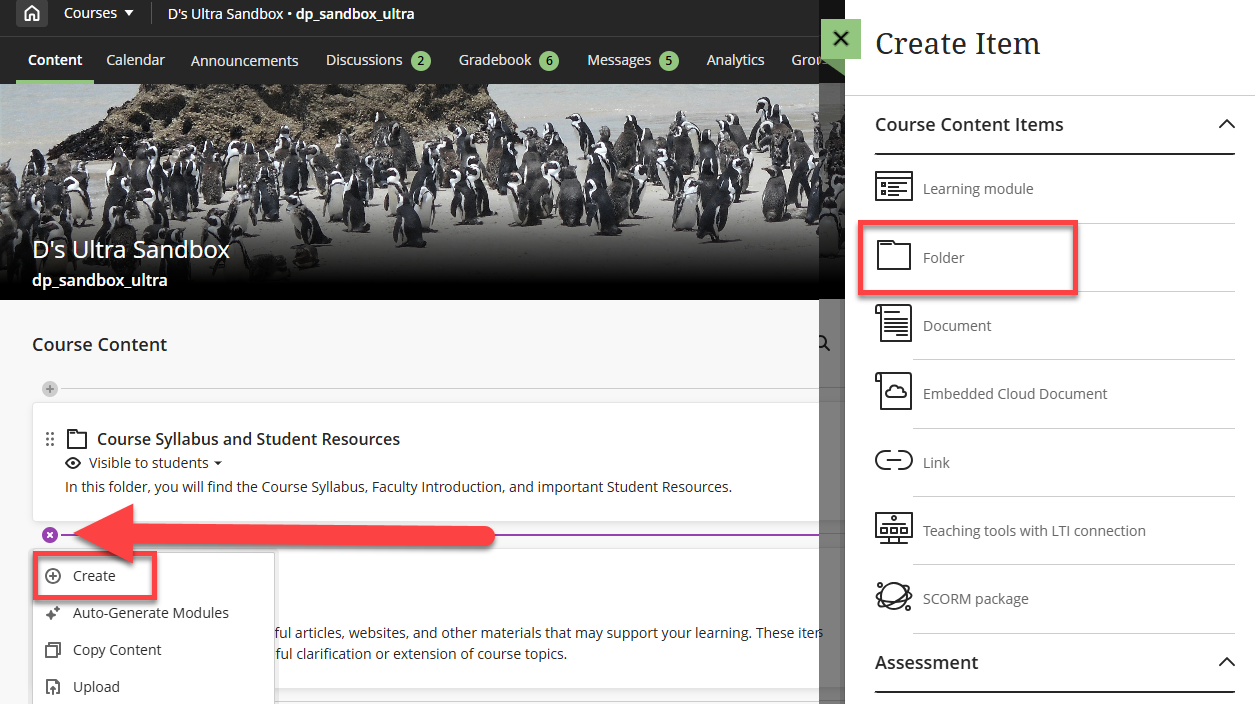
Give your Folder a name, decide whether to make it visible to students, and provide an optional text-based description (maximum 750 characters). Click Save to save your changes.
Once you create a folder, click on it to open. Then click the + button to add content within it. You may add additional folders, Ultra Documents, assignments, tests, discussions, files, links, and more.
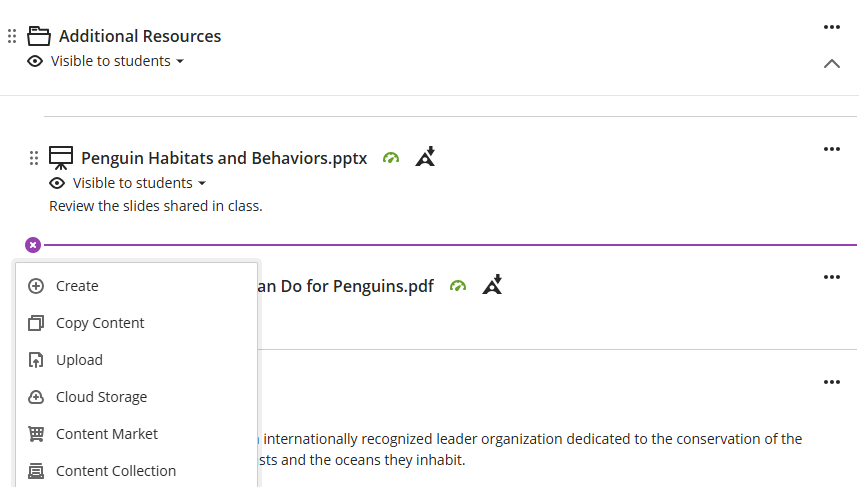
For more information refer to the Organize Your Content in Learning Modules or Folders support page.
Create Ultra Documents
An Ultra Document lets you present a variety of content—text, images, video, attachments, links, Knowledge Checks, and more—all in one place. You can use it to build rich course materials by combining multiple visual and textual elements into a single, streamlined item. Ultra Documents are built with flexible block types, giving you control over layout, design, and how your content is displayed.
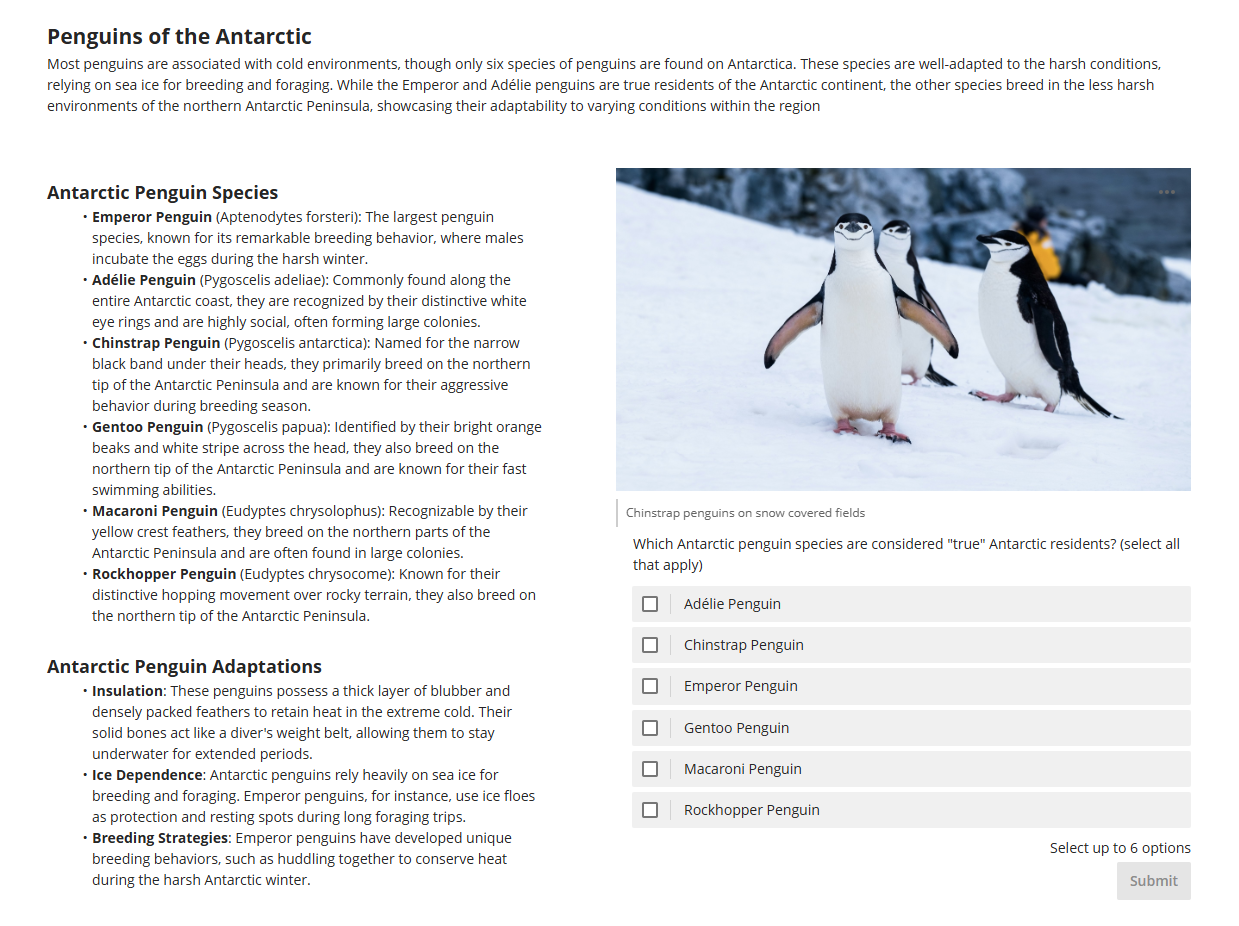
To create an Ultra Document, click on the + button anywhere on your Course Content page, within a Learning Module, or within a Folder. Select Create and then select Document.
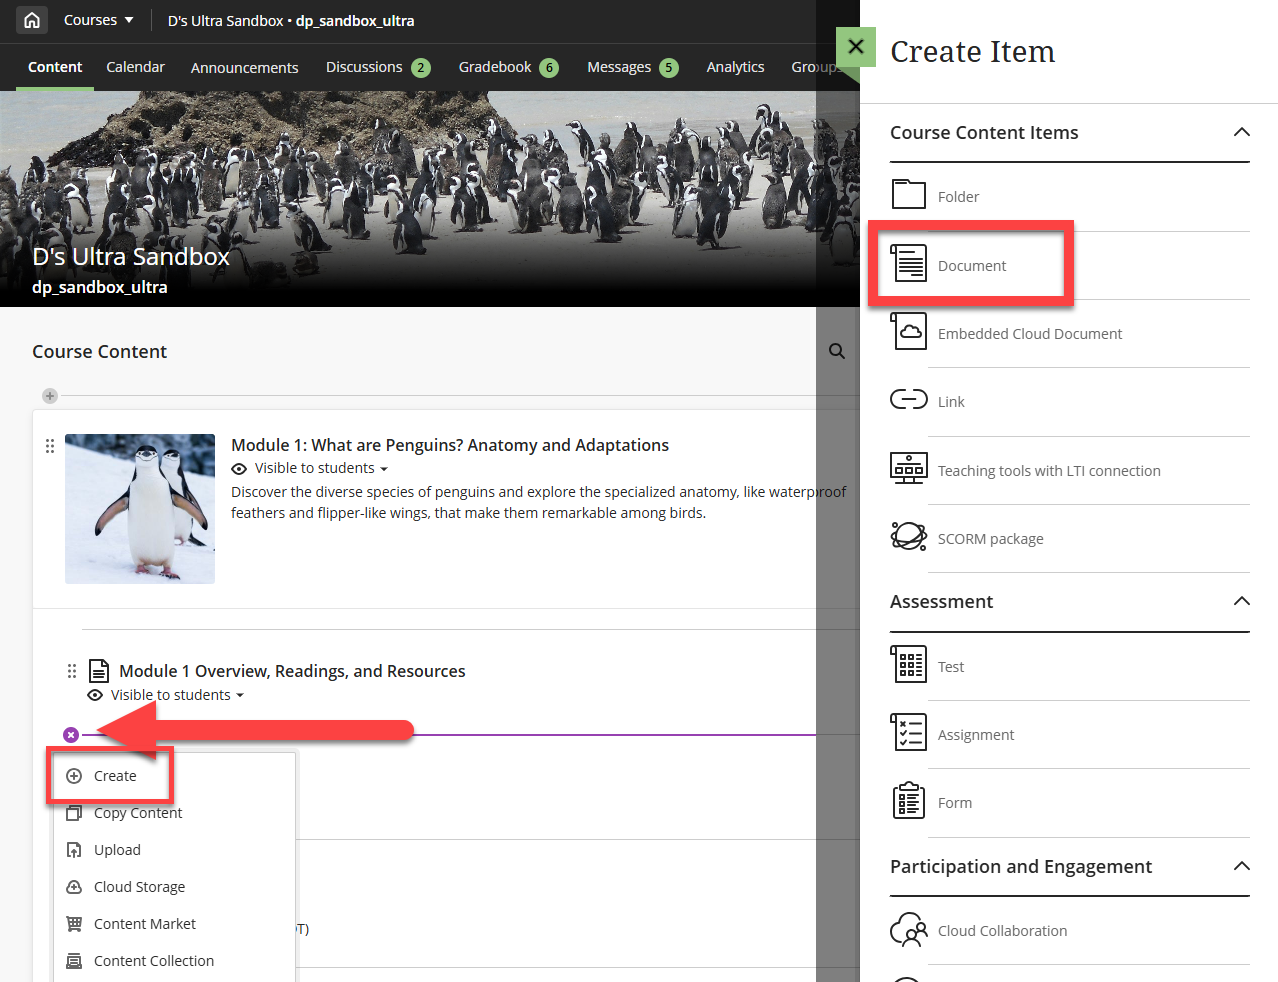
Give your Ultra Document a name and set the visibility status. Next, select the type of content block you wish to add. Content blocks allow you to design Ultra Documents by adding different types of content.
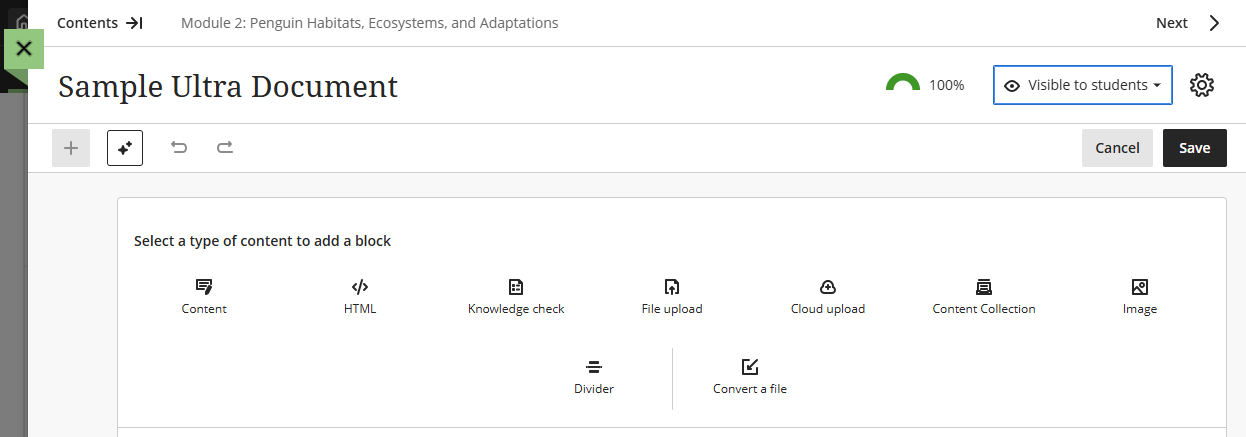
There are several different block types to choose from, but the most frequently used are Content, Image, File Upload, and Knowledge Check.
- Content block: The Content block is the most common (and familiar) block type. A Content block utilizes the the text/content editor to add and format text, links, file attachments, images, media, etc. This is most similar to an Item in Original courses.
- Image block: The Image block allows you to upload images from your computer, add royalty-free images from Unsplash, or use AI to generate an image. You will have the options to change the aspect ratio and reposition the image, add a caption, and add alt text or mark the image as decorative.
- File Upload block: The File Upload block allows you to upload a file from your computer. You may select whether your file may be view only, download, or have the ability for students to both view and download. Do not upload media files (ex mp3, mp4, mov) via this method. Instead, create a Content block and use the text/content editor to add media content.
- Knowledge Check block: The Knowledge Check block allows you to create multiple choice and multiple answer questions for students to engage with and receive immediate feedback. Watch the Knowledge Checks in Blackboard Documents video tutorial for more information.
If you create multiple blocks, you can create a more visually appealing layout by resizing and moving them into columns and rows.
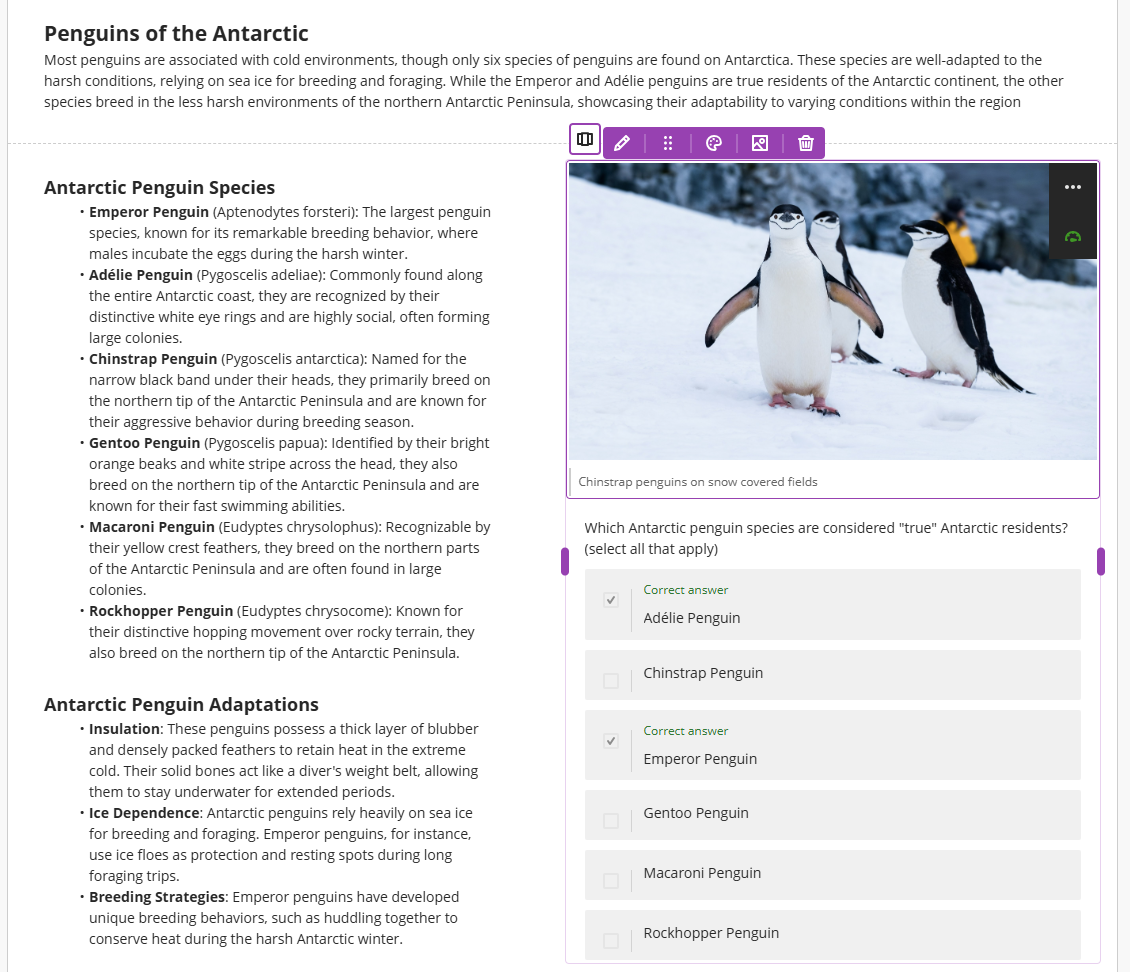
For more information about Ultra Documents, including all block types, block styling options, and how to create a document layout, refer to the Create and Manage Ultra Documents support article.
Upload Files
You may upload files directly into your Course Content area or into a Learning Module or Folder. When you upload a file you have the option to give your students viewing and downloading privileges.
Supported file types include:
- PDF Files
- Documents (DOC, DOCX)
- Presentations (PPT, PPTX)
- Spreadsheets (XLS, XLSX)
- Text files (RTF, TXT)
- ZIP packages
- Most image types
To upload a file, click the + button and select Upload.
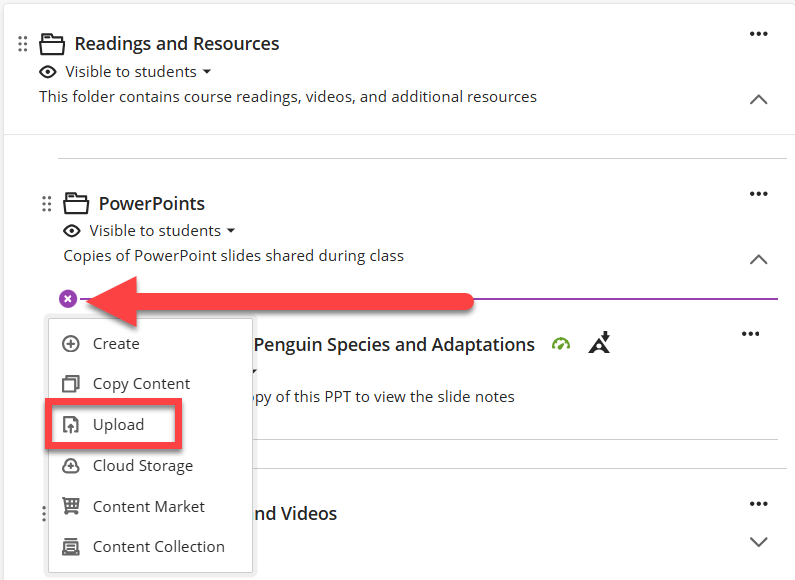
Select your file. You will then have the option to edit the file's Display Name and decide how students can interact with the file (view only, download only, or view and download).
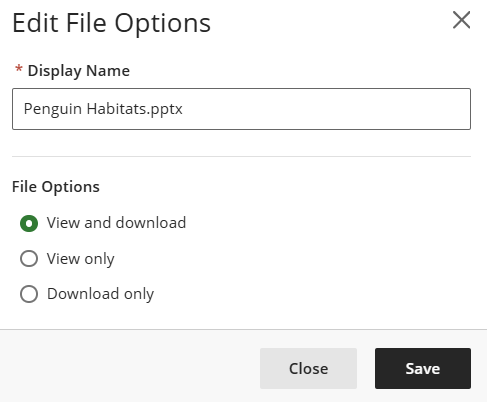
When you upload files and folders to your course these items are hidden from students by default. You may update the visibility of the file individually or use the Batch Edit tool to update multiple items all at once.
For more information, refer to the Create and Manage Course Content: Upload Files support page.
Files: Best Practices
- Use Ally to Improve Your File's Accessibility: When you upload files into your course Ally will scan the content and produce an accessibility score for each file. In addition to your accessibility score, Ally provides information to help you improve your content and overall accessibility. Refer to the Create Accessible Course Content (Blackboard Ally for Instructors) support article for more information and detailed instructions.
- Scanned Documents: When you scan a text, such as a book, journal article, newspaper article, etc., the resulting document is an image of the text. These scanned PDFs are considered completely inaccessible to all users. Additionally, scanning text, journals, etc. and uploading them to your myLesley course, may be a violation of copyright and fair use. For more information and resources, refer to Accessibility Checklist: Don't use scanned PDFs.
- Media (audio and video files): Do not upload media files (ex mp3, mp4, mov) directly into the Course Content area or within a Learning Module or Folder! For detailed information and instructions for sharing media in myLesley, please refer to the Managing Media in myLesley Support Article.
- Link to Online Content: Create links to content that you find online (including journal articles and library resources). This helps to drive additional traffic to the site and show that the content is being used. Additionally, downloading files, journal articles, and library resources and then uploading them to your course may be a violation of copyright. Need help finding online resources? Have questions about fair use and copyright? Reach out to a librarian: asklib@lesley.edu!
Link to Online Content
To create link, click on the + button anywhere on your Course Content page, within a Learning Module, or within a Folder. Select Create and then select Link.
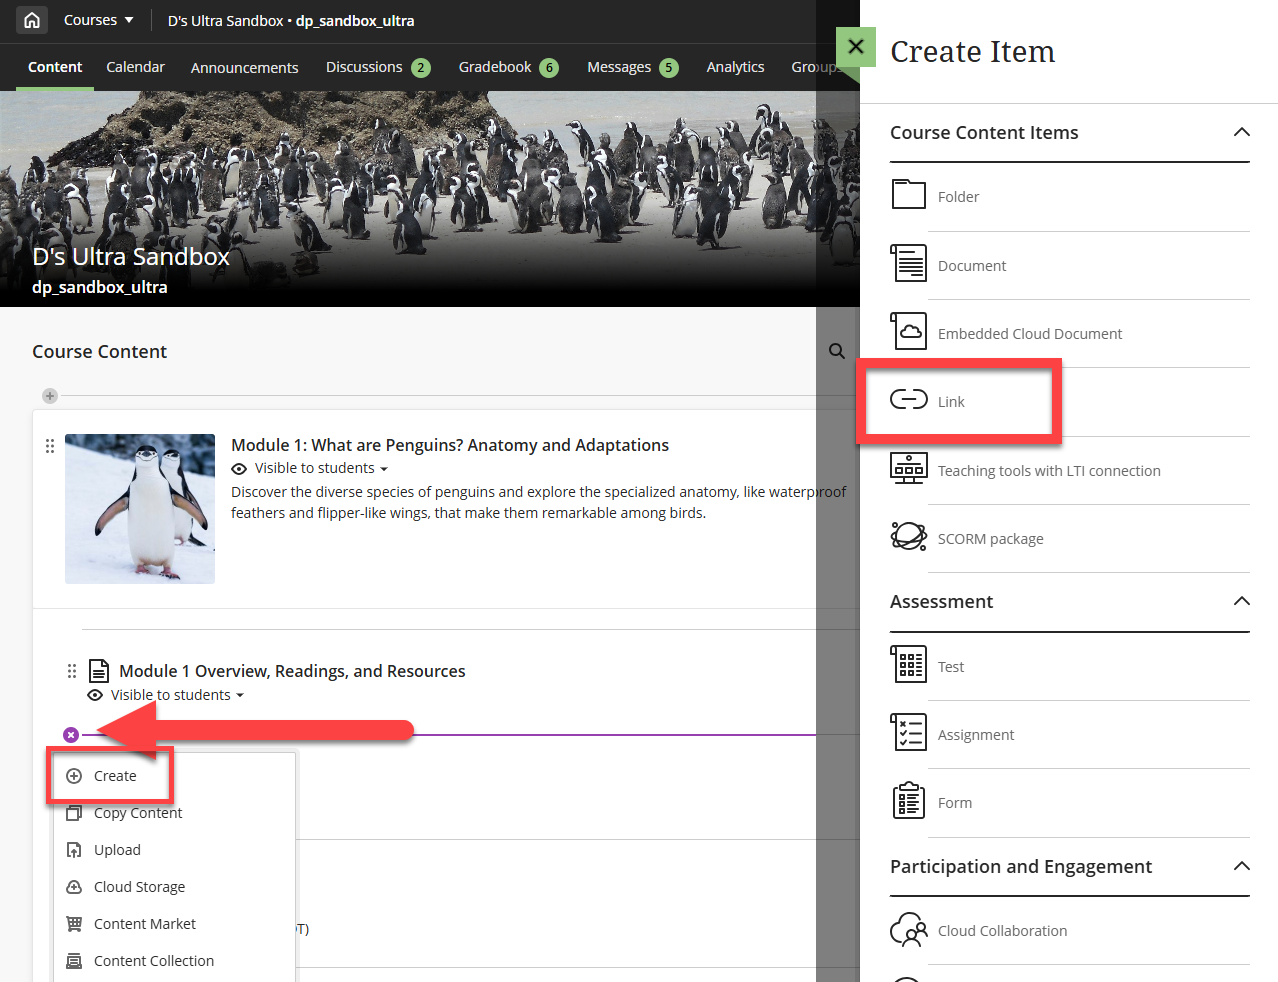
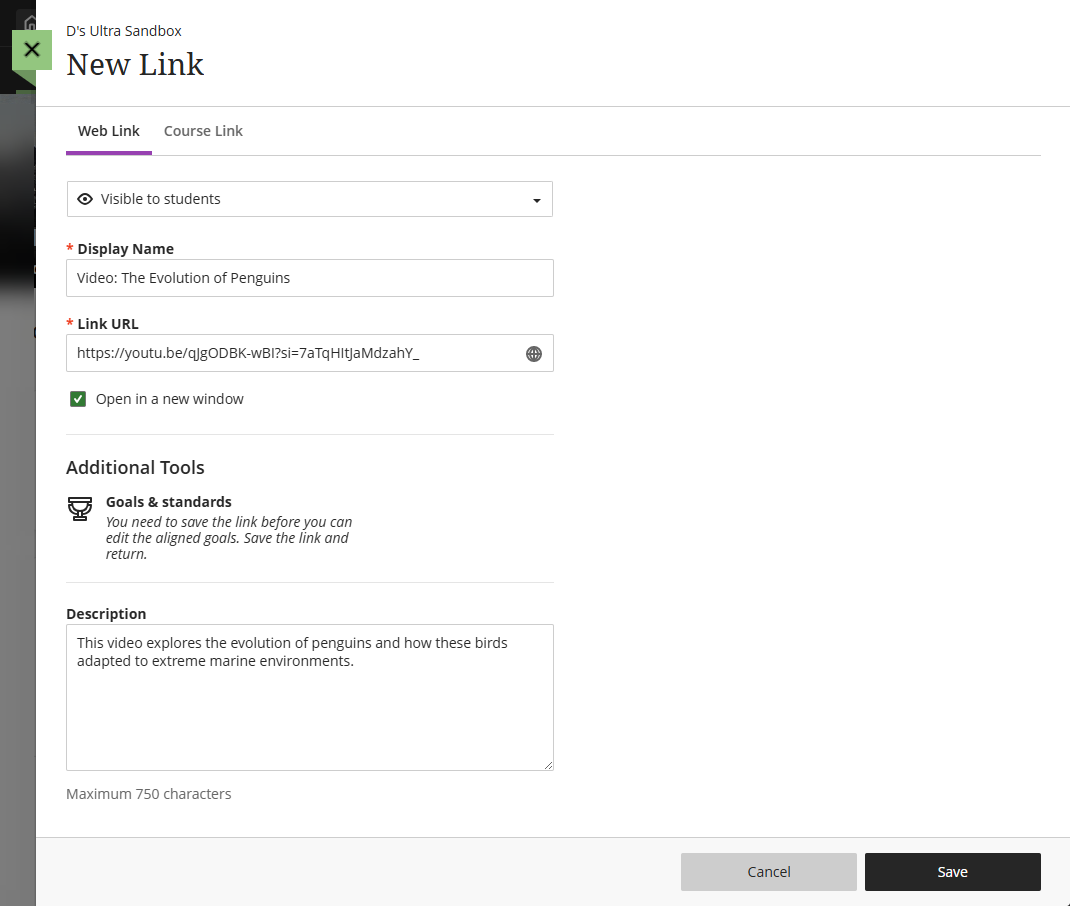
Give your link a Display Name (ex the title of the website or article), enter the Link URL, and enter an (optional) description. Click Save to save your changes.
In order to link to content from the Lesley Library, you will need to use a permalink. This permalink will contain the Library's proxy prefix, so materials can be accessed off campus. For information about linking to Library resources, refer to the How to Link to Library Content Guide.Manage Course Content Items (Edit, Move, and Delete Content)
Blackboard Ultra makes it easy to edit and manage your course content. You can update your content's visibility settings, move and reorder content in your course, edit or delete your content, and more. Refer to the Edit and Manage Course Content Items support page for more information and detailed instructions.
Use Blackboard Ally to Review and Improve the Accessibility of Your Course Content
Blackboard Ally is a tool within myLesley that helps improve the usability and accessibility of your course content. Ally automatically scans your course and takes steps to enhance accessibility.
Ally can:
- Generate alternative formats of files that students can download.
- Provide accessibility scores for your course content.
- Offer information and guidance to help you improve your content and overall accessibility.
Refer to the Create Accessible Course Content (Blackboard Ally for Instructors) support article for more information and detailed instructions.
Create and Share Media Content
The best way to share media (audio and video) with your students will depend on whether it is media you have created or media that others have created.
Media You Created (Kaltura Media)
To share media you have created, including recorded lectures or narrated presentations, upload your media to myLesley via Kaltura Media.
Kaltura provides a lot of advantages, both to you and your students, including:
- Compatibility: Kaltura will accept a large amount of media types and automatically convert it to versions your students can view, regardless of their device.
- Accessibility: Kaltura will automatically caption your media content. Accurate captioning of audio and video content ensures that people who are Deaf and hard of hearing can understand your content. Additionally, captions are very useful to non-native English speakers, viewers watching in a sound-sensitive environment such as a library, can help viewers with learning disabilities or attention deficits maintain concentration, and can help all learners improve comprehension.
- File Size: Students do not have to download content. Instead, the media is hosted on Kaltura's servers and streams through myLesley. Additionally, uploading your media to Kaltura does not impact your overall course file size (all courses have a 5 GB data limit and communities have a 50 MB data limit).
- Privacy and Security: Kaltura content cannot be downloaded by anyone who is not the owner, nor can they be shared on other websites.
To add Kaltura Media content directly to your Course Content page (or within a Learning Module or Folder), click the + button and select Content Market.
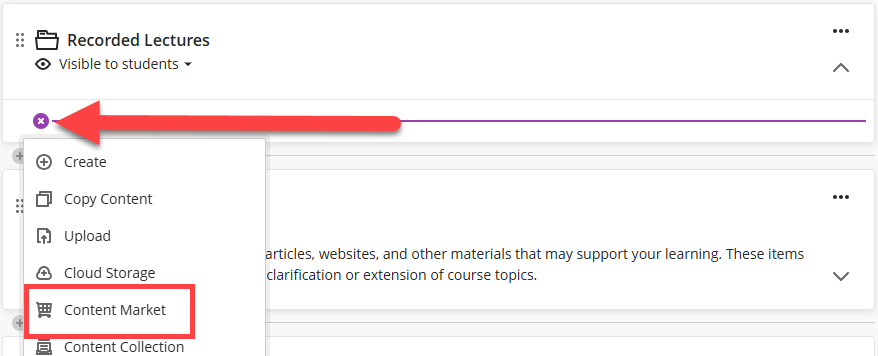
Or, you may add Kaltura Media directly into an Ultra Document, Discussion, Assignment, or anywhere you see the Text/Content Editor. Locate the place where you want to add content and click the Insert Content (+) button in the content editor. This will open a menu. Select Content Market.
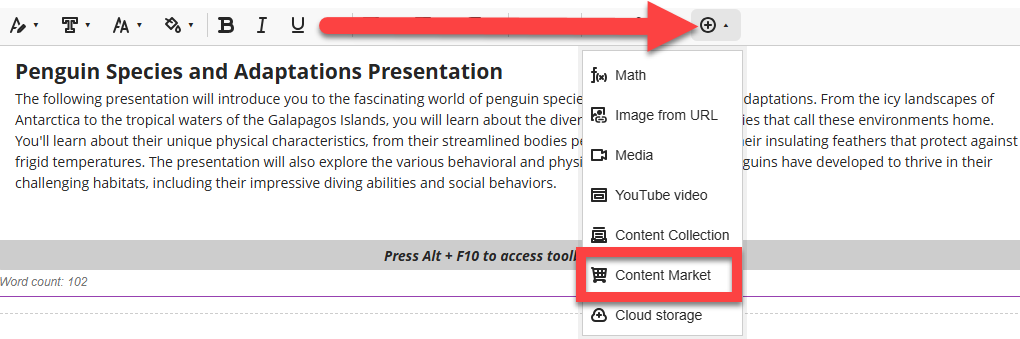
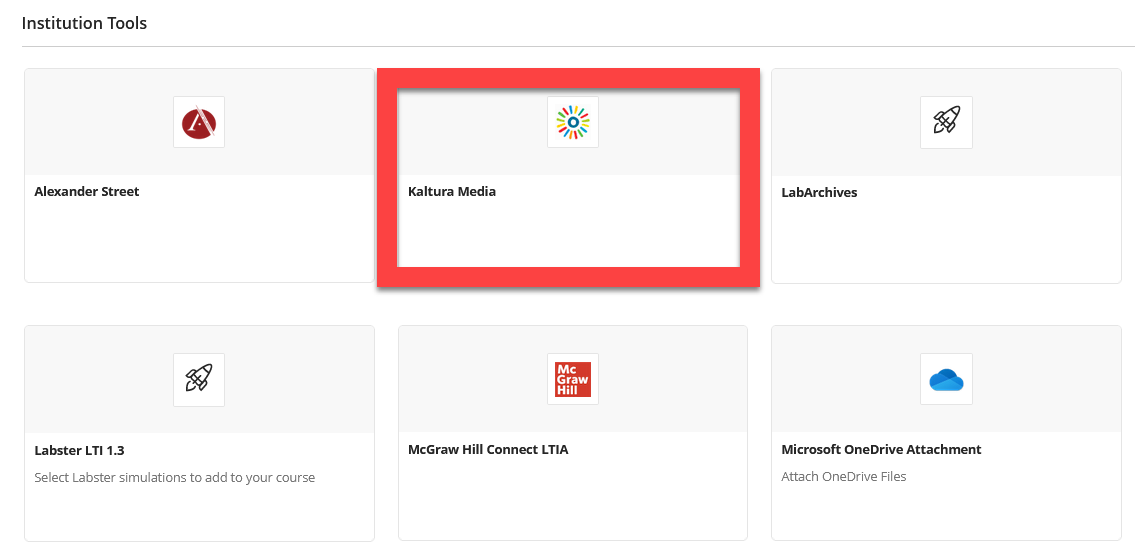
This will bring you into the Content Market. Scroll down to Institution Tools and select Kaltura Media.
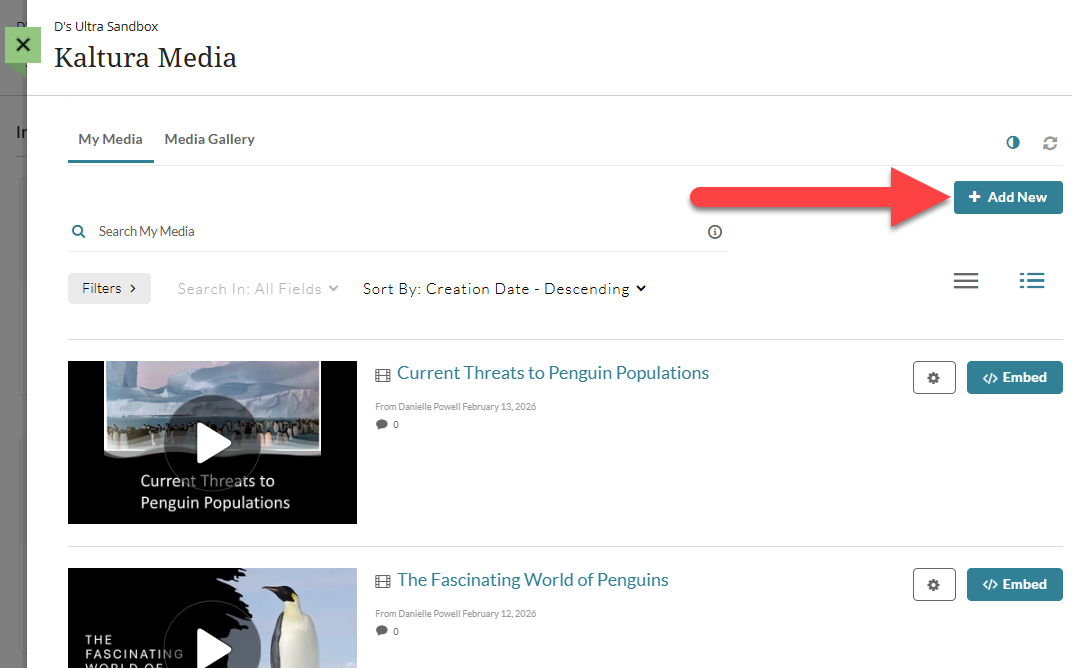
This will take you to your Kaltura My Media, where all of your Kaltura media is stored. From here, you may upload new media, embed media you uploaded previously, or record new media.
For more information and detailed instructions, refer to:
- Upload media to myLesley via Kaltura Media
- Record a Presentation and Share it in myLesley via Kaltura Media
- Use Kaltura Media Express Recorder to quickly record your webcam or screen
- Kaltura Media: Captioning Video Content
Media Created by Others
If you are not the creator of the media or do not have permissions from the publisher, you cannot upload the media into your course. This includes copies of DVDs that you have purchased. If the content exists on the web (ex YouTube, Vimeo, PBS, library media databases), you may either link to it, or embed it anywhere you see the text/content editor (ex Ultra Documents, Assignments, Discussions, etc.).
Have questions about fair use and copyright? Reach out to a librarian: asklib@lesley.edu!
Manage Your Media in myLesley
For more information about managing your media content in myLesley, refer to the Managing Media in myLesley support article.
Student Work and Participation
You can create your Assignments, Tests, Discussions, and Journals in the Course Content area, right alongside other content. This enables students to access their course content and submit their work all in the same place. When you create Assignments and Tests, a Gradebook item is created automatically. If you set your Discussions and Journals to be graded, this will also create a Gradebook item.
Create Assignments
You can easily create Assignments alongside other content in your course, allowing students to easily find and submit their work. Once students submit their Assignment, you may review their submissions, grade, and provide feedback.
To create an Assignment, click on the + button anywhere on your Course Content page, within a Learning Module, or within a Folder. Select Create and then select Assignment.
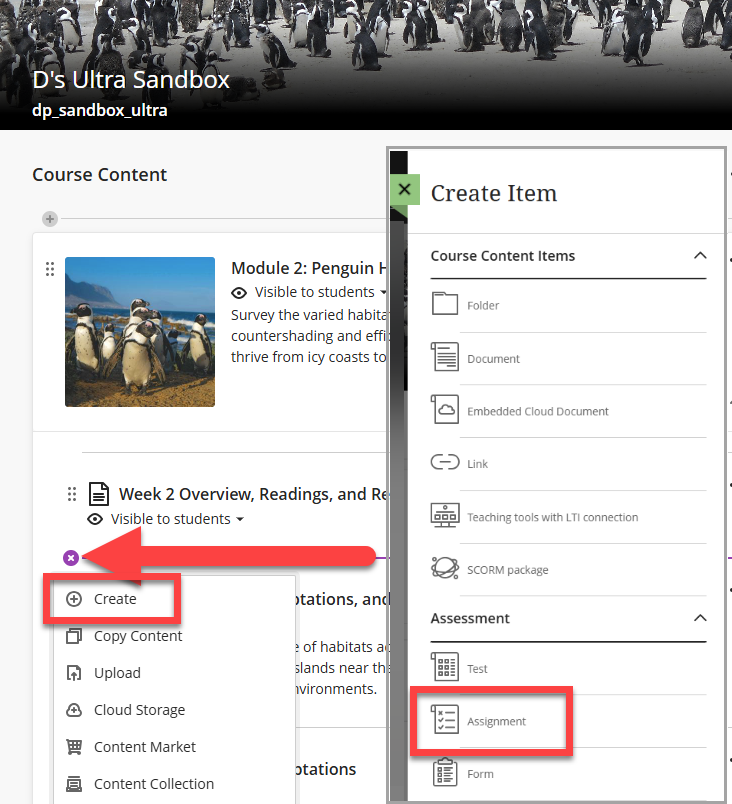
Give your Assignment a name, select the visibility, and enter the instructions. Use the Text/Content Editor to add any relevant links, images, attachments, and more. Click Save to save your instructions.
Next, click the Assignment Settings (gear icon) to add a due date and grading information, specify a submission method and file format, attach a rubric, enter a description (which will appear on the Course Content page), and more.
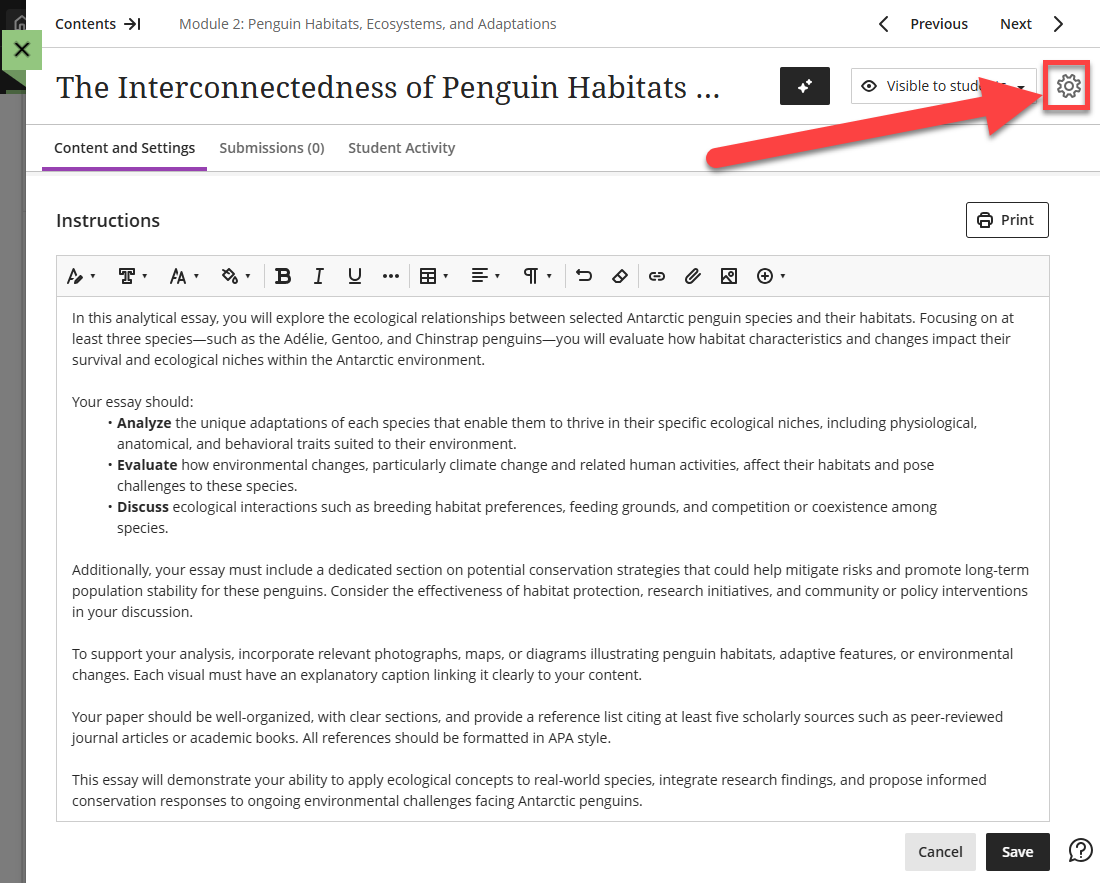
For more information and detailed instructions, refer to the Create and Grade Assignments support article o r watch the Creating Assignments video tutorial.
Create Tests
Ultra Course View allows you to create tests alongside other content in your course. Your students will take their test online and you may then grade your students' test submissions and provide feedback.
To create a Test, click on the + button anywhere on your Course Content page, within a Learning Module, or within a Folder. Select Create and then select Test.
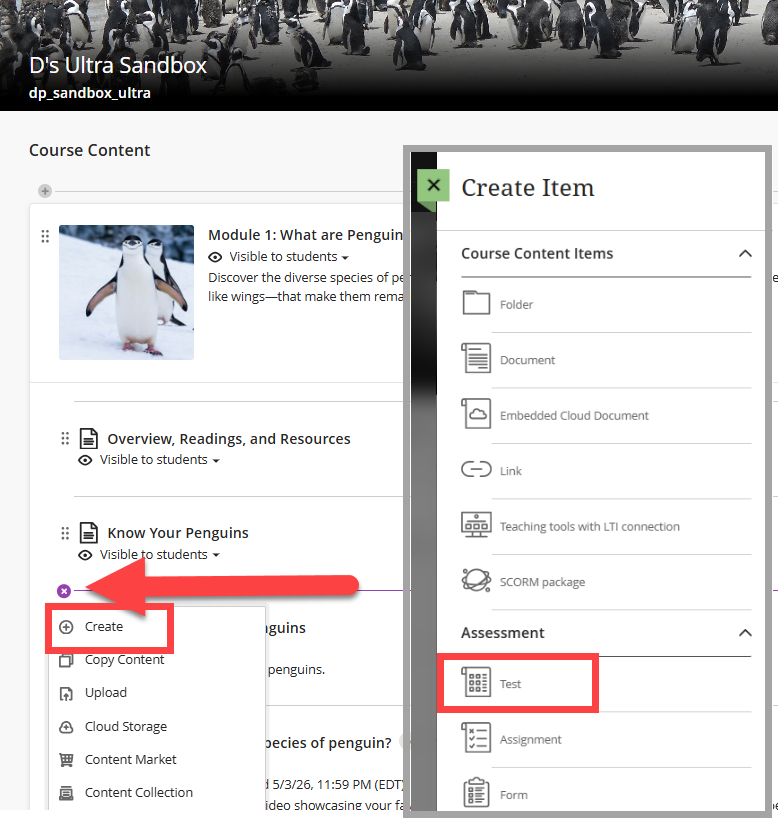
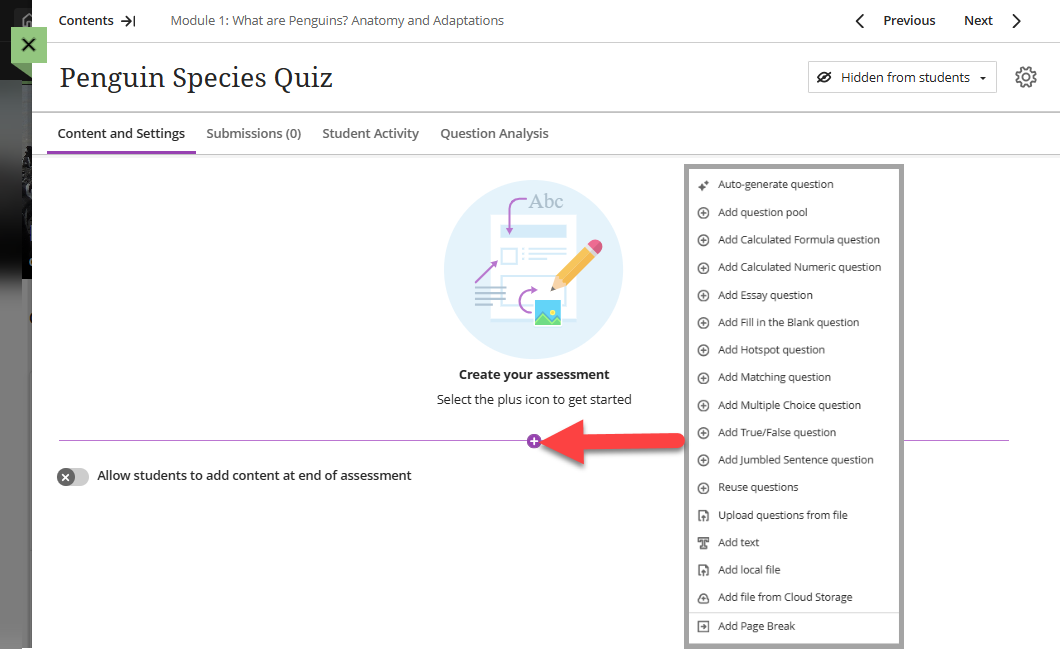
Give your test a name and click the + icon to add test questions. You may choose a question type, add a question pool, upload questions from a file, or reuse questions or content from an existing test. You may also add files and text (ex instructions and additional resources).
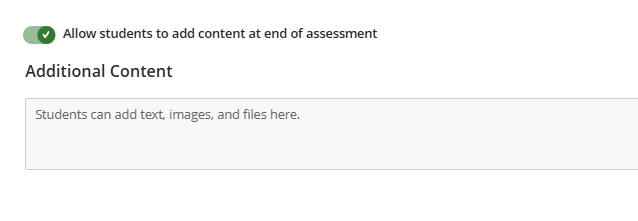
In addition to answering test questions, you may also allow students to add additional content at the end of the assessment, such as additional text or supporting files.
Once you have created your Test, click on the Test Settings (gear icon) to open the Test Settings Panel. Here you can add a due date, set the presentation options, set the number of attempts, post test grades automatically, add a description (which will appear on the Course Content page), and more.
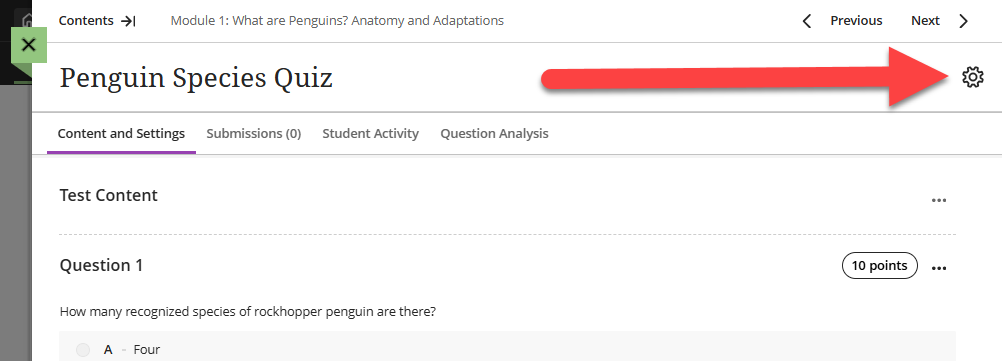
Once you have finished, click Save at the bottom of the Test Settings panel to save your changes.
For more information and detailed instructions, refer to the Create, Manage, and Grade Tests support article or watch the Create a Test tutorial video.
Create Discussions
Blackboard Ultra features robust Discussions that support student engagement and critical thinking. You can create discussions for specific lessons, the course as a whole, and/or create group discussions. You also have the option to grade your discussions and specify due dates and participation requirements.
To create a Discussion, click on the + button anywhere on your Course Content page, within a Learning Module, or within a Folder. Select Create and then select Discussion.
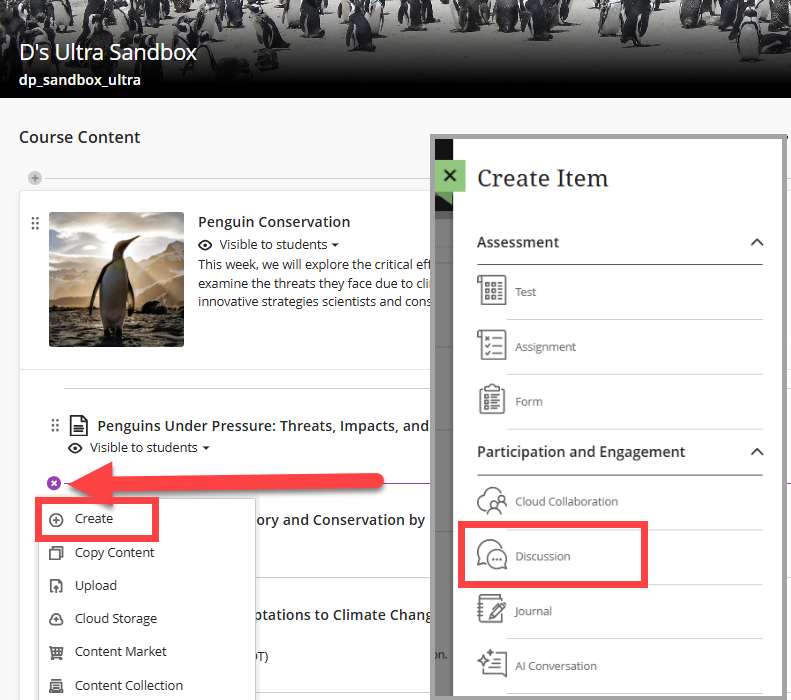
Give your Discussion a name, select the visibility, and enter a prompt. Use the text/content editor to format your text, add links, images, attachments, and more. Click Save to save your discussion prompt.
Next, click on the Discussion Settings (gear icon) to add grading and participation information, prevent students from editing published posts, allow anonymous responses, and more.
Click Save in the Settings panel to save your changes.
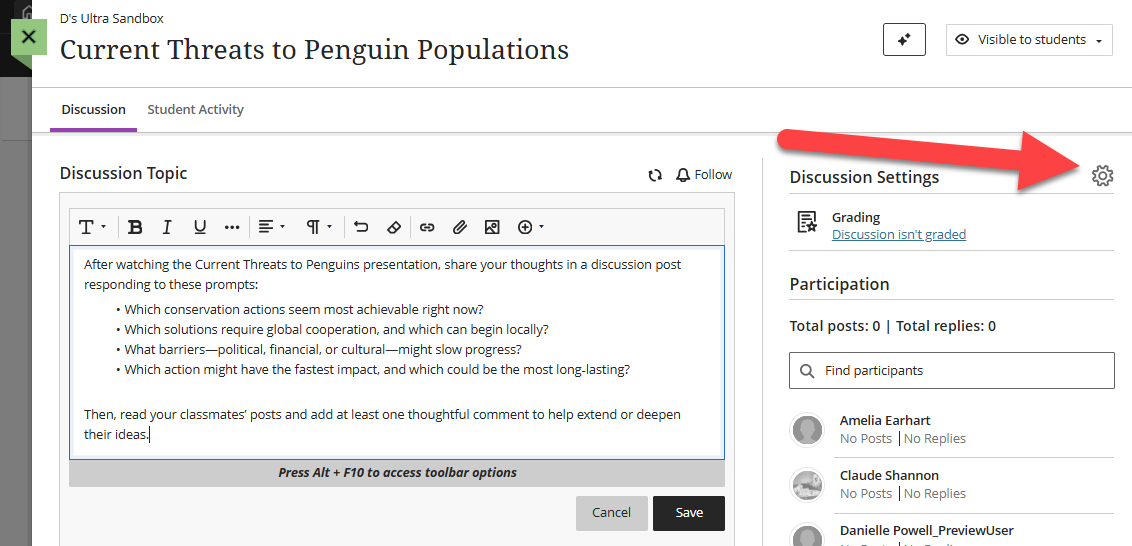
For more information, refer to the Create, Manage, and Grade Discussions support article or watch the Create Discussions video tutorial.
Create a Journal
A journal provides a personal space for students to communicate privately with you. You can use a journal as a self-reflective tool for students to post their opinions, ideas, and concerns or you can use it as a tool for students to analyze course-related materials.
To create a Journal, click on the + button anywhere on your Course Content page, within a Learning Module, or within a Folder. Select Create to open the Create Item panel. In the Participation and Engagement section, select Journal.
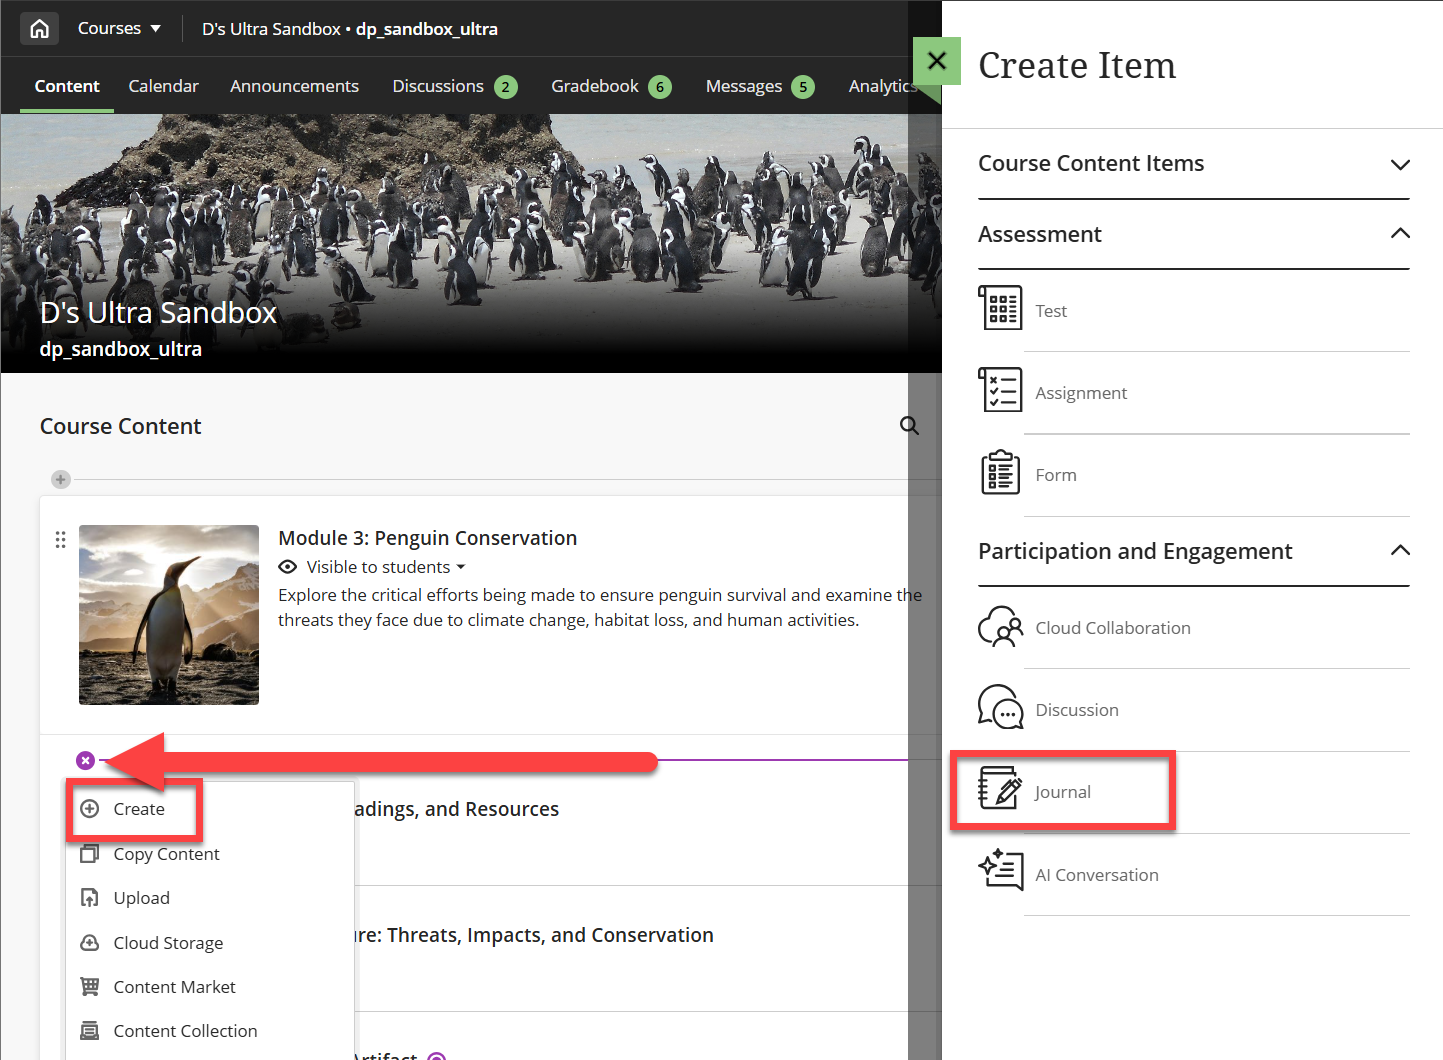
Give your Journal a name, select the visibility and enter a topic. Use the Text/Content Editor to add any relevant links, images, attachments, and more. Click Save to save your topic.
By default, Journals are not graded. Click on the Journal Settings (gear icon) to add grading information, (including a due date, points possible, a grading rubric, etc.), and select whether students may edit or delete their own entries or comments.
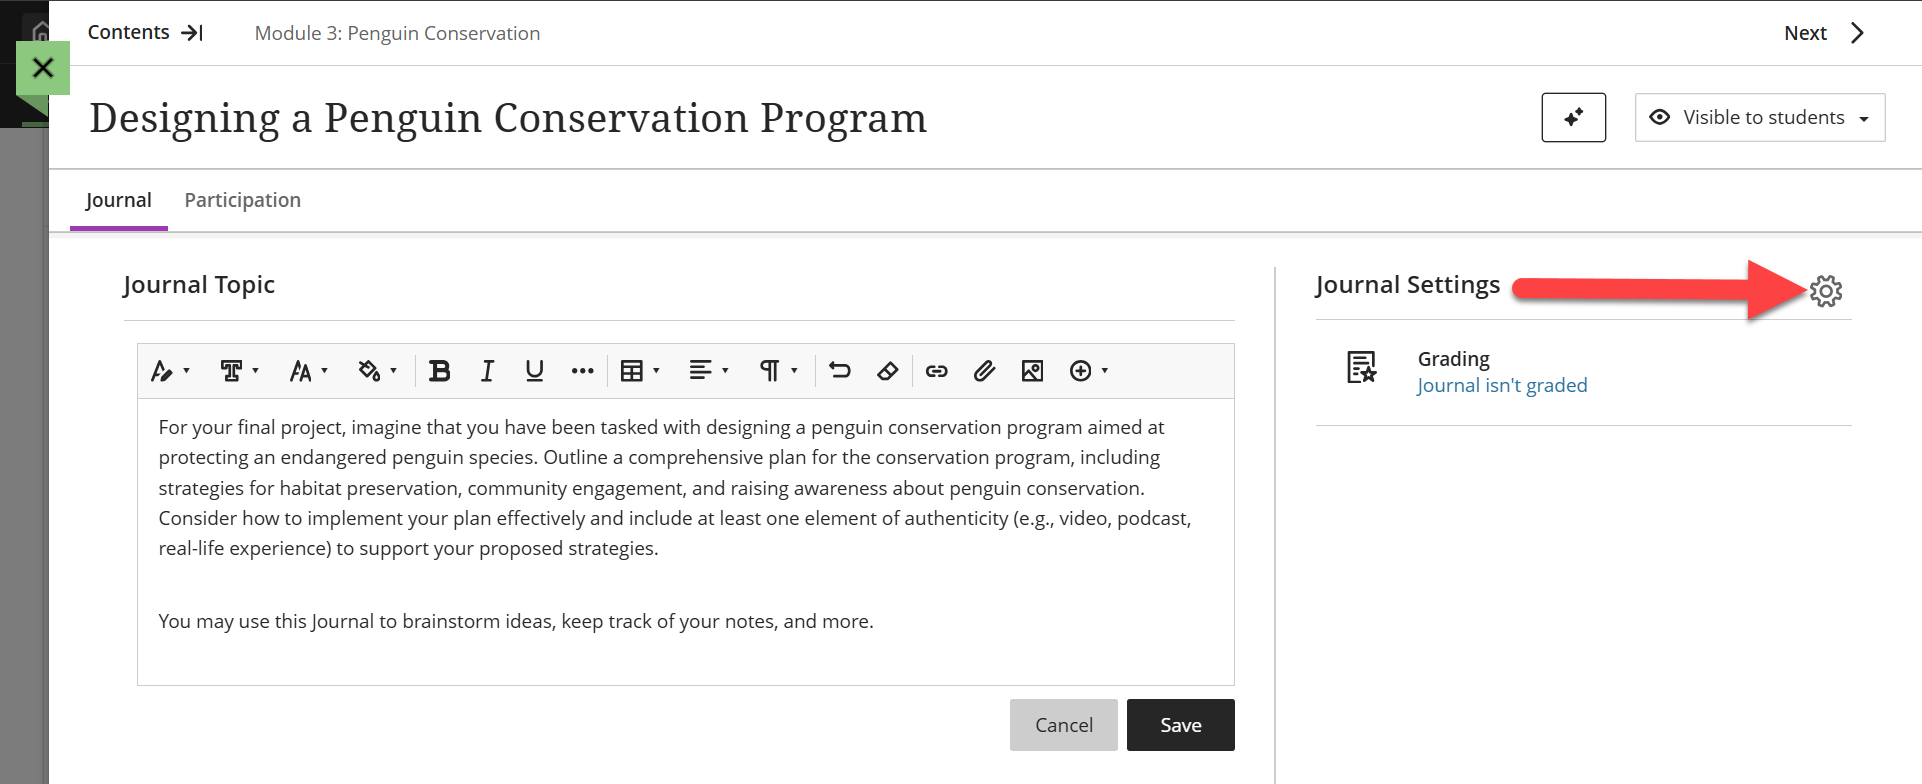
For more information, refer to the Journals support page or watch the Create a Journal tutorial video.
Create and Manage Groups
Group work can be very beneficial for students, teaching them skills such as time management, sharing diverse perspectives, developing approaches to resolving differences, and more. For more information on the benefits of group work, refer to The Derek Bok Center for Teaching and Learning: Group Work.
You can create course groups to support collaboration and peer learning through graded activities such as assignments, tests, and discussions, or for non-graded purposes.
Create Course Groups
To create groups, click on the Groups link in your course menu. This will bring you to the Groups page. Click + New Group Set to create a new group.
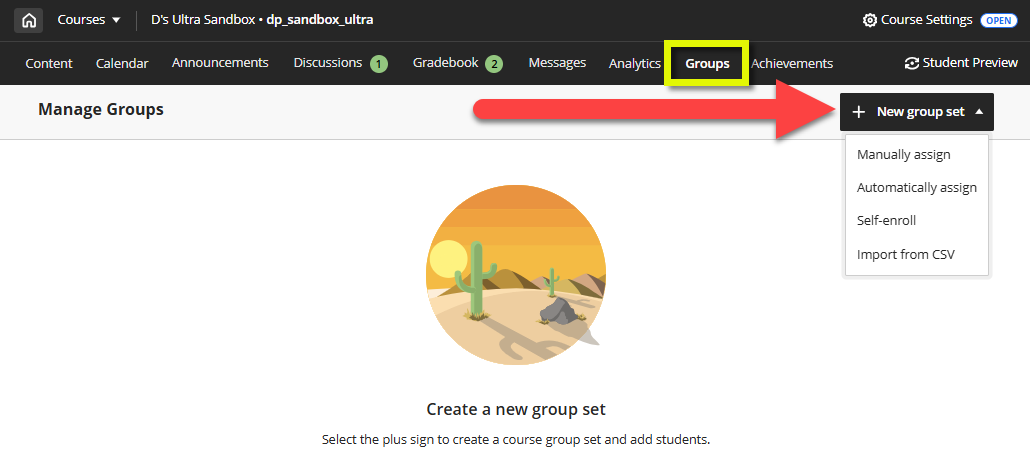
Select how you want to structure your groups and enroll your students. You will have the option to:
- Manually assign: You create groups and manually assign students.
- Automatically assign: You specify the number of students per group and Blackboard randomly assigns students to the groups.
- Self-enroll: You create groups and allow students to enroll in a group of their choosing.
- Import from CSV: Download the provided Group Sets Template to create your groups, then upload the completed file into your course.
As you create your groups you will have the option to edit the group set description, rename groups, manage group membership, message group members, and more.
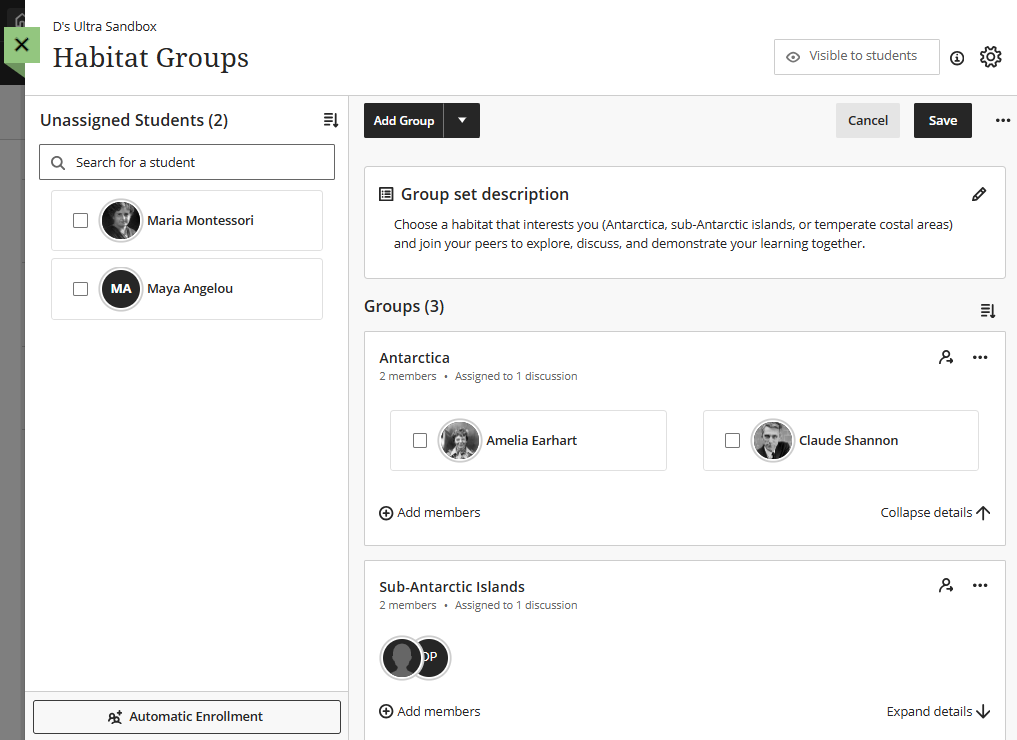
For more information and detailed instructions, refer to the Create and Manage Groups support article.
Assign Group Work
When you create Discussions and Assignments, you have the option to assign them to course groups or create a new group.
Note: You will need to create your groups before assigning group work.
Group Discussions
When you create or edit a Discussion you can assign it to groups, allowing students to work together in a more private setting. You may use Group Discussions for smaller conversations, assign different discussion topics to each group, or simply provide a place for student collaboration on a larger group project. Students will only be able to see and participate in their group's discussion.
You can assign group discussion from your Discussion Settings.
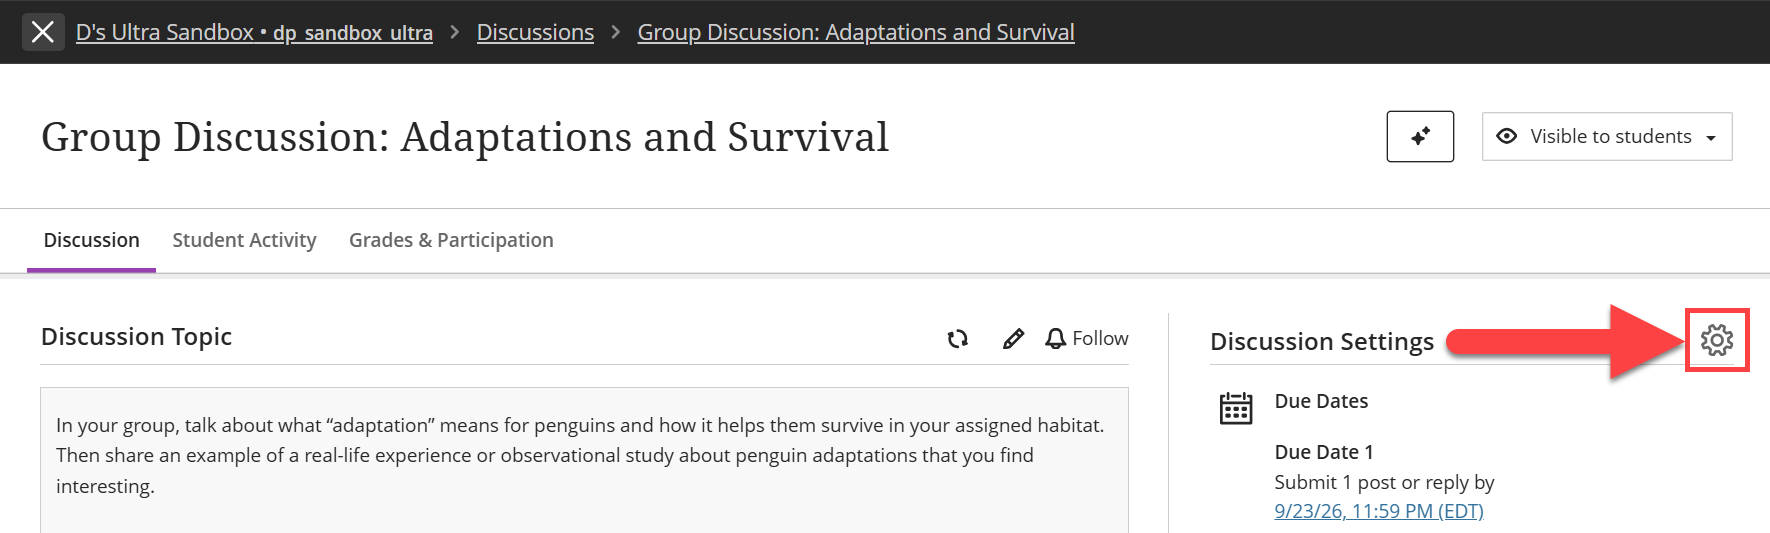
In the Additional Tools section, click the Group Discussion menu and select a group set. Click Save to save your changes.
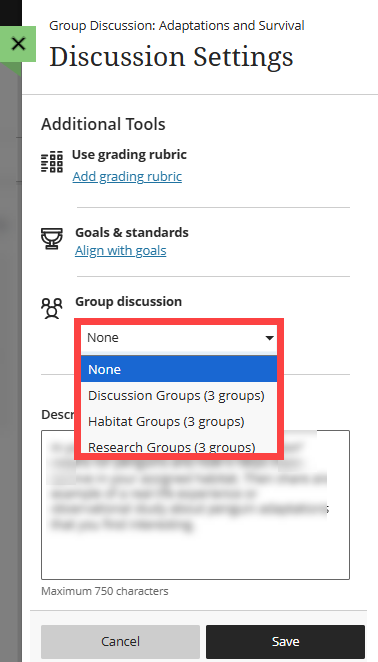
Refer to the Group Discussions support page for more information and detailed instructions.
Group Assignments
When you create or edit an Assignment you can assign it to groups, allowing students to collaborate on an assignment or project.
You can assign group assignment from your Assignment Settings.
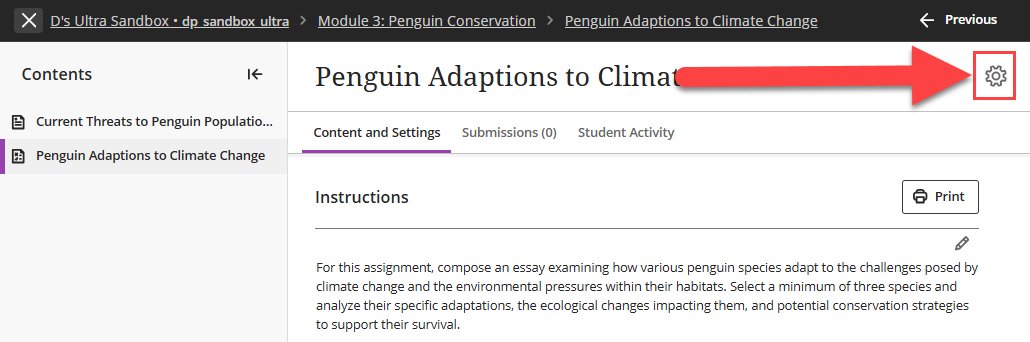
In the Additional Tools section, click the Assigned Groups menu and select a group set. Click Save to save your changes.
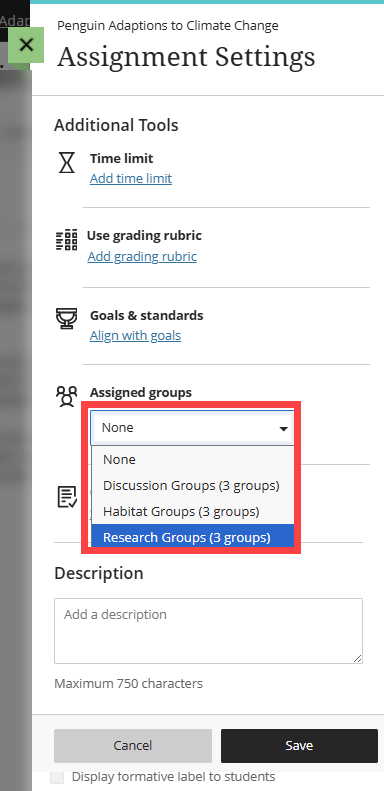
Refer to the Group Assignments support page for more information and detailed instructions.
Copy Course Content
Ultra makes it easy to copy materials from one course into another. You may choose to make an exact copy of a course or copy individual items from one course into another.
Copying content from an Original course into Ultra? The Should I Create New Content in Ultra or Copy From an Original Course? support article will guide you through the types of content that you may copy from Original and which types of content you should create new in your Ultra course.When you copy content from a previous course into your current course, certain items, such as Due Dates, are included in the copy. In order to prevent students from seeing old information while you are updating your content, we strongly suggest setting your course to Closed before copying your course. The Set Course Availability in myLesley support article will walk you through the process.
To copy content, go into the course you wish to copy content INTO. On the Course Content page, locate the place where you wish to add content (such as on the Course Content page or within a specific Folder or Learning Module), click the plus sign (+) to open the menu and select Copy Content.
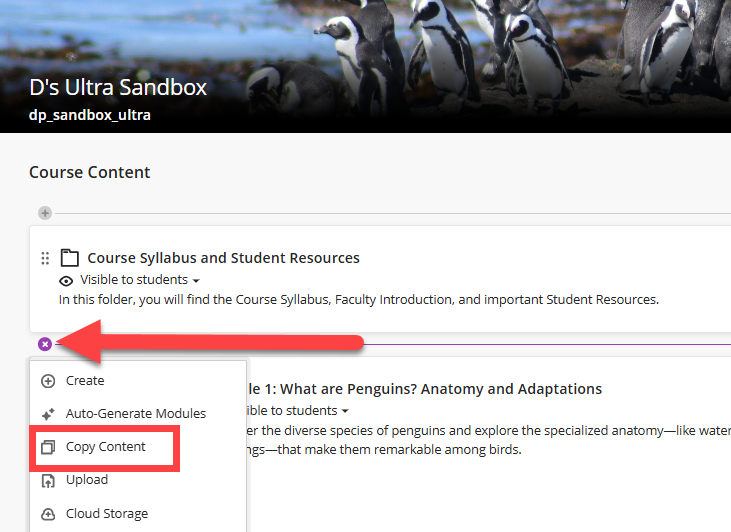
This will bring up a list of all courses in which you are enrolled. Scroll through the list or use the search bar to search for a specific course.
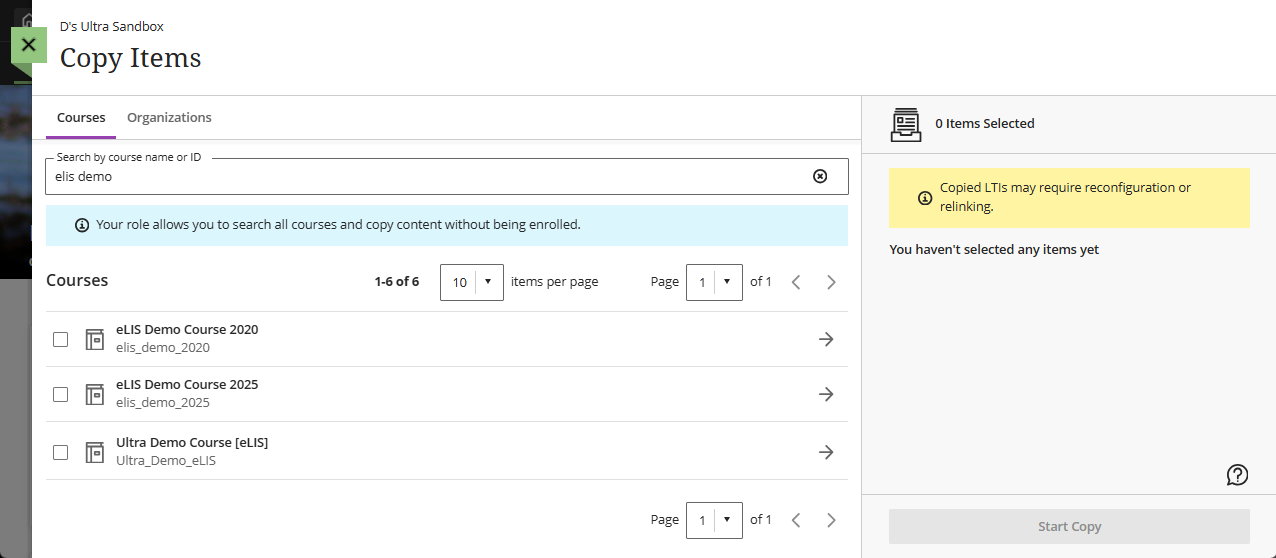
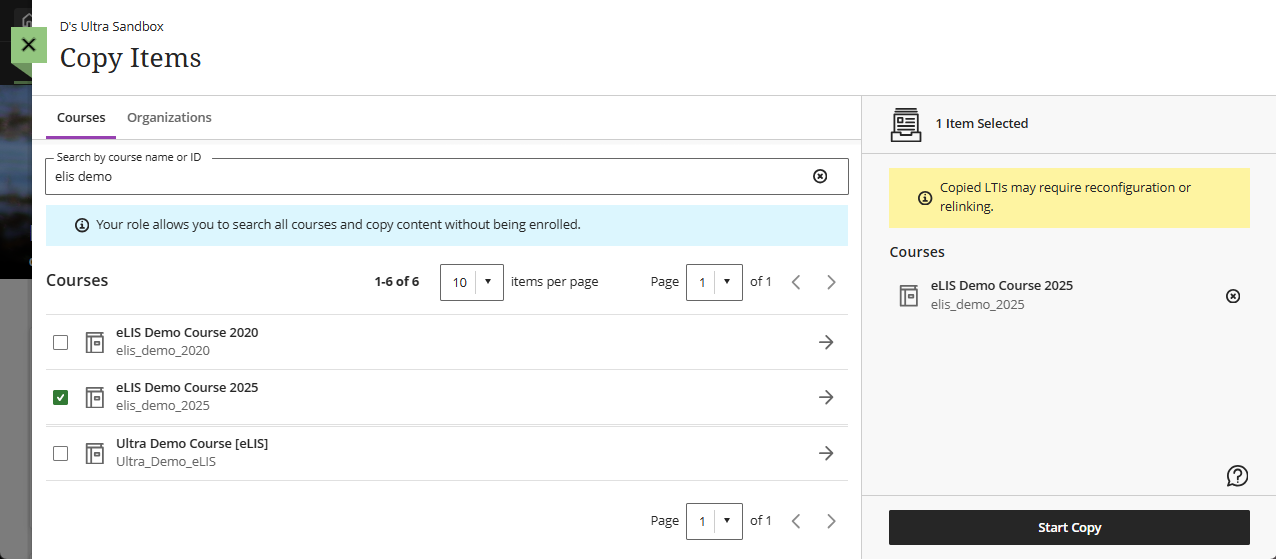
To make an exact copy of a course, click the checkbox next to the course to select it. The entire course will be brought over to the Selected Items column. Click Start Copy to copy your course.
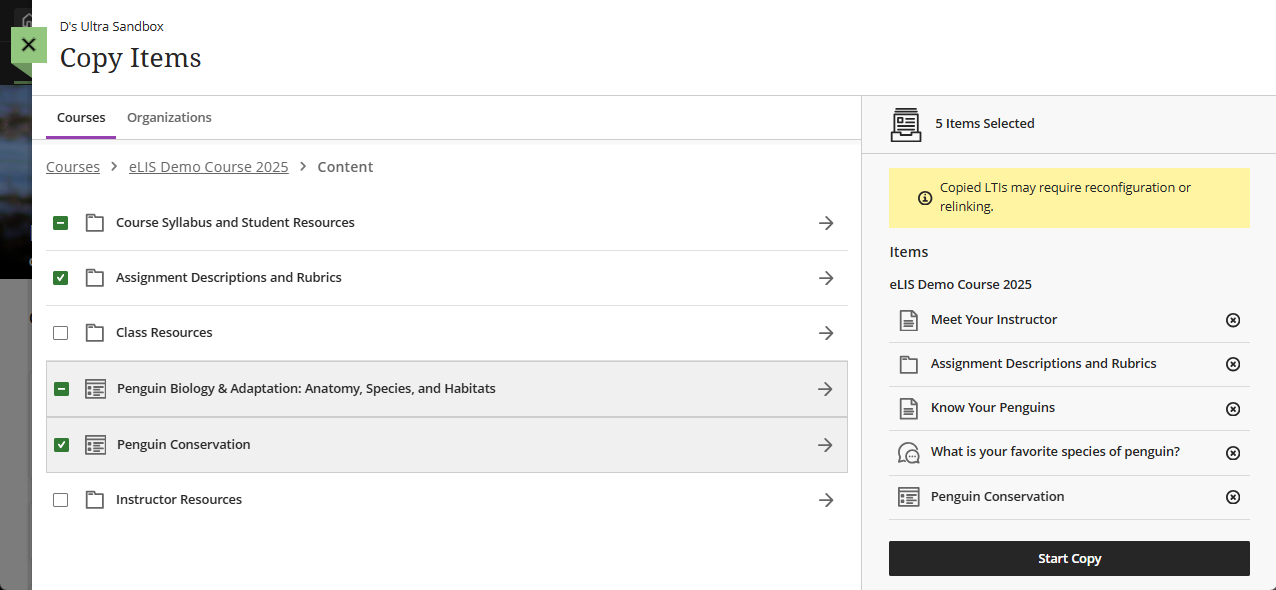
To copy individual items, click on the name of the course you want to copy from. This will display a list of categories. Select a category to see items available for copy. You may select and copy as many items from the course as you wish, including entire modules, individual items/Ultra Documents, assignments, discussions, rubrics, and more.
As you select content, it will be listed in the Selected Items column. Once you have selected the desired content, click Start Copy to copy your content.
The copy process may take several minutes to complete.
More information, including information about common copy errors and how to fix them, may be found in the Copying Ultra Courses support article.
Set Content Visibility and Release Conditions
All content you create or copy from another course is hidden from students by default. You may change or update your content's visibility setting either when creating/editing the content or after the content appears in your course.
Content may be hidden from students, visible to students, or you may set release conditions (release content by date, by users, or by student performance).
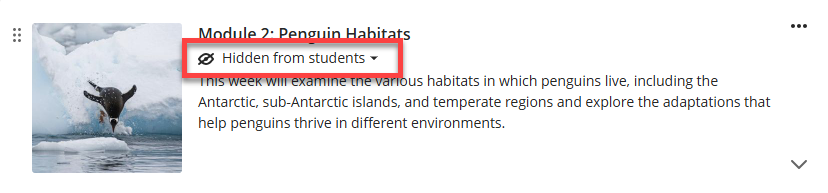
If your folder or learning module is hidden from students or set to release at a later time, your students will not be able to view the content inside of it, regardless of its visibility settings.
Set Content Visibility
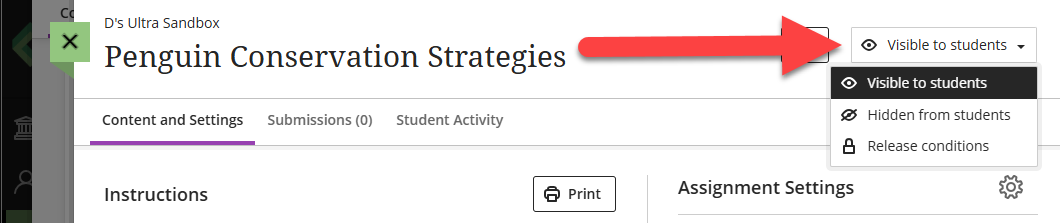
When creating or editing your content, click on the visibility drop-down menu to change its visibility status. You may make your content visible to students, hidden from students, or set release conditions.
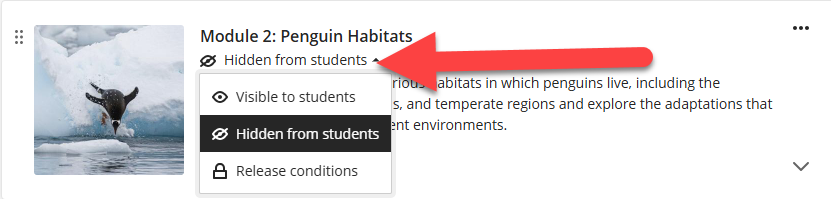
You may also change the content availability directly from the course content page. Click on the content visibility drop-down menu to change an item's visibility status.
Set Release Conditions
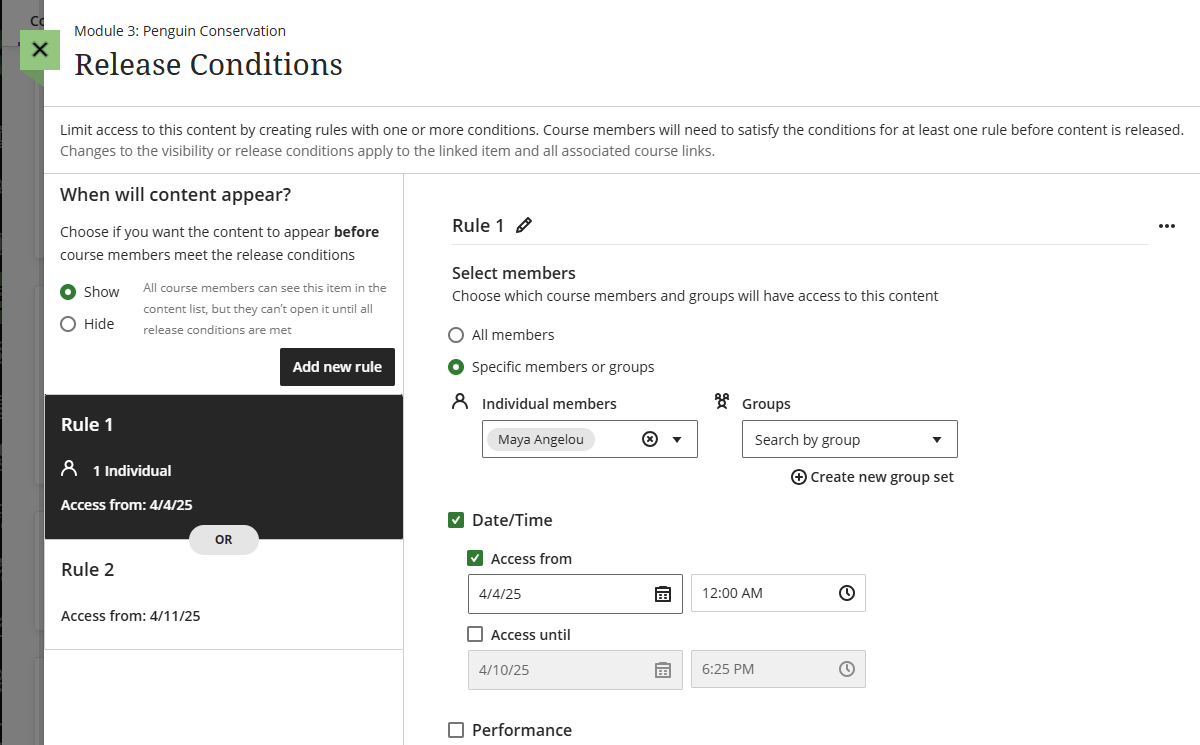
You can set release conditions to determine when content is available to students. If you have a student, or group of students, who needs access to content earlier than the rest of the class you may set multiple rules to give students different access dates.
You may set Release Conditions for any item in your Course Content, including Learning Modules, Folders, Ultra Documents, Assignments, Tests, and more.
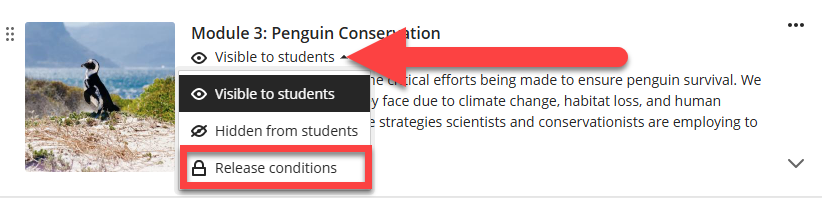
Locate your item and click on the visibility drop-down menu. Select Release Conditions.
You will then create rules for your release conditions to specify who has access (all course members or individual students or groups) and when they have access (based on dates or performance).
For more information refer to the Setting Content Visibility and Release Conditions support page or watch the Release Conditions tutorial video.
Batch Edit
The Batch Edit tool allows you to update common settings across your content (such as visibility and due dates), bulk delete content, and more.
On the Course Content page, click on the Options Menu (three dots on the right side of the page) and select Batch Edit.

This will bring you to the Batch Edit page. Click the check box next to the items you want to update. You can choose entire Folders or Learning Modules, or individual items. If you select an entire Folder or Learning Module, all items within it will also be selected. You may click to open a Folder or Learning Module in order to select individual items within it.

Once you have selected your items you may:
- Edit Dates: Edit due dates on selected items. You may change the dates by a select number of days, based on course start, or change to a specific date/time.
- Edit Visibility: Choose whether to show or hide the selected items for students. This is especially useful if you copied content from a previous course or did not update your visibility settings when creating content.
- Delete Items: Delete all selected items.
For more information, refer to the Batch Edit support article or watch the Batch Edit tutorial video.
Communicate with your Students
Communicate with your entire class at once using the Announcements tool or communicate with individual or groups of students using the Messages tool. As a best practice, use the Announcements tool for communications to the entire class.
Announcements
Announcements are a great way to post time-sensitive information or notifications to your students. Ultra courses display an Announcement as an overlay, requiring the student to dismiss the pop-up before they can access the course content. Announcements can also be emailed as well as viewed in the Activity Stream.

To create an Announcement, click on the Announcements tab. This will bring you into the Announcements area. Click on the + button to create a new Announcement.

Give your Announcement a title and enter a message for your students. You may choose to email a copy of the Announcement to your students and/or schedule the Announcement to send at a later time.

Click Save Draft to save your Announcement as a draft or click Post to post your Announcement immediately. If you scheduled your Announcement, it will not post or send the email until the specified date/time.
For more information, refer to the Announcements support page or watch the Create Announcements tutorial video.
Messages
Course messages are private and secure communications sent within your course and among course members. You may send messages to communicate with individuals, groups, or the entire class.
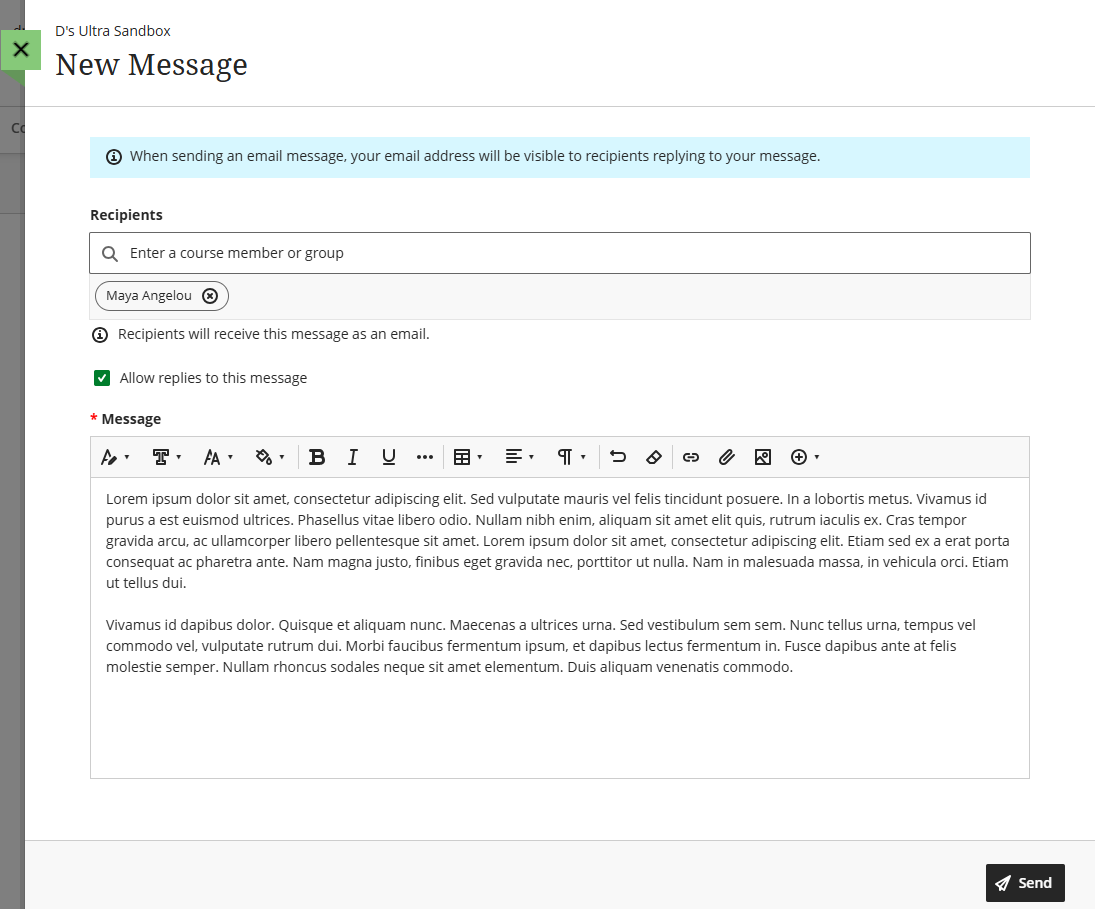
To send a Message, click on the Messages tab. This will bring you into the Messages area. Click on New Message to create a message.

In the Recipients area, select who you would like to message. A copy of your message will be sent to your recipient's email automatically. By default, your students can reply to your message, but you may uncheck this option.
Enter your message and click Send.
For more information, refer to the Messages support page or watch the Messages Tutorial Video.
Track and Grade Attendance
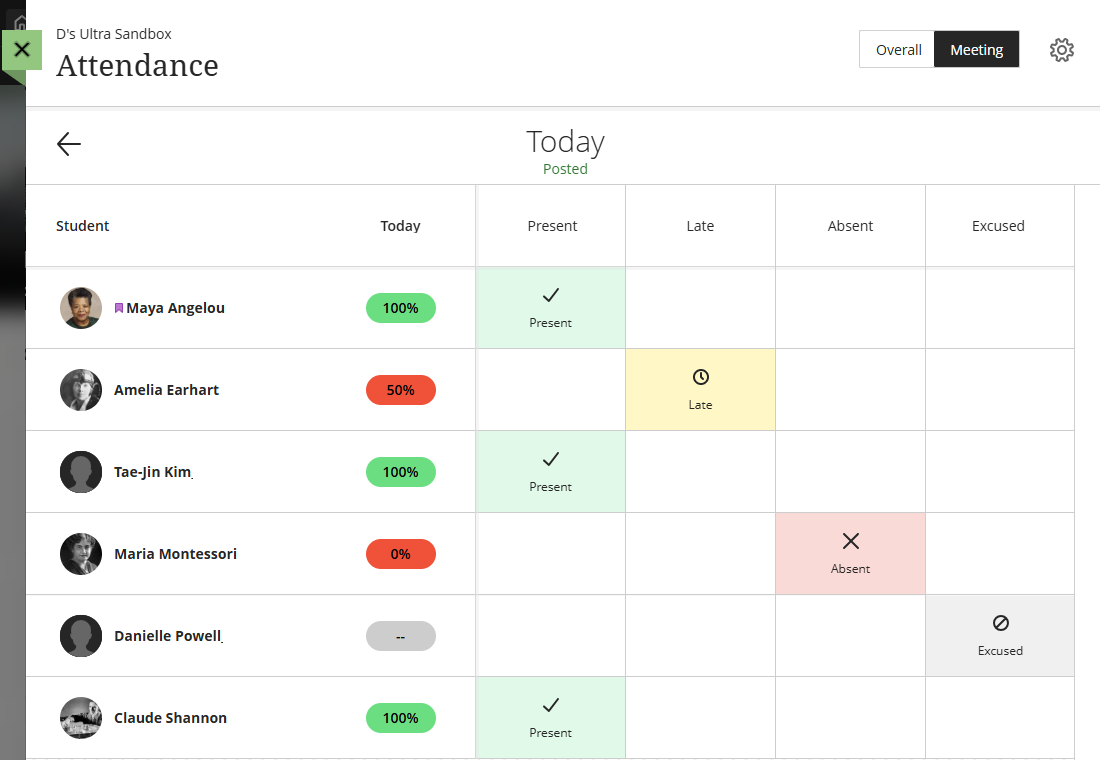
The Attendance tool allows you to easily track attendance from within your myLesley course. For each course meeting, you can mark whether each student is present, late, absent, or excused. The attendance records for each student appear in a single column in the Gradebook alongside their grades. You may also decide whether or not to use attendance as part of the Overall Grade calculation.
For more information and detailed instructions, refer to the Track Attendance in myLesley support article or watch the Attendance Tracking tutorial video.
Navigate and Set Up Your Course Gradebook
Your Gradebook is the central location for grading student work, calculating grades, and tracking student performance. A well-organized Gradebook allows you to simplify grading workflows, ensure grades are calculated accurately, and provide students with a clear view of their progress throughout the course.
Access Your Course Gradebook
From within your course, locate the Gradebook tab. If you have outstanding grading tasks, you will see an indicator:
- Needs Grading: If you have submissions that need grading, you will see a number.
- Needs Posting: If you have graded all of your submissions but have grades that need to be posted, you will see an exclamation point (!).
Click on the Gradebook tab to navigate to your course's Gradebook.
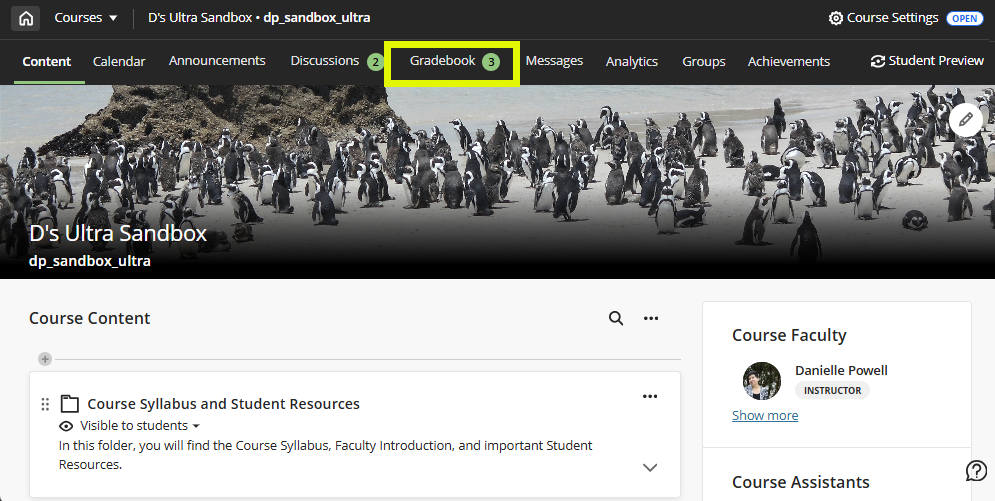
When you open your Gradebook the Grid View will display by default. You can easily toggle between the Gradebook's Grid View and List View by clicking on the buttons at the top of the page.
Gradebook Grid View
Click the Grid View button to access the Gradebook's Grid View. Students are listed on the left, along with their student ID and overall grade. Each graded item in your course appears as its own column, making it easy to view and manage grades for individual assessments.
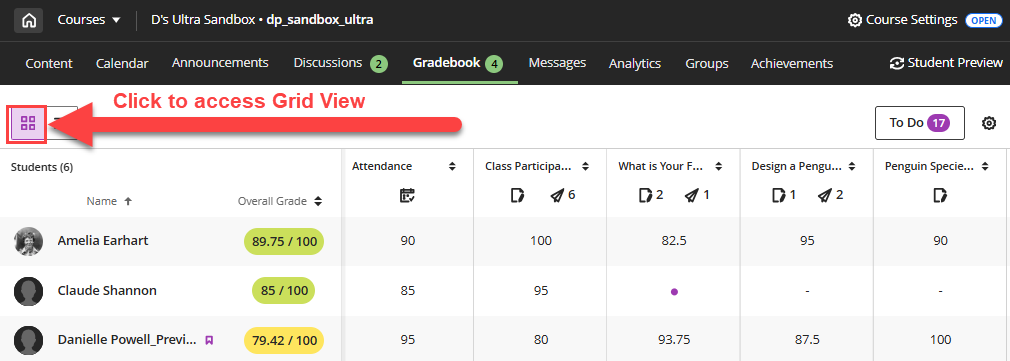
Locate an assessment and click on the Assessment Name in the column header. This will open the Assessment Details panel. From here, you can complete common grading tasks including:
- Grade student attempts.
- Post grades.
- Send a reminder message to students who have not yet submitted.
- Download submissions and results.
- View grade statistics.
Depending on your assessment type, you may view additional assessment details including the due date, grade and submission/participation information, student accommodations, and more. To edit this information, click on the assessment name.
If a student has submitted an assignment a purple dot will appear in the Gradebook. Click the grade cell to open the Grade Details panel. From here, you can complete common grading tasks including:
- Grade the student's submission attempts.
- Post the individual student's grade.
- View submission details (ex due date, submission date, grade, the maximum number of points, number of allowed attempts).
- Enter, edit, or view Overall and Attempt feedback.
- Add private grading notes.
- View the student's course-level accommodations, exempt the student from the assignment, or grant a one-time exception (due date extension, access extension, number of attempts).
Click the navigation arrows to navigate to the next student (up/down arrows) or the next assessment (left/right arrows).
Gradebook List View
Click on the List View button to access the Gradebook's List View. The list view lists all the gradable items in your course.
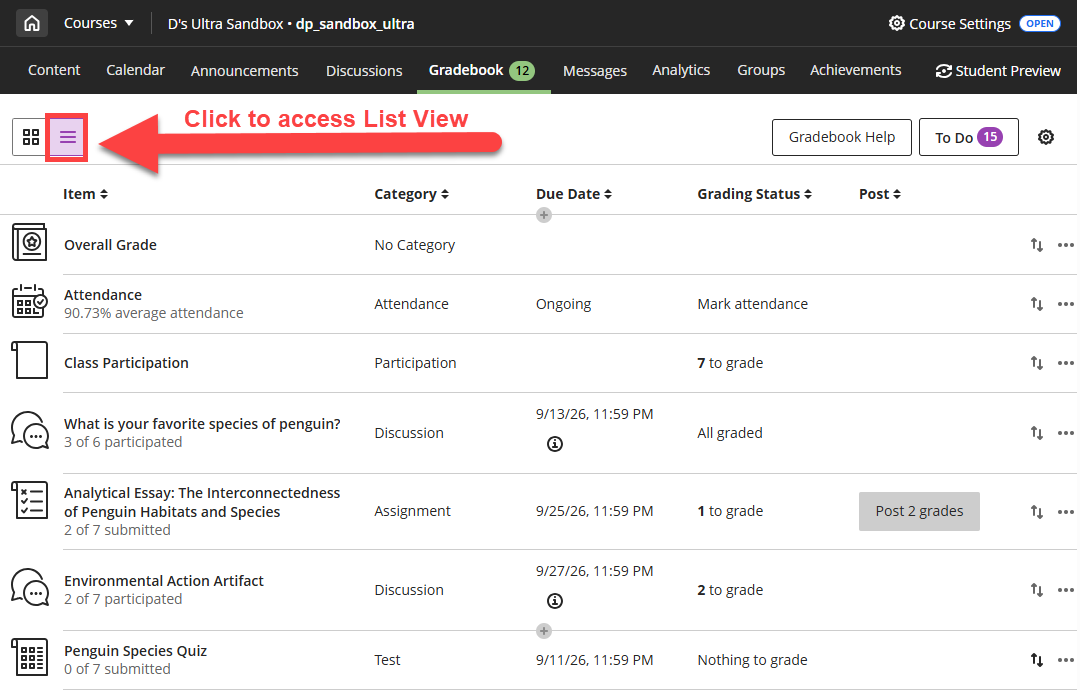
Select an item’s name to go to its Submissions or Grades & Participation page. Or select x to grade to go directly to the submission page and start grading.
Plan Your Gradebook Setup
Planning out your Gradebook and grading structure in advance helps ensure that your grades are organized, accurate, and aligned with your course grading policies.
Before setting up your Gradebook, review your syllabus and identify all graded activities, including assignments, quizzes and tests, discussions, presentations, participation, and more. As you look through your activities, consider how you will assess your students' work. Once you have your plan, begin adding content to your course.
As you create gradable items in your Course Content, your Gradebook will populate automatically. You may also create manual grade columns for any activities that occur outside of myLesley/Blackboard, including in-class presentations, participation, and more. Once you have added your graded activities, set up your Overall Grade so that students can see how their course grade is calculated.
Ready to get started? Grab your syllabus and check out the Gradebook Setup Tutorial.
Refer to the Blackboard Ultra Gradebook and Grading support article to learn more about managing your Gradebook and completing grading tasks.
Grade Student Work
Prioritize Your Grading Tasks and Action Items
Blackboard features two main grading tasks:
- Needs Grading: Submissions that have not been graded.
- Needs Posting: Submissions that you have graded but have not been released to students (posted).
Manage Grading Tasks Across All of Your Courses
To view your grading tasks across all of your courses, click Grades in the main Blackboard navigation. This will bring you to the Global Grades Page. Here you will see a list all of your courses (in alphabetical order) and the current status of grading. Locate a course and click on View All Work to go to that course's Gradebook.

Manage Grading Tasks For a Single Course
There are multiple ways to leverage your course Gradebook to help you manage your grading tasks and prioritize what needs your attention.
- Gradebook To Do Panel: From within your course, navigate to your Gradebook and select the To Do button. This will to open a to-do list of your grading tasks. The number indicator in the To Do button indicates the number of submissions to grade and to post. Select a task to begin.

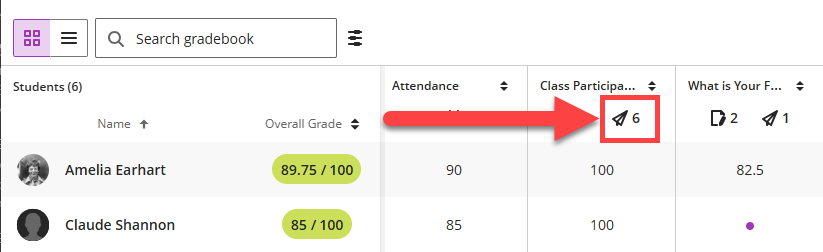
- Grid View: Needs Grading and Needs Posting: The Gradebook's Grid View features icons under the column headers to indicate items that need grading (paper and pencil icon) or need posting (paper airplane icon). Click on an icon to begin the grading task.
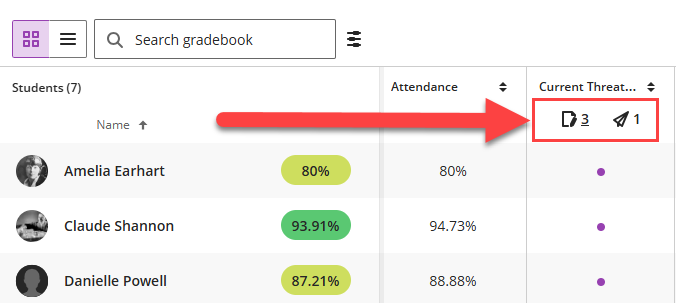
- List View: Sort by Grading Status: Use the sorting features in the Gradebook's List View to quickly and easily view your grading tasks. Sort by Grading Status to surface everything that needs to be graded.

Grade Assignments
You will grade your Assignment from the Assignment's Submissions page. You may access this page from multiple areas:
- Base Navigation: Click on Grades, locate the course, and select the Assignment you want to grade.
- Course Gradebook: Click on the Gradebook tab in your course and locate your Assignment. You may access it from either the Grid View or List View.
- Course Content: Locate your Assignment in your Course Content area or within a Learning Module or Folder. Open your Assignment and click on the Submissions tab.
Once you have arrived on the Submissions page, select a student's name to view their assignment and begin grading.
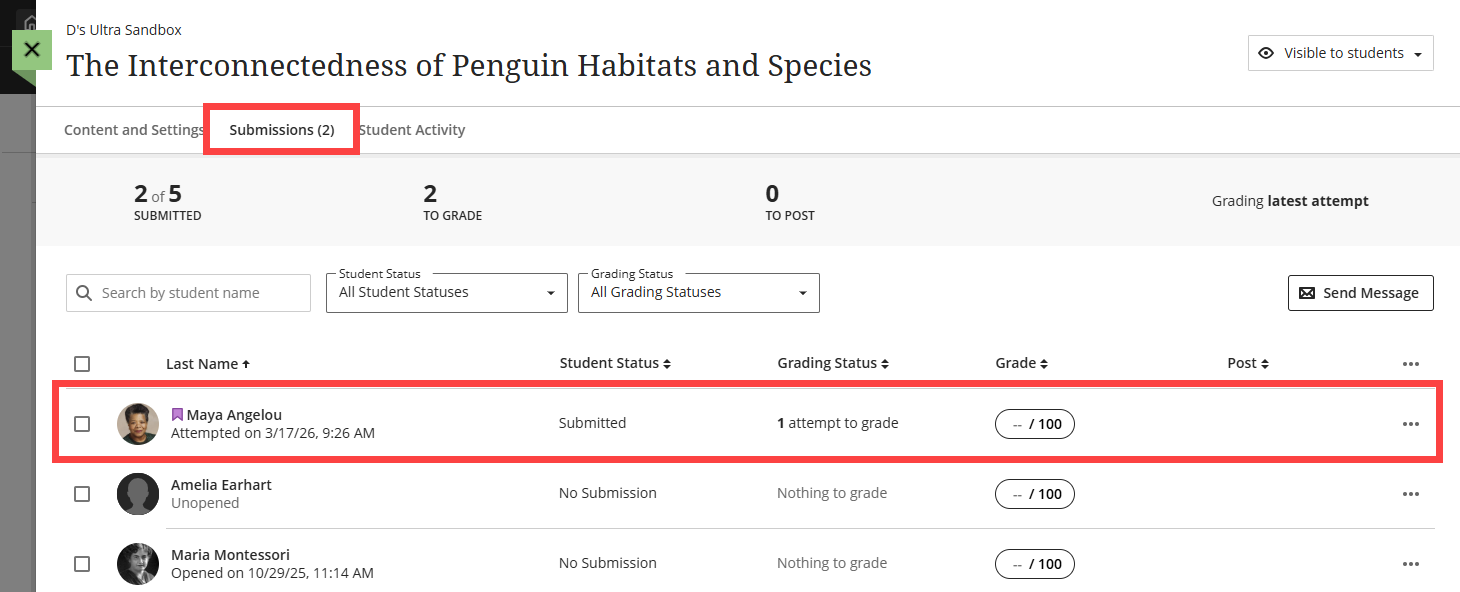
This will open the grading page. your student's submission will appear in the middle of the page with panels on the left and right side. You may click on the arrows to expand or collapse the Students Panel and the Feedback and Rubrics Panel. If your student has submitted more than one file, they will appear on separate tabs above the Bb Annotate tools.
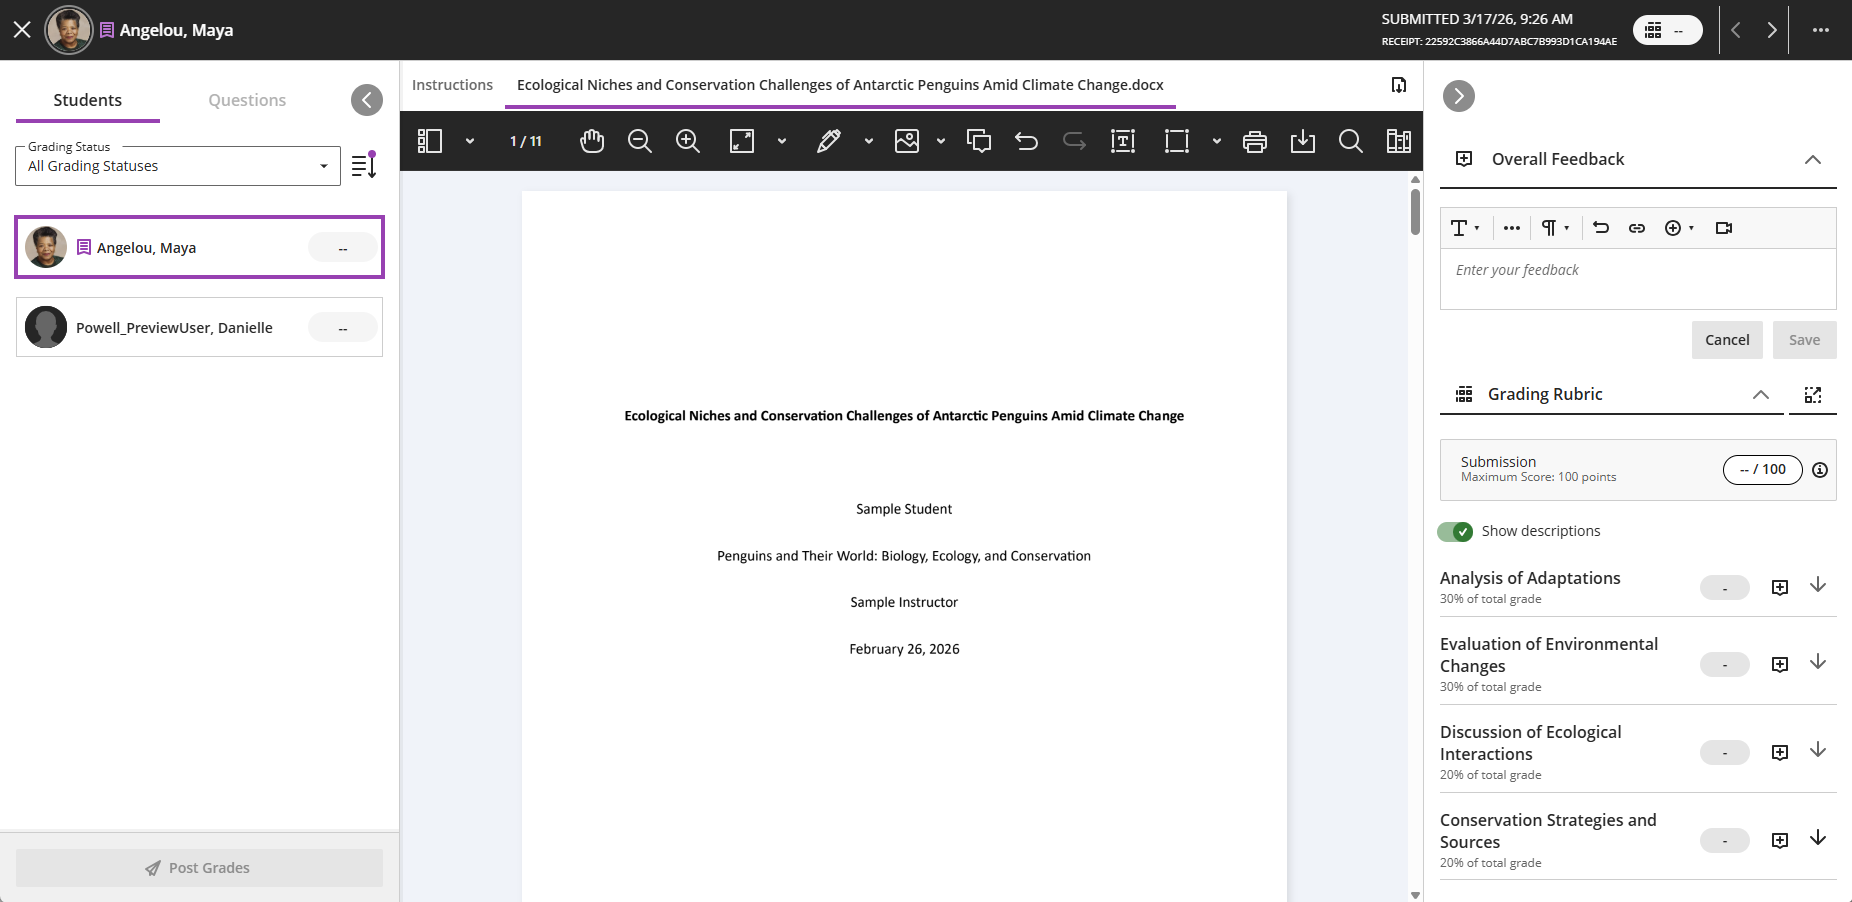
As you review your student's submission, you may use the Bb Annotate tools for inline grading, grade with a rubric, and provide feedback to your student.
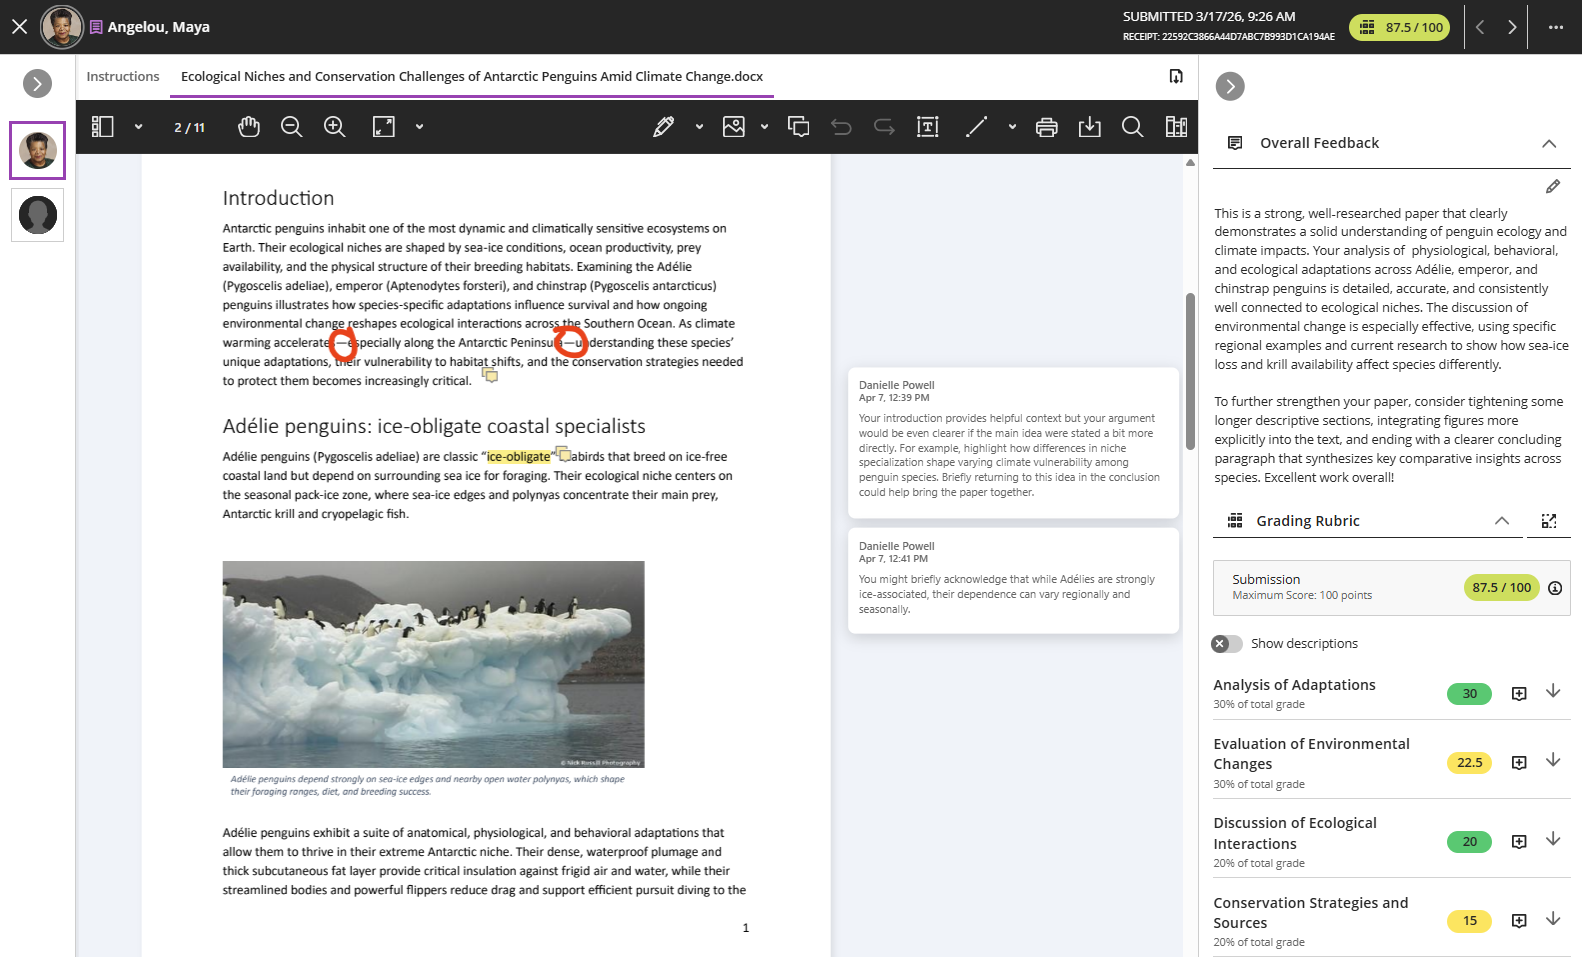
For more information and detailed instructions, refer to the Grade Assignments support page or watch the Grading Assignments tutorial video.
Grade Tests
You will grade your Test from the Test's Submissions page. You may access this page from multiple areas:
- Base Navigation: Click on Grades, locate the course, and select the Test you want to grade.
- Course Gradebook: Click on the Gradebook tab in your course and locate your Test. You may access it from either the Grid View or List View.
- Course Content: Locate your Test in your Course Content area or within a Learning Module or Folder. Open your Test and click on the Submissions tab.
Once you have arrived on the Submissions page, select a student's name to view their test and begin grading.
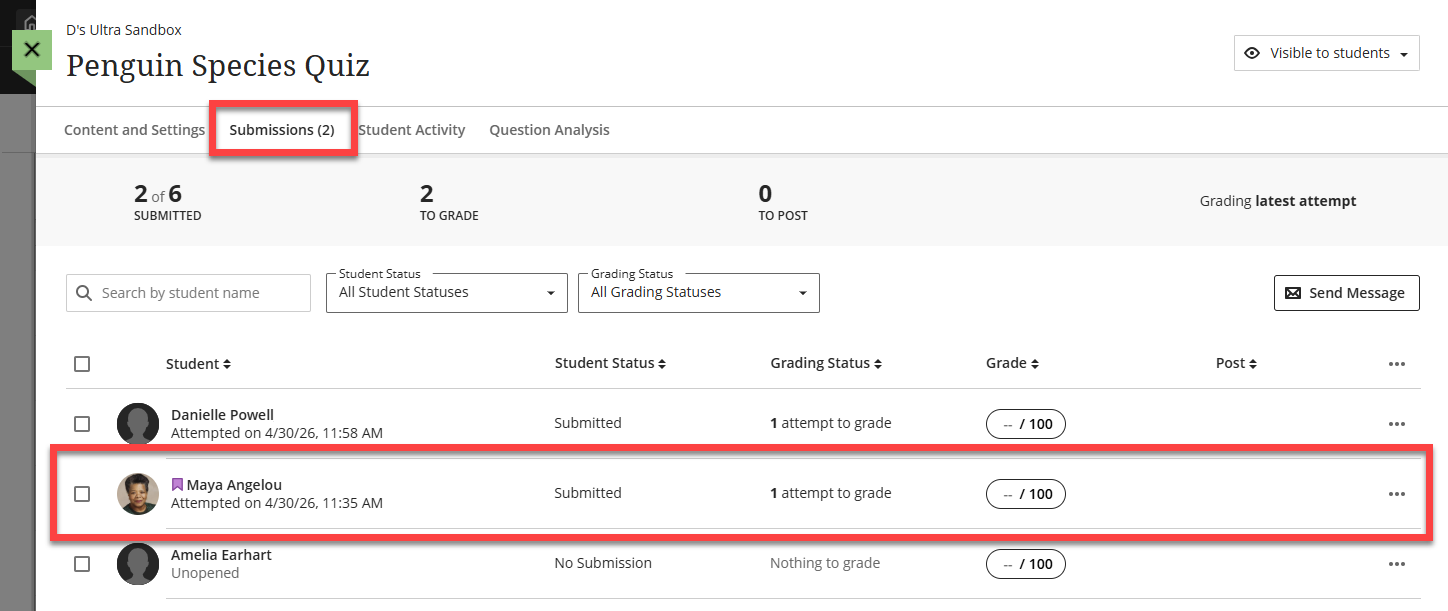
You will have the option to Grade the Test by Student or Grade the Test by Question. The test questions will appear in the center of the page with panels on the left and right side. You may click on the arrows to expand or collapse the Students/Questions Panel and the Feedback Panel.
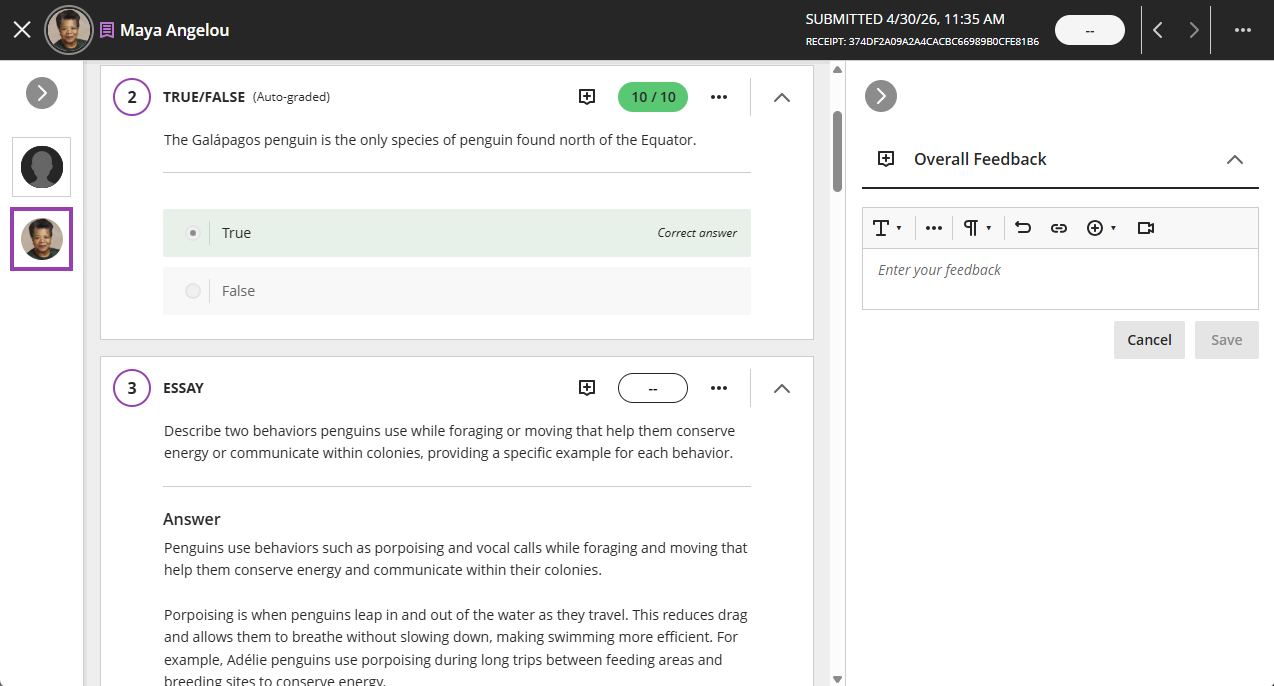
If the question(s) are graded automatically you will see the students' scores for each question. You may manually change the score or select a question's Feedback button to add feedback specific to the student's response to the question.
Essay questions must be graded manually. Read your student's response and enter a score in the question's grade pill. Select the Feedback button to add feedback specific to the student's response to the question.
For more information and detailed instructions, refer to the Grade Tests support page or watch the Flexible Grading Tests tutorial video.
Grade Discussions
By default, discussions are not a graded activity. If you would like to grade your discussion, go into the Discussion Settings and select Grade Discussion.
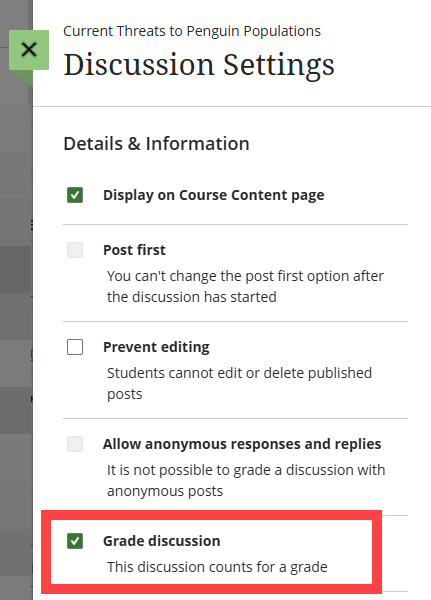
Once selected, you will see additional settings, including due dates and participation requirements, maximum points, and the option to attach a rubric. Refer to the Discussion Settings support page for detailed information.
Once your students post their discussion responses, you can begin grading. Discussions are graded from the discussion's Grades & Participation page. You may access this page from three areas:
- Base Navigation: Click on Grades, locate the course, and select the discussion you want to grade.
- Course Gradebook: Click on the Gradebook tab in your course and locate your discussion. You may access it from the both the Grid View and the List View.
- Course Content: Locate your Discussion in your Course Content area or within a Learning Module or Folder. Open your Discussion and click on the Grades & Participation tab.
- Discussions Tab: Click on the Discussions link in your course to navigate to the Discussions area. Open your Discussion and click on the Grades & Participation tab.
Once you arrive on the Grades & Participation tab, you will see a list of all of the students in your course, whether they have participated in the discussion, their grading status, and their grade. Click on a student's name to begin grading their work.
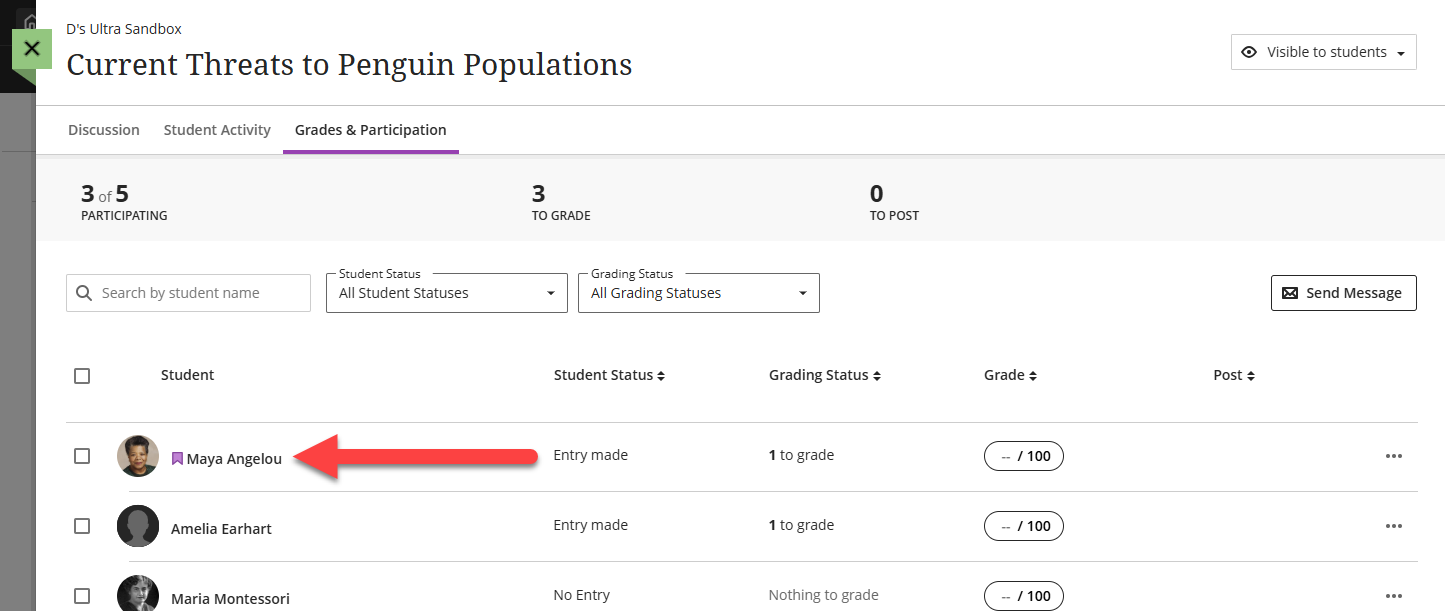
Your student's responses and replies are highlighted so that you can read their contributions in context. At the top of the page, click on the grade pill to enter a grade or to open and grade with a rubric (if using). Click the Feedback (+) icon to open the feedback panel and provide feedback to your student.

For more information, refer to the Grade Discussions support article or watch the How to Grade Discussions tutorial video.
Grade Journals
By default, journals are not a graded activity. If you would like to grade your journal, go into the Journal Settings and select Grade Journal.
Once selected, you will see additional settings, including a due date, maximum points, and the option to attach a rubric. Refer to the Journal Grade Settings support page for detailed information.
Journals are graded from the journal's Grades & Participation page. You may access this page from three areas:
- Base Navigation: Click on Grades, locate the course, and select the journal you want to grade.
- Course Gradebook: Click on the Gradebook tab in your course and locate your journal. You may access it from both the Grid View and the List View.
- Course Content: Locate your Journal in your Course Content area or within a Learning Module or Folder. Open your Journal and click on the Grades & Participation tab.
Once you arrive on the Grades & Participation tab, you will see a list of all of the students in your course, whether they have posted journal entries, their grading status, and their grade. Click on a student's name to read and comment on their entries and grade their work.
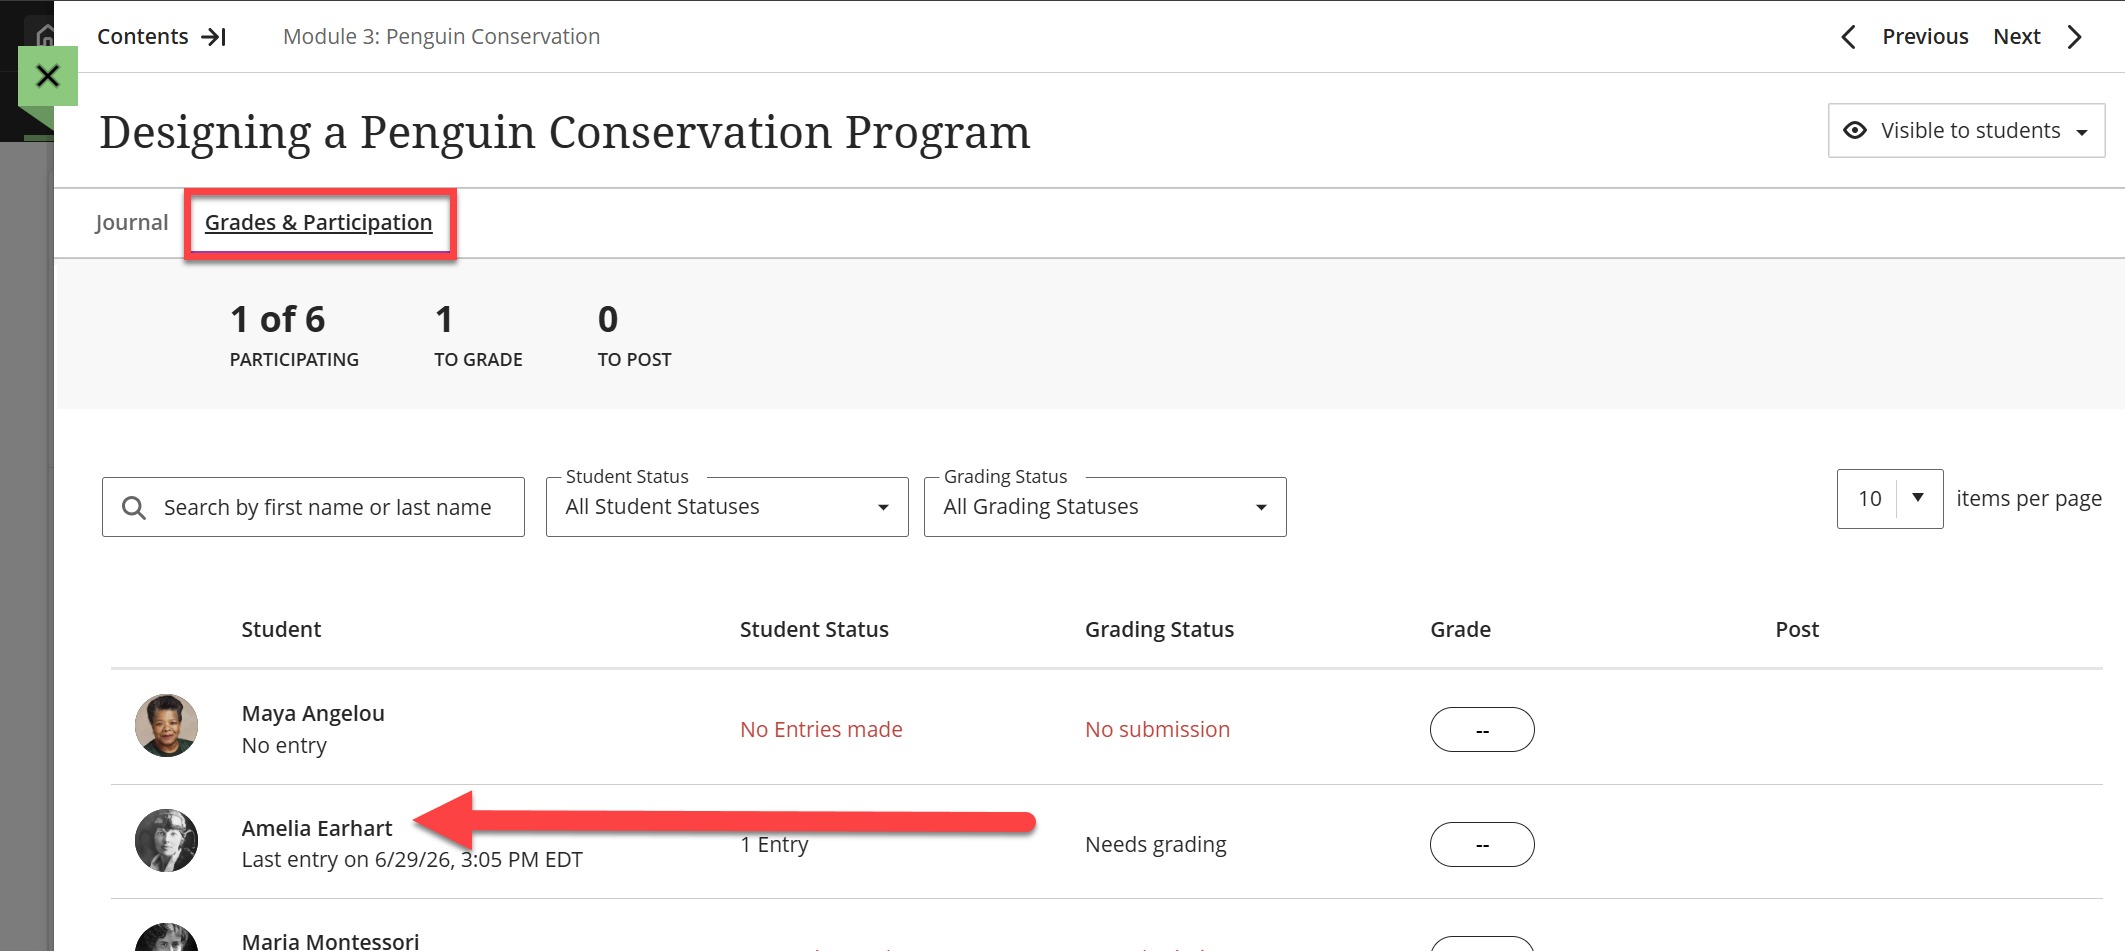
At the top of the page, click on the grade pill to enter a grade or to open and grade with a rubric (if using). Click the Feedback (+) icon to open the feedback panel and provide feedback to your student.
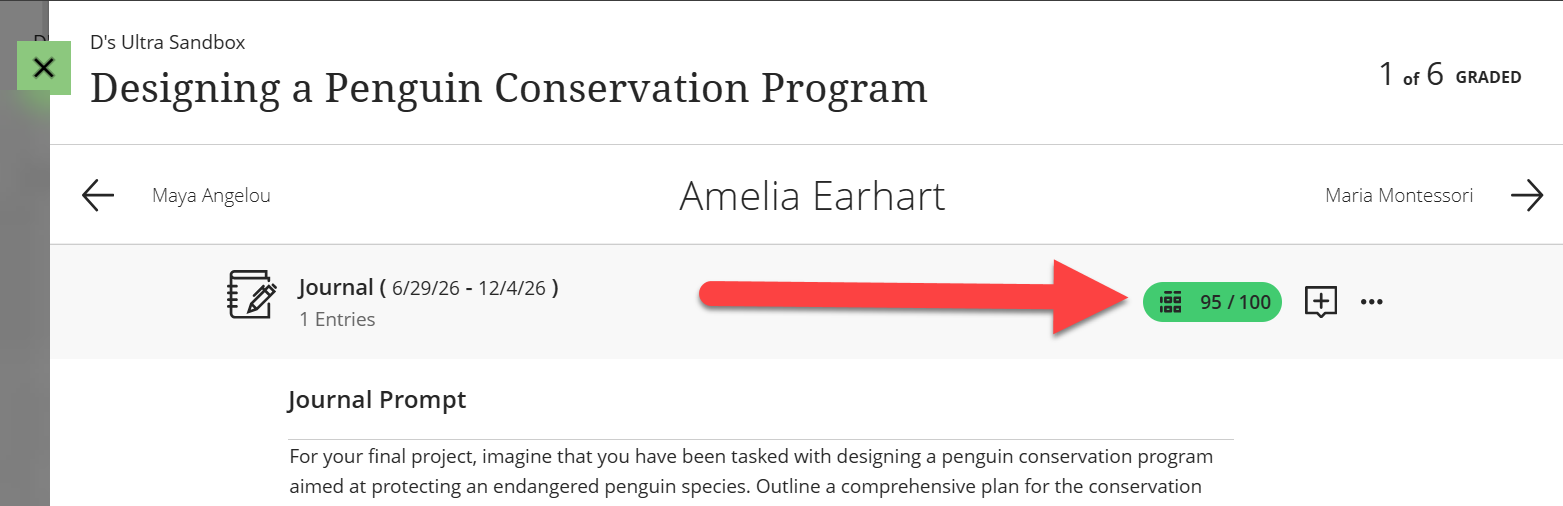
For more information, refer to the Grade Journals support article.
Assign Automatic Zeroes for Late Work
You can choose to automatically assign zeroes to work that is not turned in by the due date. If allowed, students can still submit work after the due date and you can grade it as normal.
Note: Students with due date accommodations will not receive automatic zeroes for overdue work.
To assign or unassign automatic zeroes, go to the Gradebook and click Settings (gear icon). This icon is available from all Gradebook views.

This will open the Gradebook Settings panel. Scroll down to the Automatic Zeroes section and select or unselect the box to assign automatic zeroes.

Manually Enter or Override Grades
You may manually enter or override grades directly from the Gradebook Grid View.
- Hover your mouse over the top of the grade column until the Edit button (pencil icon) appears.
- Click the pencil icon to enter Column Edit Mode.
- Type a grade into a cell and press Enter on your keyboard, use your arrow keys, or click on the next student to continue grading.
- Once you have finished grading, click the checkmark at the top of the column to save your changes.
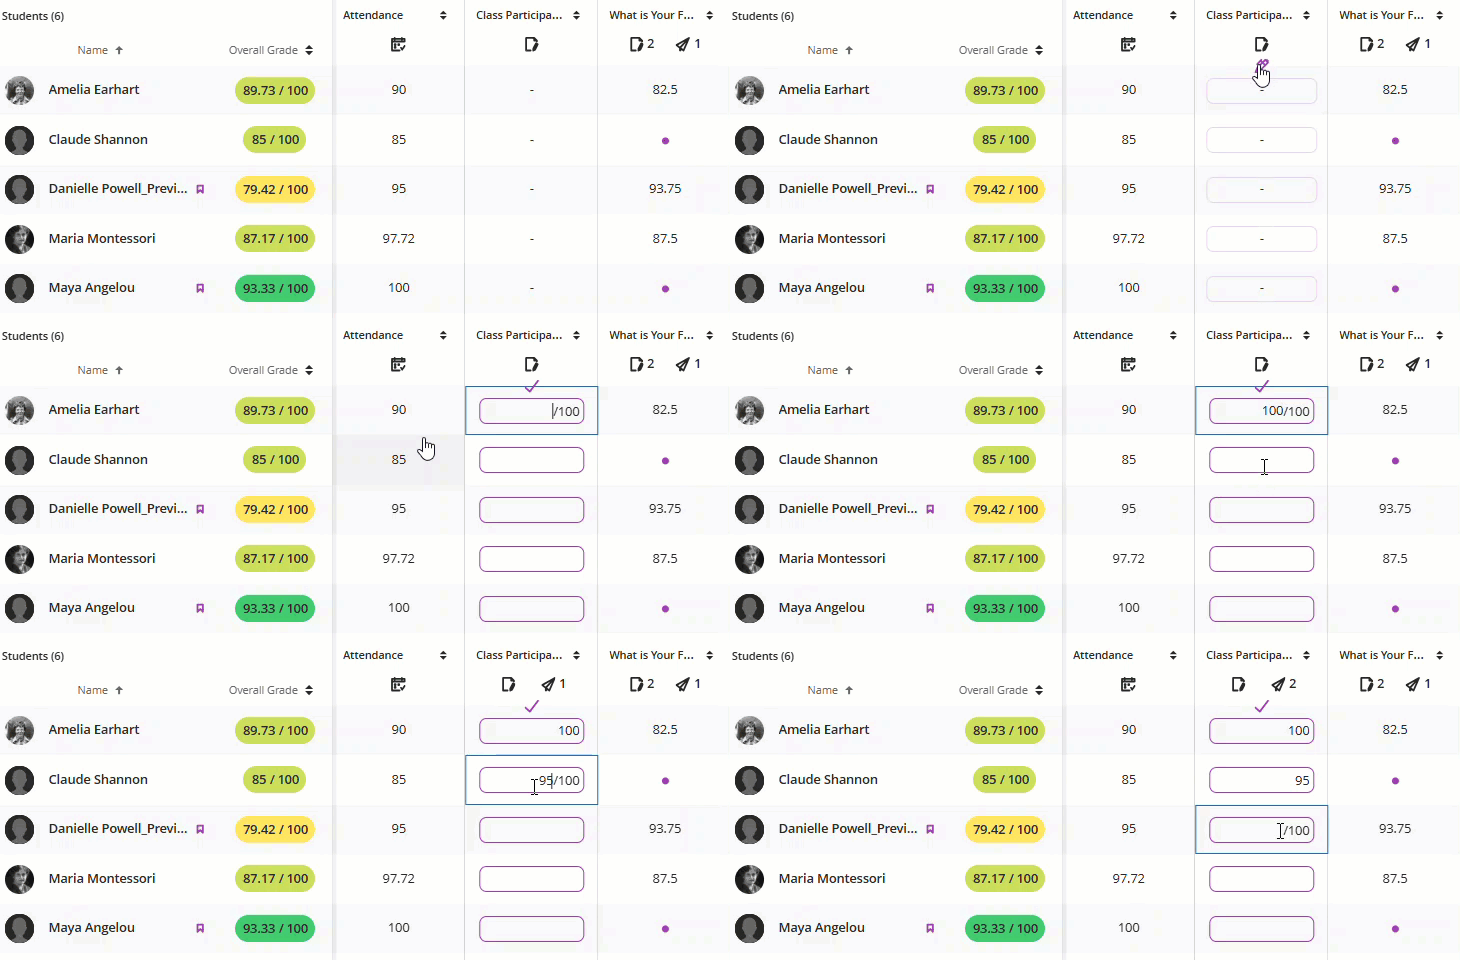
Once you have saved the grades, click the Post icon below the assessment name to post the grades.
Manage Student Accommodations, Exceptions, and Exemptions
Blackboard Ultra offers different ways of accommodating your students, depending on your their needs. This may include extended due dates, untimed Tests, an exemption from a course activity, or early access to course content.
- Set Course-Wide Due Date or Time Limit Accommodations: You can set Accommodations for individual students to allow for extended due dates and/or additional time to complete tests. Accommodations are tied to the individual student and are applied to all graded items within the course.
- Grant One-Time Assessment Exceptions: When special circumstances arise, you can give an individual student an Exception for a specific assessment. You may give the student additional submission attempts, reschedule the due date, or extend access to the assessment. Exceptions are tied to the specific Assignment or Test and do not affect other assessments in the course.
- Exempt a student from a graded activity: In some circumstances you may need to exempt a student from an assessment or course activity. Exemptions can be applied to any item in the Gradebook including Assignments, Tests, Discussions, Journals, and more. Exemptions are tied to the specific Gradebook item and do not affect other course activities. When a Gradebook item is exempt, it will not be included in the student's Overall Grade calculation, marked late, or assigned an Automatic Zero.
- Set Release Conditions: You may set release conditions to determine when content is available to students. If you have a student, or group of students, who needs access to content earlier than the rest of the class you may set rules to give students early access. You may set Release Conditions for any item in your Course Content, including Learning Modules, Folders, Ultra Documents, Assignments, Tests, and more.
For more information and detailed instructions, refer to the Manage Student Accommodations in Blackboard Ultra support article.
Progress Tracking and Student Progress Reports
Progress Tracking allows students to keep track of what they have done in the course. Students can track their progress within a Learning Module as well as any content on the Course Content page. Additionally, instructors can track student progress throughout the course, providing insight into student engagement.
Watch the Actionable Data Insights video to learn more about Progress Tracking see the tool from both an instructor and student standpoint.
For more information, refer to the Progress Tracking and Student Progress Reports support article.
View Your Course as a Student (Student Preview)
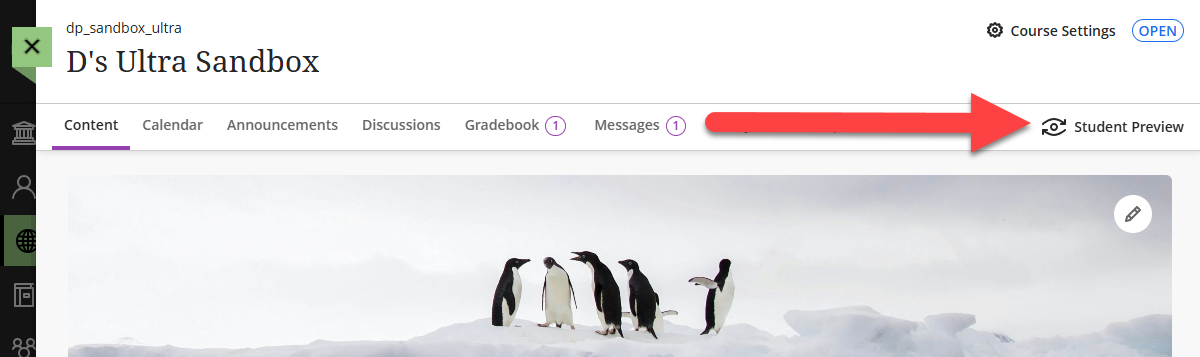
Student Preview allows you to review your course content from a student's perspective. You can check the course's look and feel, ensure release conditions are functioning as intended, submit Assignments and Tests, check grades and feedback from a student perspective, and more.
Click the Student Preview button on the course menu to enter Student Preview.
For more information, refer to the Student Preview support article or watch the Student Preview tutorial video.
Additional Resources and Support
Student Resources
These resources are designed to get your students up and running in myLesley/Blackboard:
- myLesley Student Orientation: The myLesley Student Orientation consists of video walkthroughs and a self-paced course designed to walk students through the basics of using myLesley/Blackboard.
- myLesley Student Quick Start Guide: This guide provides students with step-by-step instructions for navigating their myLesley/Blackboard course, reviewing course content, participating in class activities, submitting work, reviewing grades, and more.
Blackboard Ultra Training Options
Choose the training option that best suits your needs! Whether you prefer to go at it alone, or want extra support and training on your journey, we have a training for you: Blackboard Ultra Training Options.
Unable to attend one of our trainings? Email elis@lesley.edu to set up an appointment or request a small group training.
What's New in Blackboard Ultra?
Blackboard is releasing new features and improvements every month! Some of these new features are large updates with completely new functionality while others are small enhancements. Check out the highlights some of the newer features and improvements that we think you'll enjoy: What's New in Blackboard Ultra?
Faculty Online Office Hours
Have questions about myLesley/Blackboard? Need assistance? Join the eLIS staff for our weekly online office hours every Monday and Thursday, 2:00 - 4:00 ET. No appointment necessary: Join eLIS Online Office Hours.
Contact Us
Reach out to eLearning and Instructional Support (eLIS) at elis@lesley.edu with any questions or to request a 1:1 or small group training.
Was this article helpful?
That’s Great!
Thank you for your feedback
Sorry! We couldn't be helpful
Thank you for your feedback
Feedback sent
We appreciate your effort and will try to fix the article