 | Information Technology Tyler Room Audio Visual Instructions |
Choose Your Presentation Location:
Decide whether you'll present from the left or right side of the Credenza, located at the front-center of the Tyler Room.
- The Credenza houses the Main Display, Microphones, and Audio/Video inputs, with inputs located at both ends.
- Each side is labeled, so you can select the corresponding input from the touchscreen controls.

Using the Camera for Video Conferencing:
If you plan to use the camera near the room entrance for video conferencing (e.g., Zoom), you must set up on the left side of the Credenza. This side contains the only input for the camera.
Source Screen
Selecting a Display Source:
Decide which source to use for your presentation. The Tyler Room has multiple display options:
- Main Credenza Television Display: Located in the center of the room, inside the Credenza. It can be raised using the touchscreen panel.
- Projectors: Two screens (labeled left and right).
- Confidence Displays: Additional TVs on wheeled stands by the Credenza (labeled left and right). These can be angled in front of the presenter for viewing during the presentation. There are two display stands—one lower and one raised.
Powering On Displays
For the Main Credenza Display:
- Access touchscreen controls on your selected side of the Credenza.
- On the source menu (left side of the panel), choose your source (e.g., "Credenza Left Side").
- Tap the "Credenza Display" icon. The motor will raise the display, which powers on automatically.
- Plug the provided HDMI cable into your laptop to connect.
For Projectors:
- On the touchscreen panel, tap the icon for the left or right projector. Screens will deploy automatically.
- Tap the icon again to power on the projector. Plug in the HDMI cable to connect your laptop.
For Confidence Displays:
- Ensure they’re plugged into power and connect the HDMI cable.
- Plug one end into HDMI 1 on the Confidence display and the other into the HDMI outlet of the corresponding Credenza side.
Setting Up the Camera for Video Conferencing:
- Use the Left Side Credenza for video conferencing (camera input is only available on this side).
- Connect the provided USB-C cable to your laptop.
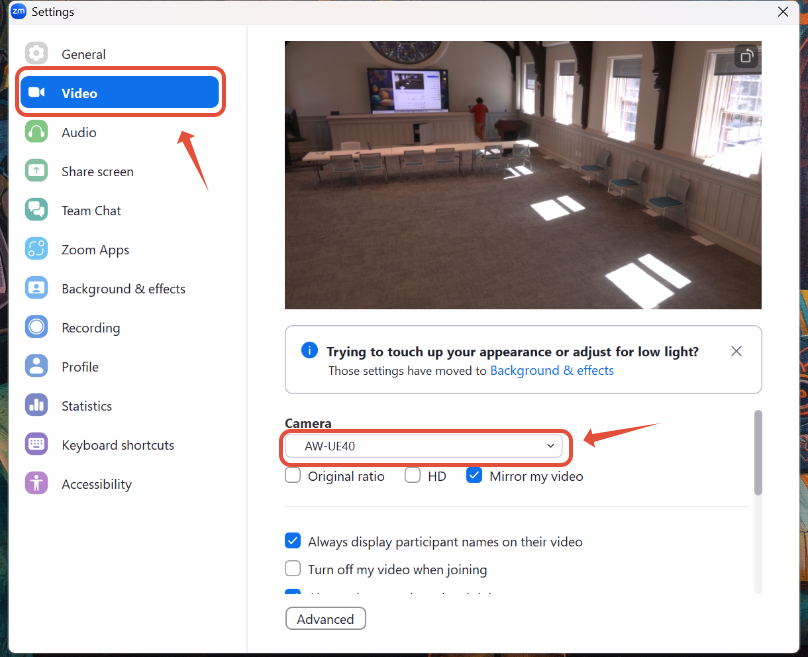
- In Zoom, select AW-UE40 as the camera input from the drop-down menu. If not selected, Zoom defaults to your laptop webcam, which won't show the room.
- Configure the camera settings:
- Access the Camera & Conference controls via the touchscreen (tap the camera icon at the top right).
- Adjust zoom, pan, and tilt. Use your Zoom window to monitor changes.
- Set the conference volume as needed.
Using Microphones in the Space:
- The Tyler Room includes:
- 4 Wireless Handheld Microphones.
- 4 LAV Lapel Microphones.
- All microphones are stored in their charging bays inside the Credenza.
- To use:
- Select and unplug the microphones you need. (For additional microphones, contact IT.)
- Turn on the microphone; it will automatically connect.
- Test the microphone by speaking into it and ensure the volume is appropriate
- For Zoom audience audio:
- Use the provided microphones, as built-in laptop microphones won’t project the room’s sound.
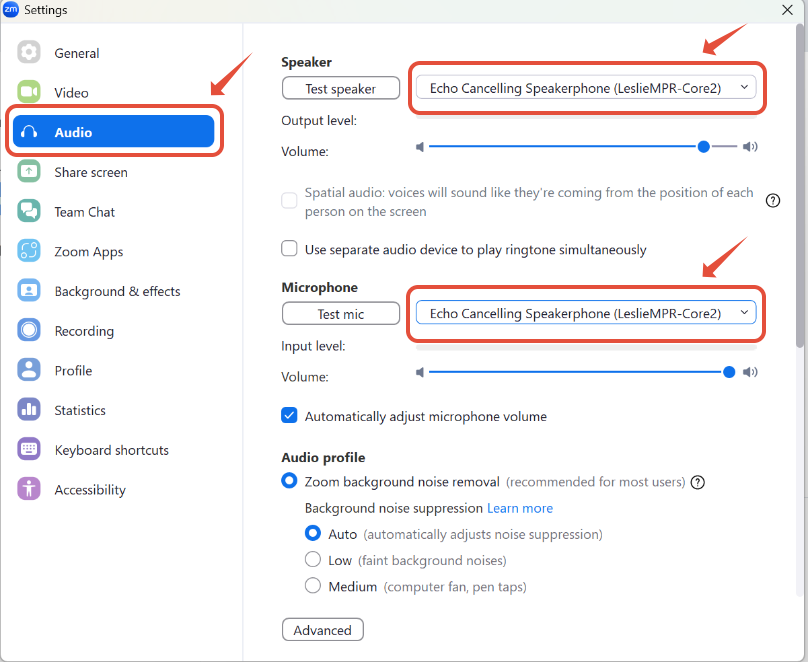
- Ensure that you select the Echo Cancelling Speakerphone (LeslieMPR-Core2) Microphones from the selection so that your audience can hear you clearly. Reference the setup images below for guidance on how to make this selection.
- After Use:
- Return all microphones to their corresponding charging bays.
Example Of Setting Up the Space
This will be an example of setting up on the Credenza Left Side, using the Main Credenza Display as well as connecting the camera for Video Conferencing and using the microphones in the room.
- Tap the Screen to Begin on the side of the space you want to set up.

- Tap your source from the left side Source Menu. For this example, we will be setting up on the Credenza Left Side. We will tap that source to select it. Once selected, we can then tap an available display from the selection. We are going to be using the Credenza Display for this example, so you can go ahead and tap the Credenza Display icon.


- Plug in the provided HDMI cable to your laptop. The Credenza Display should automatically detect your laptop and display the image on the display.
- Plug in the provided USB-C cable into your laptop for connection to the Camera for video conferencing.
- Make sure that you are selecting the correct camera output for your presentation. If using zoom, you can make sure everything is connected correctly by accessing our Zoom Settings on your computer. To access your Zoom Settings on a Windows Device (if you have Zoom Workplace already installed on your computer) right-click the Zoom icon within the caret (^) icon in the taskbar to open its menu.

- Select Video from the left-side taskbar, then choose AW-UE40 from the Camera drop-down menu. You should now see the layout of the room on your screen from the view of the camera.
- Tap the Camera Icon in the top-right corner of the touch panel to open the Camera & Conference Controls. Use these controls to adjust the camera’s pan, tilt, and zoom as needed, setting up the presentation space exactly as you want your Zoom audience to see it.

- Once you have your Camera set how you need it to be, we can finally make sure that our Microphones are connected properly so our Zoom Audience can hear us. Select Audio from the left-side taskbar within our Zoom settings. Make sure to select the Echo Cancelling Speakerphone (LeslieMPR-Core2) Microphones from the drop-down menu. Make sure it is selected in both the Speaker and Microphone drop-down menus.
- When your meeting is complete, tap the red power icon in the top-right corner of the screen and select Yes, Shutdown to shut off the room's technology.

Additional Information:
- Image Mute: Selecting this option will turn the display off until it is tapped again.
- Privacy Mute: Selecting this option will mute your microphones to the Zoom Audience until it is tapped again.

Adjusting Volume of the Microphones and Speakers
Tap the Mixer Icon, found to the left of the Camera and Conference Controls. This allows you to adjust the microphone levels in the room. Each are labeled and can be controlled accordingly. If the microphones are too quiet or too loud, use this tool to make the necessary adjustments.
You can adjust the volume from your presentation that is coming out of the speakers by tapping either the – or + icons in the volume adjuster which is located at the bottom right corner of the touch screen at all times.

Rack PC
The Rack PC is an additional computer set up similarly to the HyFlex carts across the university. It allows any user to use the provided keyboard and mouse to load content for presentations, functioning as it would if they were to connect their own device.
Keep in Mind:
- DeepFreeze Software: This PC is equipped with DeepFreeze, which erases all data saved on the computer upon restart. If you sign in to any accounts, ensure you restart the device afterward to remove your data.
How to Use:
- Select Rack PC as the Source:
- From the source options, choose "Rack PC."
- Power On the Rack PC:
- Tap the Rack PC button to power on the Rack PC.
- Display Projection:
- With the display selected, the Rack PC will automatically project to your chosen screen.
Connecting House Audio System with a Bluetooth Device:
The Tyler Room Speaker System supports Bluetooth connectivity, allowing you to pair a smartphone or other Bluetooth-enabled device to play music or audio content.
Pairing Your Device:
To connect your device, you must first pair it with the system. Locate the physical Bluetooth Pair button on the wall that is perpendicular to the wall with the fireplace in the corner. Press the button to initiate pairing mode, which then allows you to pair your device with the system.

Connecting to Bluetooth:
To pair your device with the Tyler Room Speaker System, select “Lesley_MPR104_BT_Plate” from your device’s Bluetooth settings. Once connected, you can stream audio through the room’s speakers.
Adjusting Volume:
You can control the volume either directly from your connected device or using the Volume Slider on the Control Touch Panel, located on either side of the Credenza.
Was this article helpful?
That’s Great!
Thank you for your feedback
Sorry! We couldn't be helpful
Thank you for your feedback
Feedback sent
We appreciate your effort and will try to fix the article