Record a Presentation and Share it in myLesley via Video Studio
TABLE OF CONTENTS
- Overview
- Record Your Presentation
- Upload Your Recorded Presentation to myLesley via Video Studio
- Additional Resources
Overview
Narrated presentations are a great way to connect with your audience and share ideas in a personal, engaging way. Faculty may create presentations deliver lectures, explain complex topics, or provide feedback. Students may create individual or group presentations to showcase projects, discuss research, or practice presentation skills.
This guide will walk you through how to record a narrated presentation using Zoom or PowerPoint, save it as a video file, and share it in your myLesley course via Video Studio.
Record Your Presentation
You may record your presentation using whichever tool you are familiar with, including Zoom, PowerPoint, Google Slides, Keynote, Canva, and more. This guide will walk you through using two of Lesley's supported tools: Zoom and PowerPoint.
Record Your Presentation in Zoom
You may use Zoom to quickly and easily create a narrated presentation. Simply create your presentation slides using your software of choice (ex PowerPoint, Google Slides, Keynote, etc.), open Zoom, share your screen, and record your presentation.
To begin, open the Zoom application on your computer. If you do not have the Zoom application installed, you may download Zoom Workplace, install it, and login to your Lesley University Zoom account via SSO.
From the Zoom application, go to the Home  tab and select New Meeting.

Zoom will launch a new meeting.
Note: If you will be co-presenting with others (ex a group presentation), you may wish to Schedule a Zoom Meeting and invite others to join your Zoom meeting.
Before the meeting launches, a preview screen will prompt you to check your audio and video settings.

Refer to the support resources to check your settings:
Click Start to start your meeting.
Next, open your presentation. Then, at the bottom of your Zoom window, click the Share button.

You may opt to share your entire screen, specific application windows, documents, and more. Depending on your presentation type you may also set the presenter layout.

Refer to the Zoom support articles for more information and detailed instructions:
- Sharing your screen or desktop on Zoom.
- Applying a presenter layout when screen sharing in Zoom.
- Screen sharing a PowerPoint presentation in Zoom.
Once you are ready to present, click the Record button. If you do not see the Record button in the meeting controls, click the More button to open additional options.

Select the option to record to your computer. The recording will start when a recording indicator appears in the upper left corner of your Zoom window.

Refer to the Getting started with computer and cloud recording support article for more information and detailed instructions.
Once you have finished recording, your presentation will be converted to an MP4 file and saved to your computer.
Record Your Presentation in PowerPoint
You can create and record your presentation directly in the desktop version of Microsoft PowerPoint! All eligible staff, students, and core faculty may download a desktop version of Microsoft Office 365 applications.
Please note that, at this time, the online version of PowerPoint, PowerPoint for the web, does not support recording a slide show.
To record your presentation, click on the Record button in the top app bar.

You can also record by clicking on the Record tab and selecting one of the options.

The recording screen displays the recording options at the top of the screen. If you have slide notes, these will appear above your slides so that you can use them as a teleprompter as you record your presentation. You also have the option to record your webcam alongside your presentation.

If you are recording your webcam, you have the option to Show Background or Blur Background. Click on Select the Camera Mode to select your background mode.

You may change your recording view in the Views menu. You may switch between Teleprompter, Presenter View, or Slide View.

Once you are ready to record, click the red Start Recording button. A countdown will begin.

As you record, use the onscreen laser, colored pen, or highlighter tools to call attention to your slide content.

Use the Previous or Next arrows to navigate through your slides. If you added slide transitions, you will not be able to narrate while those are playing. You will need to let the transitions play before you resume your narration.

Once you have finished recording, click Stop.

Once you are satisfied with your recording, click Export to save your recorded presentation as a video (mp4 file).

Give your video a name and select Browse to choose your save location. Then click Export Video to save your video. Your video will be saved as an mp4.

Additional information and a tutorial video may be found on the Record a slide show with narration and slide timings support article.
Upload Your Recorded Presentation to myLesley via Video Studio
Depending on your role in the course, you may add Video Studio content via the text/content editor, directly into your Course Content (instructors only), or within an Ultra Document (instructors only).
Video Studio in the Text/Content Editor (Instructors and Students)
Both instructors and students can add Video Studio content anywhere the text/content editor is available, including Announcements, Assignments, Discussions, Journals, and more.
Navigate to where you want to add media, then click the Audio/Video button in the content editor.
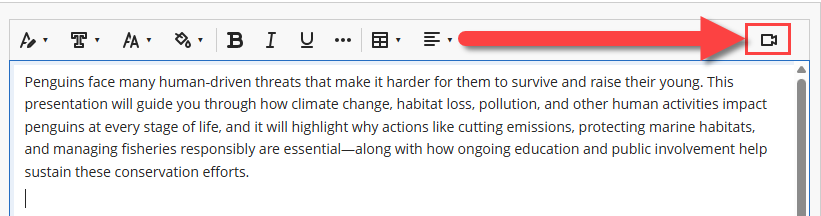
This will launch Video Studio. Select Upload from Device to upload your recorded presentation.
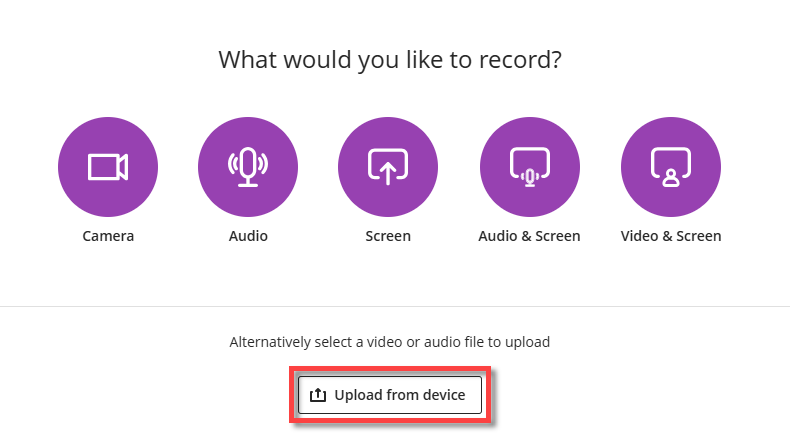
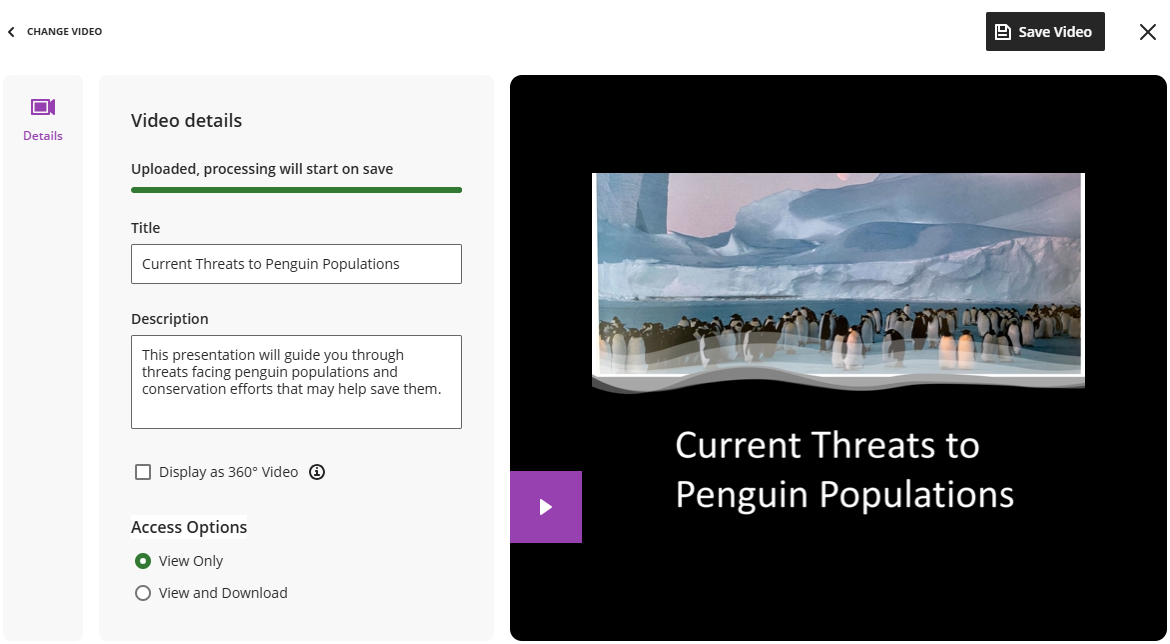
Once you have selected your file, your presentation will begin to upload. Depending on the size of your file and your connection speed, this may take several minutes.
As your media uploads, you may edit the media details including the Title, Description and, if available, Access Options. Once you have finished, click Save.
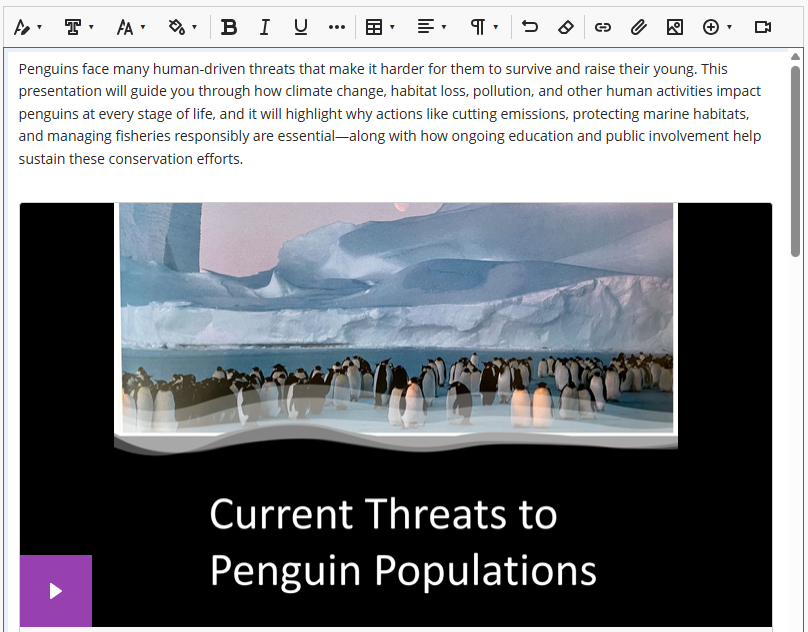
Your presentation will be embedded into your content. Make any other changes to your content and Save or Submit.
Once your media processes, a transcript and captions will be created automatically. You may go back and edit your media to update/edit your transcript and captions for accuracy.
Video Studio on the Course Content Page (Instructors only)
Instructors can add Video Studio content directly to the Course Content page (or within a Learning Module or Folder).
Navigate to where you want to add media, then click the + button to open a menu. Select Record Audio/Video.
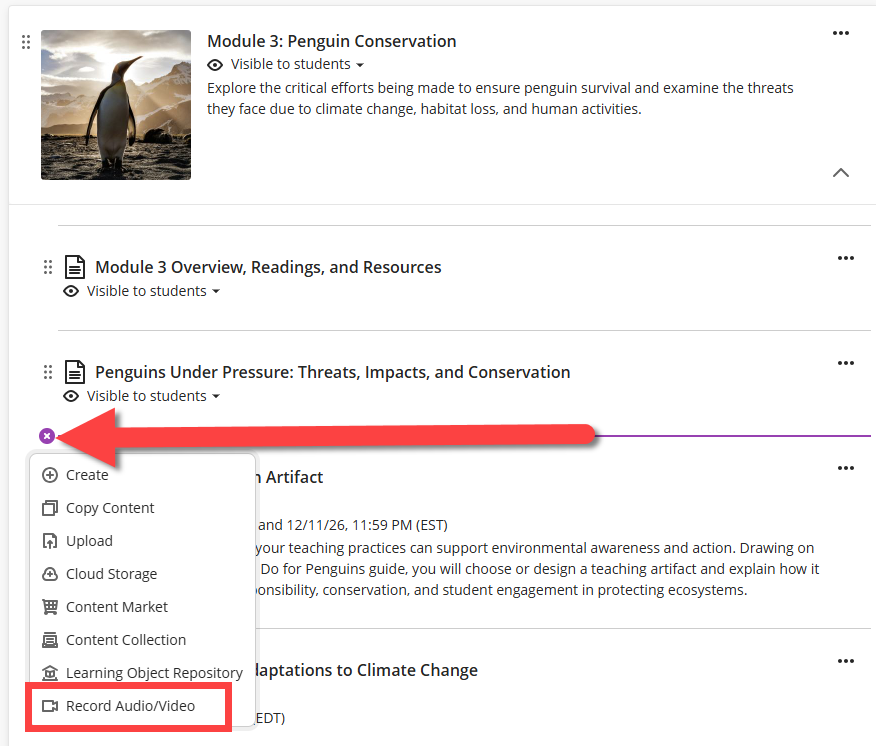
This will launch Video Studio. Select Upload from Device to upload your recorded presentation.
Once you have selected your file, your presentation will begin to upload. Depending on the size of your file and your connection speed, this may take several minutes.
As your media uploads, you may edit the media details including the Title, Description and, if available, Access Options. Once you have finished, click Save.
Your presentation will be added to your Course Content. By default, your presentation will be named Video Content and will be hidden from students. To make edits, click on the More Options (...) button to open a menu and select Edit.
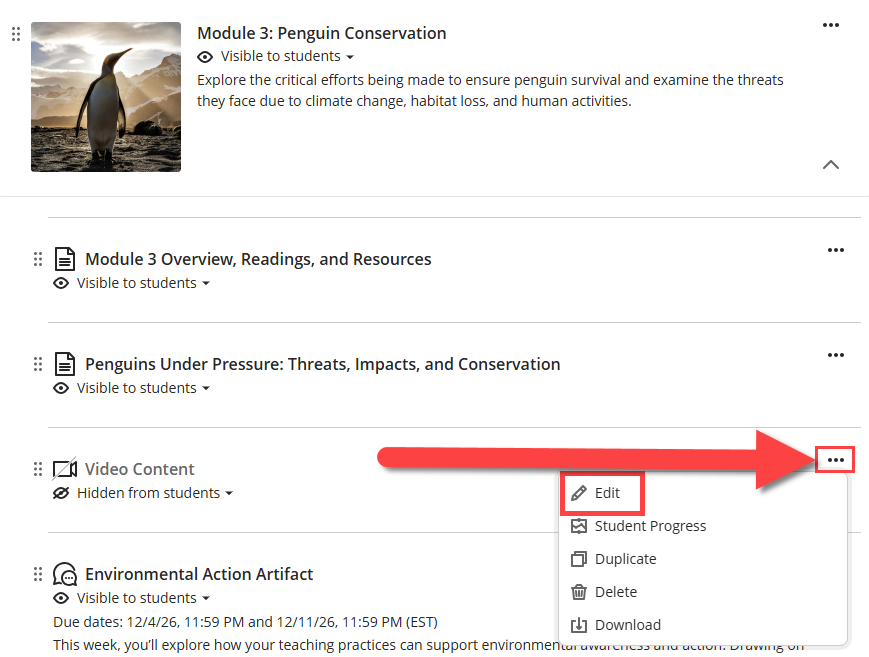
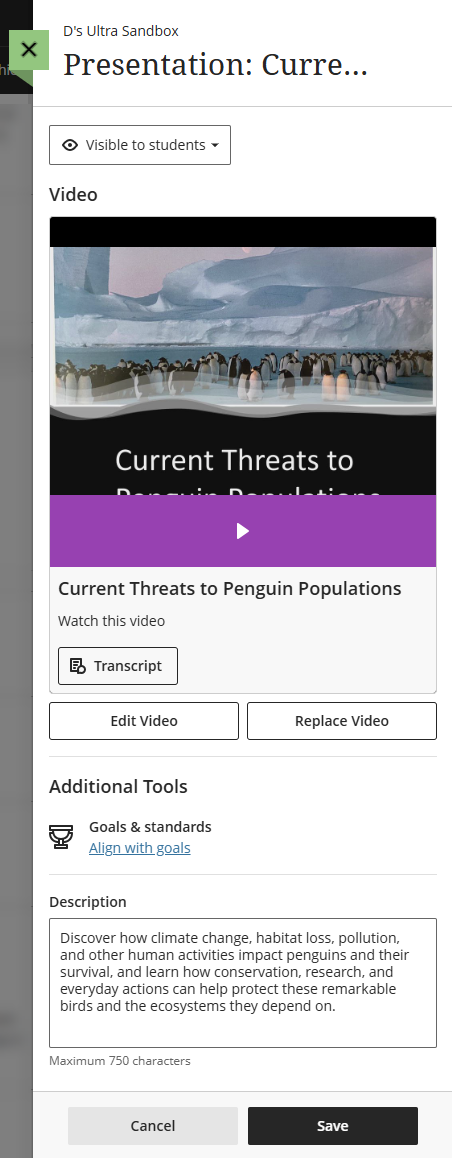
This will open the edit panel. Here, you can edit the item name and visibility, view or edit the transcript, edit the video details, replace the video, and add a brief description. Make any edits and click Save to save your changes.
Video Studio Within an Ultra Document (Instructors Only)
Instructors can add Video Studio content to an Ultra Document by creating an Audio/Video block type.
For more information about Ultra Documents, refer to the Create and Manage Ultra Documents support article.
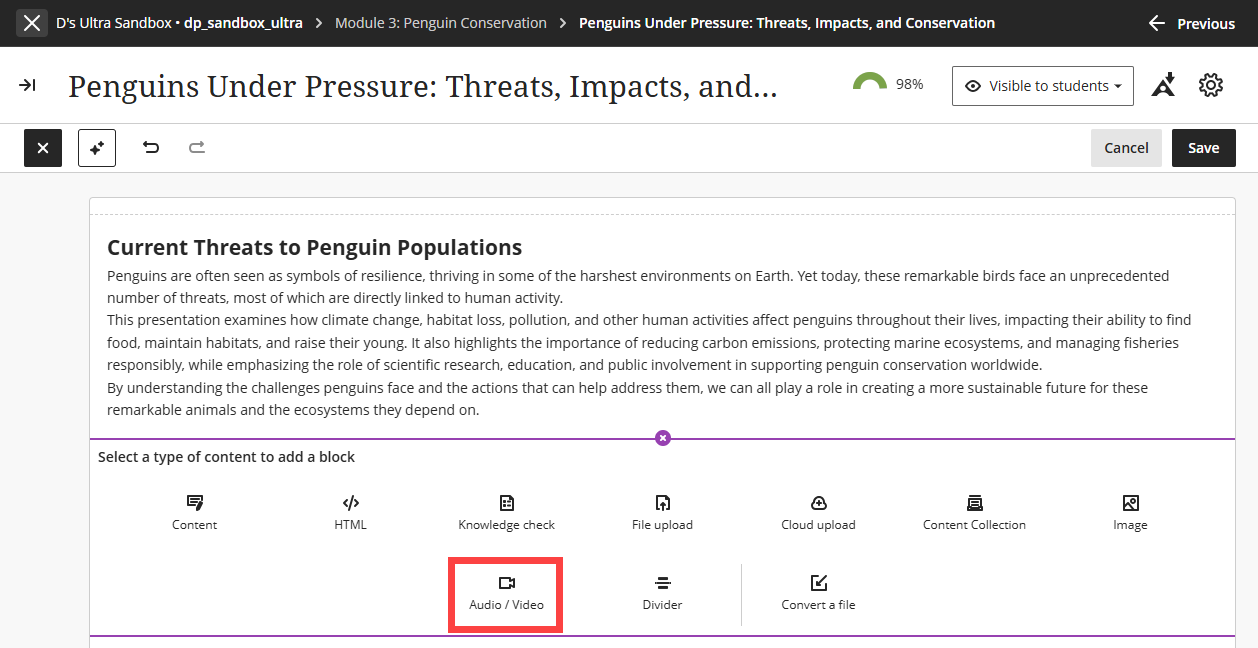
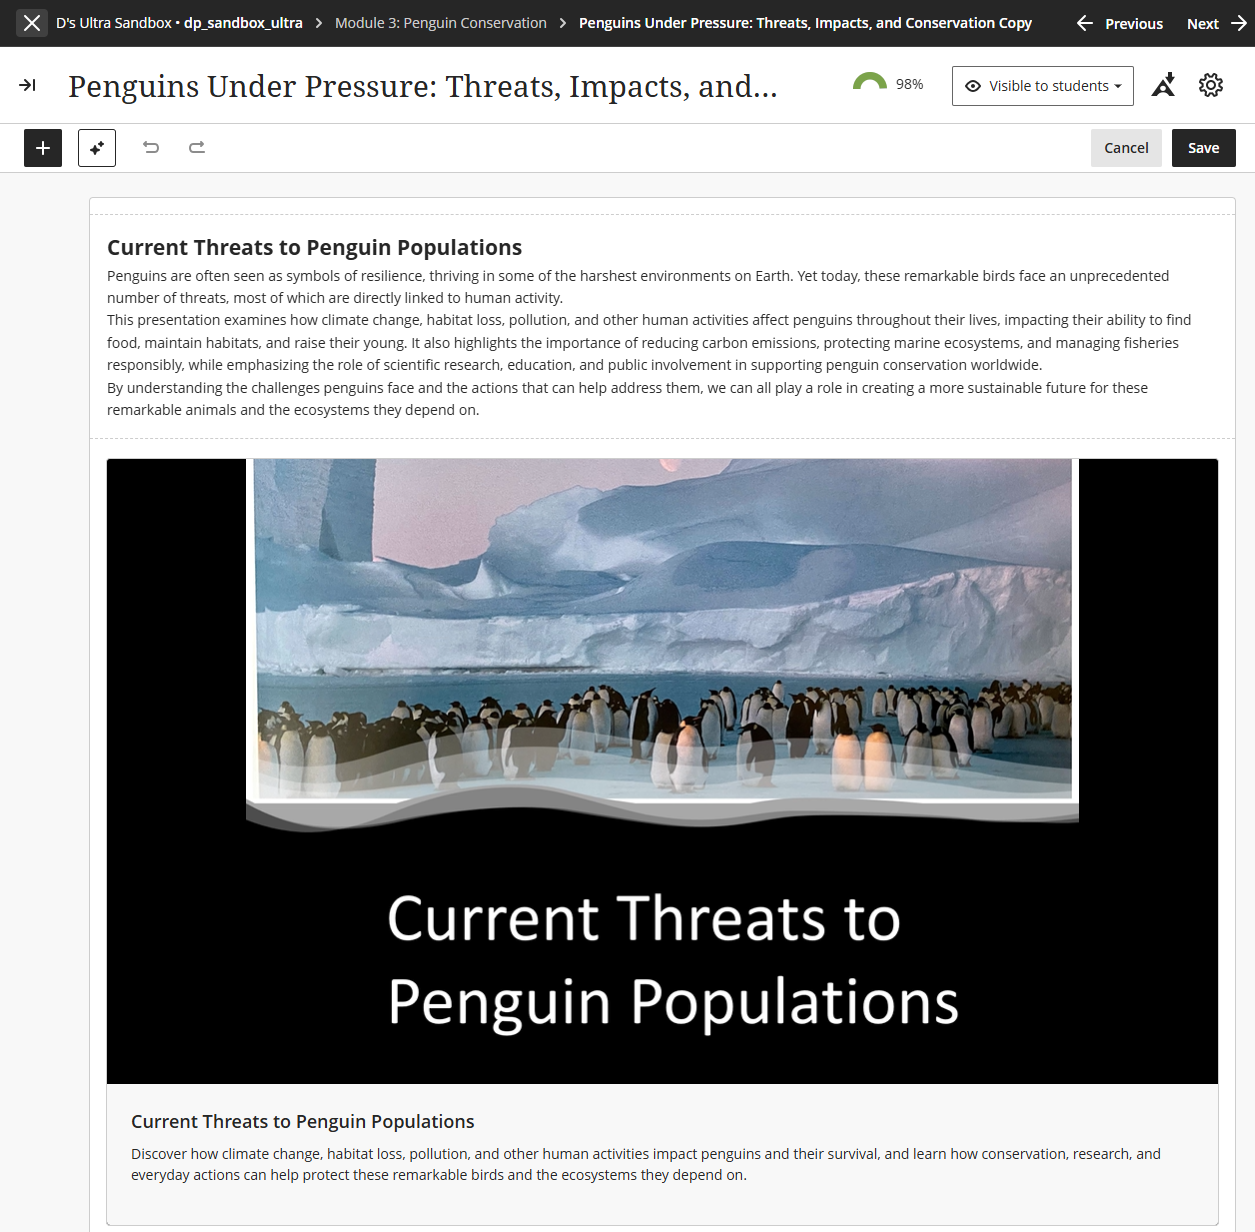
This will launch Video Studio. Select Upload from Device to upload your recorded presentation.
Once you have selected your file, your presentation will begin to upload. Depending on the size of your file and your connection speed, this may take several minutes.
As your media uploads, you may edit the media details including the Title, Description and, if available, Access Options. Once you have finished, click Save.
Your presentation will be added to your Ultra Document. Make any other changes to your Document and Save.
Once your media processes, a transcript and captions will be created automatically. You may go back and edit your media to update/edit your transcript and captions for accuracy.
Additional Resources
Download Microsoft Office
All current and active students, staff, core faculty, and emeritus faculty are eligible to download and install Microsoft Office on their personal devices while they are attending or working at Lesley. For more information, refer to the Downloading Microsoft Office 365 support article.
Adjunct faculty, alumni, and retirees may use the web version of the Microsoft applications or purchase the Microsoft Office Suite for their personal devices.
PowerPoint Tutorials
Microsoft's support site has resources to walk you through designing, creating, presenting, and sharing presentations: PowerPoint Help & Training support site.
Zoom Resources and Tutorials
- Download Zoom Workplace.
- Getting Started with Zoom Meetings.
- Sharing your Screen or Desktop on Zoom.
- Screen Sharing a PowerPoint Presentation in Zoom.
- Getting Started with Computer and Cloud Recording.
Edit Captions in Video Studio
When you upload a video to Video Studio, the tool will automatically create a transcript and captions using automatic speech recognition (ASR), commonly known as machine captions. Machine captions are considered to be 85% accurate and accuracy may vary depending on the audio quality, clarity of speech, background noise, etc. We recommend using the machine captions as a starting point and editing them for accuracy.
Refer to the Video Studio: Edit Captions and Transcripts support page for more information and detailed instructions.
Support and Training
Do you have questions or need assistance? Would you like to schedule a 1:1 or small group training? We're happy to help!
- Submit a ticket on the Support Hub or reach out to us via email at elis@lesley.edu.